Carla of Chocolate Moosey picked this week’s Tuesdays with Dorie recipe. She chose Chocolate-Crunched Caramel Tart, which is a tart with caramel, honey-roasted peanuts and chocolate ganache. Yum! You can visit Carla's blog for the complete recipe. I was so excited to make this tart. It has all of the flavors that I love. The tart kind of reminds me of a Snickers candy bar. The recipe also uses a press-in-the-pan pastry, which was a relief as I had recently had very bad luck rolling out dough.
Most of the elements of this tart I had made before. I’ve made caramel before, and I make ganache quite frequently. Dorie recommends using honey roasted peanuts from Trader Joe’s. We have a Trader Joe’s near us but it is also so busy and I feel so claustrophobic in the store, that I usually avoid it. We were nearby the other day so I made a quick run over to pick up the nuts. I’m really glad that I did because these are so good. I’m glad that the recipe only calls for ¾ of a cup of peanuts since I kept eating them out of the bag. They are highly addictive and very, very good. I need to think of something to bake that will use up the leftover nuts or I’ll just end up eating them all!
This tart looks quite fancy when everything is all said and done, but the steps were quite simple and didn’t take very long. The pastry is made in a food processor and takes just minutes. He caramel is the most complex element, but as long as you have all of the ingredients ready it was no sweat. My caramel came to a boil almost immediately, so that was nice. I didn’t use a candy thermometer, but I’m fairly certain that my caramel was at the right temperature. The caramel gets sticky fast, so I’m glad I didn’t wait too long before adding the chopped peanuts.

The ganache: chocolate, heavy cream, and butter: is such a beautiful thing. Simple, but so tasty in the end. I put the tart together and refrigerated it a bit longer than the 30 minutes that the recipe suggests. The caramel was a little too firm, but I left the tart sit at room temperature overnight and the caramel softened considerably. I was really happy with this tart: it tastes great, looks impressive and comes together without a lot of effort.
Recipe from Baking from My Home to Yours by Dorie Greenspan, pages 355-357.

The original recipe calls for dried sour cherries. My grocery store just had regular dried cherries. They do have a bit of tartness to them, but I’m not sure if it’s the same as what the recipe calls for. I used mini dark chocolate chunks instead of the bittersweet chocolate, since I figured that would be fairly close. I buy mini dark chocolate chunks at Whole Foods and I find that they are great to have around the house. Inevitable when I pick up at bag “to have on hand,” I always use them within a few days.

The cookies are very easy to make, and it makes a lot of dough. I had a little trouble getting all of the flour/cocoa powder mixed in, so be careful that you don’t end up with unmixed dough in the bottom of your bowl. These are soft, chocolately cookies that aren’t too sweet. The cherries soften a lot, it seems like they absorb moisture as the cookie bakes. Overall these are a great cookie jar cookie with a little something special.
1-3/4 cups flour
1-1/4 cups cocoa powder
2 teaspoons baking soda
¼ teaspoon salt
1-1/4 cups butter, softened
1-1/4 cups sugar
¾ cup brown sugar
2 eggs
¼ teaspoon vanilla
12 ounces bittersweet chocolate, chopped
6 ounces dried cherries
Preheat oven to 350 degrees. Line baking sheets with silicone baking mats.
In a small bowl, combine flour, cocoa, baking soda and salt. Mix and set aside. In a large mixer bowl, cream the butter and sugars until fluffy. Add eggs and vanilla; beat until well combined. Add the flour mixture, and beat on low speed until just combined. Do not overmix. Stir in the chocolate and cherries by hand.
Form balls of dough, about the size of a walnut and place on prepared baking sheet. Bake until puffed and cracked, about 10 minutes. Transfer to a wire rack to cool completely.
Recipe from Martha Stewart’s Cookies
This week’s Tuesdays with Dorie selection was picked by Jacque of Daisy Lane Cakes. This week’s pick is Cottage Cheese Pufflets. This is quite an interesting recipe. Most people, at looking at the title of the recipe, would think that it is a roll or bread or something like that. It was a surprise to me that this recipe is in the cookie chapter. A cookie made with cottage cheese? How interesting.
I have to say that I hate cottage cheese. I can’t even stand to look at it I dislike it so much. I figured that in this recipe the cottage cheese gets pulverized in the food processor, so I wouldn’t have to look at it too much so I figured I would give it a try. This is a quick dough that you put together in the food processor. The trick is that you have to refrigerate the dough for several hours since it is super sticky. I think this was the stickiest dough that I have ever made. I decided to shape it into discs and then put it in large plastic bags. I planned to roll out the dough in the plastic bags, since I had done that before and it had worked flawlessly.
I chilled this for a long time (an afternoon errand ran late) but it was still difficult to work with. I tried to roll out some of the dough inside of the plastic bag and that didn’t work at all since the dough completely stuck to the plastic. I scraped that and rolled out the rest of the dough on a floured surface and that worked better. The dough was still sticky but I was able to get about 20 squares out of the remaining dough. I filled half of the Pufflets (basically turnovers) with ginger preserves and the other half with pineapple mango preserves.
These were a little fussy to make, but they taste pretty good. I like the ones with the pineapple preserves the best. The ginger ones are a little too…earthy. They just don’t taste right. But the other ones were quite good. I was worried that the dough would be tough since I used a lot of flour to overcome the stickiness of the dough. They weren’t tough at all. Overall, these were much more of a success than last week’s recipe. I still had my struggles but I’m more encouraged by these than last week’s turnovers.
Recipe from Baking from My Home to Yours by Dorie Greenspan, pages 148 and 149.
There are times when I know what I want to bake, and then I have to go through my cookbooks and find the right recipe. This week’s recipe is an example of that. I want to make a lemon sugar cookie, but I also wanted to use some raspberry sugar that I had purchased on vacation a couple of weeks ago. My husband and I had visited Bellingham, WA and went to this wonderful little shop called Quel Fromage. In addition to selling excellent cheese, they carried some interesting sanding sugars. I purchased raspberry sugar, espresso sugar and vanilla bean sugar.
I was looking for a thick, chewy cookie, kind of like a snickerdoodle but in sugar cookie form. I can always count on The King Arthur Flour Cookie Companion to have the recipe I need when I have a specific idea. For sugar cookies, this cookbook provides recipes for chewy, crunchy, crisp, and roll-out sugar cookies. I chose the chewy cookie, since that was the texture I was looking for. This is really a simple recipe, as you basically put everything in the mixer and stir. I wanted a stronger lemon flavor so I used 1 teaspoon of vanilla rather than the 2 the original recipe called for, and I also increased the lemon oil to about ¾ teaspoon. And of course, I used raspberry sugar for the sanding sugar.
I made the cookies using the tablespoon of dough, but after I took the first batch out of the oven I made them smaller. They just seemed too big. These cookies are quite thin, not the chubby snickerdoodle-like cookie that I was hoping for. I’m not sure that you can taste the raspberry all that much, but I liked the extra crunch that it added to the chewy cookie. These are so, so good. They just melt in your mouth. I like the lemon flavor and I think I hit just the right balance. These are a quick and easy cookie that are just excellent!

1-1/2 sticks butter
¾ cup sugar
½ cup brown sugar
¼ cup corn syrup
1 teaspoon vanilla
¾ teaspoon lemon oil
1-1/2 teaspoons baking powder
½ teaspoon baking soda
½ teaspoon salt
1 egg
2-1/2 cups flour
¼ cup coarse sugar or raspberry sugar, for coating
Preheat oven to 375 degrees. Line baking sheets with silicone baking mats.
In a large mixer bowl, combine butter, sugars, corn syrup, vanilla, lemon oil, baking powder, baking soda, salt and the egg. Mix until combined and stir in the flour. Drop the dough by the tablespoonful (or smaller) into the coarse sugar, rolling the balls to coat them. Place them on the prepared baking sheets.
Bake the cookies for ten minutes, until the edges are just beginning to brown. Do not overbake. Cool on the baking sheet for 5 minutes, and then remove to a wire rack to cool completely.
Recipe from The King Arthur Flour Cookie Companion
This week’s Tuesdays with Dorie recipe was picked by Julie of Someone’s in the Kitchen. She picked the Flaky Apple Turnovers and you can visit her blog for the complete recipe. I was fairly excited to make these turnovers, since I love apple desserts. Apple crisp, apple pie, and so on. If it is made with apples, I’ll probably like it.
This recipe starts with you making a variation of puff pastry. If this had been traditional puff pastry, I would have just skipped it. Puff pastry requires that you form butter into a rectangle, seal dough around the butter rectangle, then roll it out, fold in thirds, and repeat many, many times until you have super flaky dough. Luckily, this recipe doesn’t require this method. This recipe has you cut butter into flour, and then add sour cream. You have to refrigerate it a lot, but the recipe is certainly more stream-lined than puff pastry.
Well, despite this being an easier recipe, I had nothing but trouble making the pastry for the turnovers! I couldn’t get the butter cut in well enough, and when I added the sour cream I couldn’t get the dough to be cohesive. It was basically nothing but a crumbly mess. I tried to form it into rectangles for the first chilling, but it was still very crumbly and I was doubtful that it would come together. After the first chilling, one half of the dough was a complete mess and I just gave up on that, but the other half of the dough seemed workable (but still crumbly) and I rolled it out and chilled it for the second chilling. I was cautiously hopeful that I could make a couple of successful turnovers.
After the second chilling, you have to roll out of the dough, 1/8” thick, to a big rectangle. The dough was so hard to roll out! It took me about 30 minutes of hard work to get the dough rolled thin, and I still don’t think that I got it thin enough. By that time, the dough had warmed up so much that it was very stretchy and I knew that was bad news. It was too awkward to refrigerate it again. I tried to cut out circles, and I also had a cute apple shaped pocket pie maker. The dough was so warm and stretchy that nothing tuned out very well. I think I got two apple shaped turnovers and 2 regular turnovers out of the batch of dough. It felt wasteful but it was the best I could do this week.

Despite all of the troubles, the turnovers do taste good, despite the fact that they don’t look very good. I don’t think that they were worth all of the trouble; instead I would just use traditional pastry. It might not be as flaky, but it would certainly be easier to make!
Recipe from Baking from My Home to Yours by Dorie Greenspan, pages 316 and 317.
I made some chocolate ganache with the intention of using it to sandwich together the peanut butter cookie sandwiches, but I ended up allowing the ganache to cool too much. It was much too firm to use as a sandwich cookie filling, so I ended up not using it. I didn’t want it to go to waste, but I wasn’t sure what I would do with the ganache. I usually use chocolate ganache to cover a cake, but I wanted to try something a little different.
I went to the cooking board on my chat list and asked for suggestions on what I should do with left over chocolate ganache. The most common response was that I should just eat it with a spoon! While that would be good, I didn’t think I could eat an entire batch of ganache. One person suggested making truffles with the ganache. I’ve not made candy, so I thought that would be different. There are several variations of ganache truffles, and you can add any flavoring that you would like: extracts, liqueurs, and spices, whatever you want.
A couple of years ago my husband bought me cinnamon truffles for Valentine’s Day, so I tried to replicate those. I didn’t have cinnamon oil, which would have had a more pronounced flavor. I didn’t know how much cinnamon to add, so I added ½ teaspoon. When I tasted it I thought it would be enough, but when the truffles were completely cooled you could hardly taste the cinnamon. I would use a teaspoon next time and see if that helps. If you are using extract I would use a teaspoon, for liqueur I would use a tablespoon. Either way, just plain chocolate truffles are excellent.

I had made this ganache already, and ended up reheating it to add the cinnamon. This isn’t the best idea, but it worked. When I reheated the ganache, some of the fats in the chocolate and the cream separated. The ganache also wasn’t as smooth and shiny as it was originally, but that made no difference when making the truffles. I just had to make sure I kept stirring the ganache as it cooled. These truffles are really great! They have a smooth, buttery texture and melt in your mouth. I preferred the truffles rolled in powdered sugar, but rolling the truffles in cocoa is traditional.
3/4 cup heavy cream
1 tbsp. butter
9 oz. bittersweet chocolate, chopped
½ teaspoon cinnamon
Place the chopped chocolate in a heat-proof bowl. In a small saucepan, bring the heavy cream and the butter to a boil. Pour the boiling cream over the chopped chocolate and allow to sit for 5 minutes. Stir until smooth and then stir in the cinnamon. Refrigerate the ganache until it is firm enough to scoop (about 90 minutes).
To make the truffles, using a melon baller or a small cookie scoop, shape the ganache into balls. Roll the balls in cocoa powder or powdered sugar. Refrigerate until completely firm. Store the truffles in the refrigerator.
Ganache recipe from Annie’s Eats, who found the recipe on Confections of a Foodie Bride
I came across these cookies on Annie’s Eats when I was browsing her blog the other day. If you’ve never visited her blog, you really should! She has some great recipes, and she does so much and she’s a doctor. I’m so impressed by her! She had a little sidebar on the site featuring different recipes and this was one of the features. They looked really good and I thought I would give them a try.
The basis of this recipe is Dorie Greenspan’s peanut butter cookies. I’ve made her cookies before, substituting Nutella for the peanut butter and they were a great success. This recipe is slightly adapted in that I left out the peanuts. (I also forgot the eggs, which I realized when I typed up this recipe. They have a sandy texture and I am shocked that they came together with no eggs.) I did make the chocolate ganache, but ended up not using it. It sat in the refrigerator too long and it got too hard to use as a filling. I substituted Nutella instead, which worked out great.

I sent these to work with my husband and his coworkers really liked them. He came home that afternoon and said that they had all been eaten. I guess one of his coworkers questioned the chocolate and peanut butter combo (really?) but ended up liking them anyway. I don’t think that you can taste the hazelnuts in the Nutella; only the chocolate flavor shines through. These also store very well; they haven’t gotten hard and still taste as good as the day I made them. These are a great twist on a traditional peanut butter cookie, perfect for the cookie jar.
2-1/2 cups flour
1 teaspoon baking soda
½ teaspoon baking powder
¼ teaspoon salt
2 sticks butter, softened
1 cup peanut butter
1 cup brown sugar
¾ cup sugar
2 eggs
About ½ cup sugar, for rolling
About ½ cup Nutella, for sandwiching
Preheat the oven to 350 degrees. Line baking sheets with silicone baking mats.
Combine the flour, baking soda, baking powder and salt in a small bowl and set aside. In a large mixing bowl, beat the butter on medium speed for a minute or two, until smooth and creamy. Add the peanut butter and beat for another minute. Add the sugars and beat for 3 minutes more. Add the eggs, one at a time, beating for one minute after each addition. Scrape down the bowl and add the dry ingredients, mixing only until they just disappear.
Shape the dough into teaspoon sized balls; roll the balls in the sugar and place on the prepared baking sheets. Flatten the balls with the palm of your hand or with a fork dipped in sugar. Bake for about 10 minutes, until lightly browned. Cool on the baking sheet for a minute or two, then remove to a wire rack to cool completely.
When completely cool, sandwich the cookies together with Nutella.
Inspiration for this recipe from Annie's Eats . Cookie recipe adapted from Baking from My Home to Yours by Dorie Greenspan.
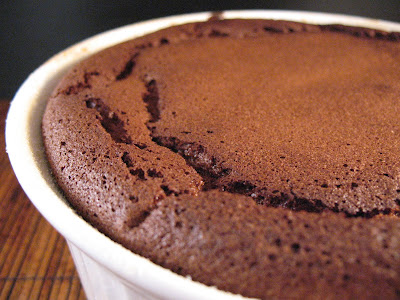
This week’s Tuesdays with Dorie recipe was picked by Susan of She’s Becoming DoughMessTic. She selected the Chocolate Soufflé! You can visit Susan’s blog for the complete recipe. Most people are probably familiar with soufflé, but I had never made one and I can’t recall eating honest to goodness soufflé before. So this was a new experience for me in more ways than one.
I have to say that I was quite scared to make this week’s recipe. I don’t feel like I am very good at folding egg whites, and that’s the key in a successful soufflé. Only recently have I even been willing to try folding in egg whites and I am getting better at it, but I still don’t have great confidence. I figured that I would give it a try and just not worry about the soufflé being perfect.
This is a very simple recipe, which contains chocolate, sugar, milk, and eggs. I was curious if other soufflé recipes were so simple, and I noticed that many of the other recipes were more complex, including butter and other ingredients. This was a rare Tuesdays with Dorie week in that I didn’t use any butter (except to butter the pan). I go through a lot of butter during a typical week!
The soufflé came together quite easily. I was pleasantly surprised. I don’t think that I got the egg whites incorporated 100%, but close to it. Most importantly is that the egg whites didn’t deflate very much so I was hopeful. I put it in the oven, set the timer, and hoped for the best. When I took it out of the oven, it hadn’t puffed up all that much, but it had raised some. It was a little dark on one edge but it looked pretty good. I had about one minute to photograph the soufflé before it started to fall. It tasted really good, especially the crunchy bits around the edges. It was nice and light and very chocolately. I thought that it was a very good soufflé for my first try. I’m certainly more encouraged to try other soufflés!
Recipe from Baking from My Home to Yours by Dorie Greenspan, page 406

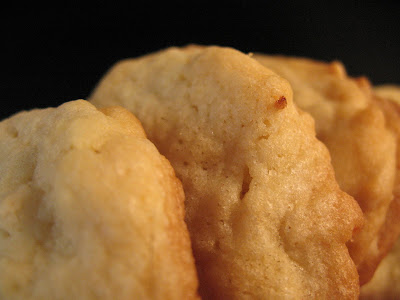
I came across this recipe when I was browsing online through recipes. While I love to look through cookbooks, I end up finding a lot of recipes through various online sources. This recipe was included on my chat list’s site. I usually just go to the chat lists but every once in a while I look at the other content on the site and I have found a couple of good recipes. I saw this one and thought that it looked good. I do have to hand it to food stylists; they looked quite a bit different in the picture than they looked in real life.
I think these cookies are good, and have good almond flavor, but it seems like they are missing something. I didn’t use white chocolate chips, which are usually quite sweet. I used some white baking chocolate that I had on hand and it didn’t taste the same as white chocolate chips. I don’t think that you can taste the white chocolate at all. I think I will try a different type of white chocolate, or maybe some toffee chips, to see if that would add a complexity of flavor.
2 1⁄4 cups flour
1 teaspoon baking soda
1⁄2 teaspoon salt
1 cup butter, softened
1 1⁄2 cups sugar 2 eggs
1 1⁄2 teaspoons almond extract
8 ounces white baking chocolate, coarsely chopped
1 1⁄3 cups slivered almonds
Preheat oven to 375 degrees. Line baking sheets with silicone baking mats.
Mix flour, baking soda and salt in medium bowl; set aside. Beat butter and sugar in large bowl with electric mixer on medium speed until light and fluffy. Add eggs and extract; beat until well blended. Gradually beat in flour mixture until well mixed. Stir in chocolate and almonds.
Drop by heaping tablespoonfuls 2 inches apart onto ungreased baking sheets. Bake for 10 minutes or until edges are lightly browned. Cool on baking sheets 1 minute. Remove to wire racks; cool completely.
Recipe from McCormick Cooking with Flavor
This week’s Tuesdays with Dorie recipe was selected by Melissa of Life in a Peanut Shell. She chose the Espresso Cheesecake Brownies, which have a brownie layer topped with an espresso/cream cheese layer and then topped with a sour cream layer. Yum! You can get the complete recipe for the brownies on Melissa’s blog. These sounded so good and I couldn’t wait to make them.
There are quite a few steps to making these brownies, which is not uncommon in a layered bar cookie. None of the steps are all that difficult, but with baking and chilling and all of those things, these took some time to make. In a way it was kind of nice, as I was able to do some other things around the house in between the steps of making the brownies. The brownies are basically a one-bowl brownie, where you melt the butter and chocolate together and then add the other ingredients. The cheesecake layer was also quite straight-forward. You are supposed the put ¾ of the brownie batter in the pan, top with the cheesecake layer, dot with the remaining brownie batter and then swirl. Mine just did not swirl nicely. It’s like the brownie batter was too heavy and when I tried to swirl it, it just sank to the bottom. I had originally planned to omit the sour cream layer, since I swirly-topped brownie can be quite beautiful, but since you couldn’t really see the swirl on my brownies, I went ahead and did the sour cream topping.

I chilled mine overnight and I’m glad I did. They were super easy to cut and they are quite a substantial brownie. Dorie suggests cutting the brownies into 4 big pieces, removing the pieces from the pan and then cutting each quarter into 4 pieces. I did this and it worked great, but these cookies are so rich that I think that they are a little too big. It would be harder to cut, but I think that I would cut these into 25 pieces rather than 16. The espresso is very strong, and you really need the sour cream layer to balance all of the flavors, so I am glad that I ended up following the recipe completely.
Recipe from Baking from My Home to Yours by Dorie Greenspan, pages 104 and 105.


