Monday, February 27, 2012

English Muffin Bread


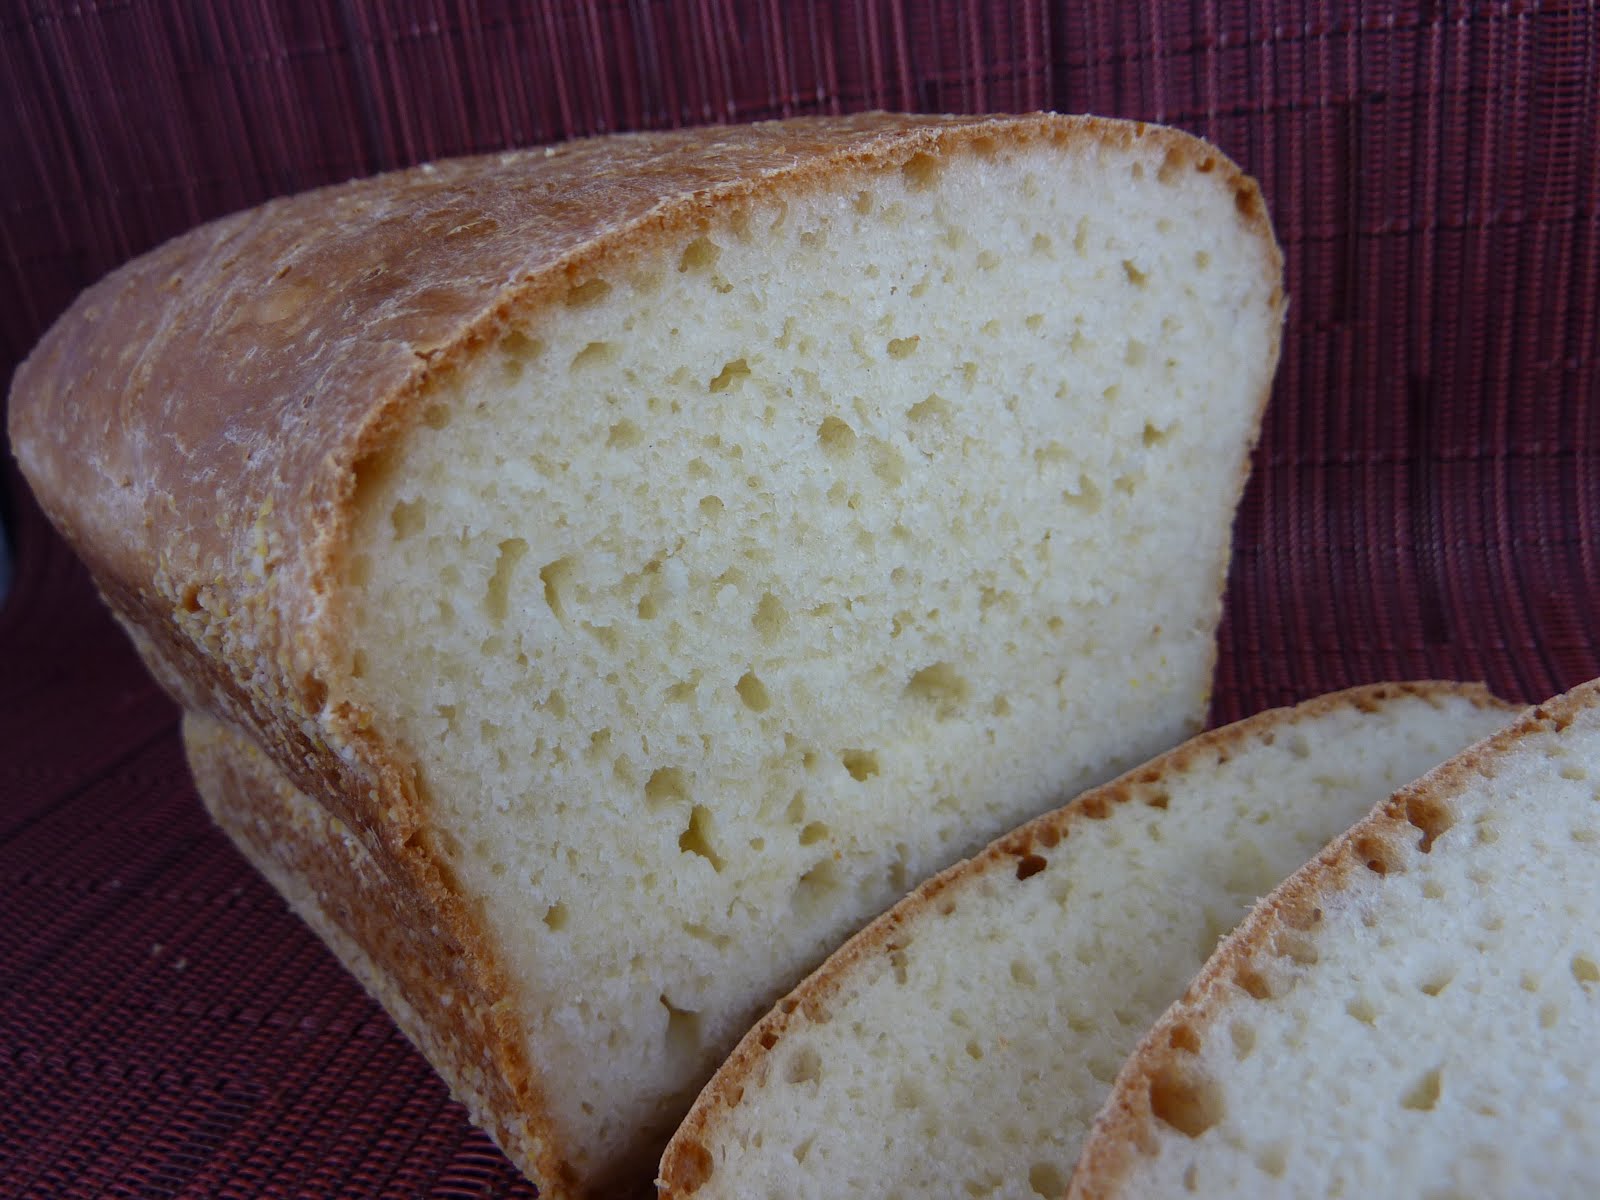
With my new proofing oven, I’ve been dying to make new types of bread. I saw this loaf come up on My Baking Addiction and it looked perfect. I love English Muffins so why wouldn’t I like it in the form of a loaf? This weekend was windy and rainy and my husband was fighting a cold, so I figured that bread and soup would make a nice dinner in.

This bread is so quick to make, which is so unusual for a yeast loaf. Due to the airy texture of the loaf, you don’t want to spend lots of time kneading the dough or allow it to rise in the same way that most loaves do. You mix everything together and stir for one minute. Put it in the pan and let it rise and then bake. I think from start to finish this took about and 15 minutes, which seems like some sort of speed record. Despite the quickness of making this loaf it is very, very tasty! It was perfect paired with soup for dinner. What was left over was perfect toasted with some jam. I can't wait to make this again.

3 cups flour
1 tablespoon sugar
1 1/2 teaspoons salt
1/4 teaspoon baking soda
1 package yeast
1 cup milk
1/4 cup water
2 tablespoons vegetable oil
cornmeal

In a large mixer bowl, add the flour, sugar, salt, baking soda, and yeast; stir with the paddle attachment to combine.

In a small bowl, combine the milk, water, and oil and heat to between 120 and 130 degrees. Make sure to stir the liquid before measuring its temperature. Pour the hot liquid over the dry ingredients. Beat at high speed for 1 minute, the dough will be quite soft and sticky.

Lightly grease an 8 1/2" x 4 1/2" loaf pan, and sprinkle the bottom and sides with cornmeal. Using a greased spatula, scoop the dough into the prepared pan. Level out the dough as best you can.

Cover the pan with plastic wrap and let the dough rise until it's just barely crowned over the rim of the pan (no more than ¼ inch above the rim). This will take about 45 minutes. While the dough is rising, preheat the oven to 400 degrees.

Remove the plastic wrap, and bake the bread for 22 to 27 minutes, until it is golden brown and its interior temperature is 190 degrees. Cool the bread for 5 minutes and then turn it out of the pan onto a rack to cool. Let the bread cool completely before slicing.

Recipe from My Baking Addiction, via King Arthur Flour

Friday, February 24, 2012

Chocolate Peanut Butter Marble Cookies


I asked my husband to pick which cookies to make this week. I did a search for cookies on Foodgawker and handed him the laptop. It’s interesting to see what he comes up with. For once, he didn’t pick a single chocolate chip cookie recipe, so I think he’s expanding his cookie horizons. He picked several cookies, including the Doctor Who Weeping Angel Cookies. If you are a Doctor Who fan you know what I am talking about. That episode freaked me out and I’m certainly not making those! He came up with a few chocolate peanut butter cookies and these looked really good. Plus I could make them in advance, always a bonus.

You make two types of dough, but you make them in the same bowl so there aren’t too many dishes to wash. You refrigerate the dough and then roll them out and manipulate the dough to make a nice marbled effect. I don’t have the best luck rolling out dough to resemble anything close to a rectangle, so I rolled out the first half of the dough like directed in the recipe and the second half I just took bits of the two doughs and pieced them together and tried to swirl them from there. The two methods created different, but both very nice, marble effects. So shape the dough in any way that works for you.

I made these cookies over a couple of days: make the dough the first day, shape the second, and bake the third. They don’t need to take that long but they worked out well as it only took me a little time each day. This makes a lot of cookies, 5 dozen plus and one nice heart-shaped one for my husband!


1/2 cup butter, at room temperature
1/2 cup sugar
3 tablespoons peanut butter
1/2 teaspoon vanilla
1/2 teaspoon salt
1 egg
1 2/3 cups flour
1/2 teaspoon baking powder

1/2 cup butter, at room temperature
1/2 cup sugar
1 ounce semi-sweet chocolate, melted and cooled slightly
1/2 teaspoon vanilla
1/2 teaspoon salt
1 egg
1 1/4 cups flour
1/4 cup cocoa powder
1/4 teaspoon baking powder

Make the peanut butter dough: in a large mixer bowl, cream together the butter, sugar, and peanut butter until light and fluffy. Add the vanilla, egg, and salt and mix until well combined. Add the flour and baking powder to the butter mixture and mix until a uniform dough is formed. Wrap the dough in plastic and chill for two hours.

Make the chocolate dough: In the same mixer bowl cream together the butter, sugar, and melted chocolate until light and fluffy. Add the vanilla, egg, and salt and mix until well combined. Add the flour, cocoa powder and baking powder and mix until a uniform dough is formed. Wrap the dough in plastic and chill for two hours.

Roll each of the chilled doughs out to 1/4 inch thick rectangle. Cut each rectangle in half. Place the chocolate dough on top of the peanut butter dough and fold the dough in half and then in half again. Flatten the dough, roll into a log, fold the dough in half and flatten again. Roll the dough into a tight log, wrap with plastic and chill for at least two hours or as many as three days. Repeat with the remaining dough.

Preheat the oven to 375 degrees. Line two baking sheets with silicone baking mats.

Slice the dough into 1/4″ thick slices and place them 1 inch apart on the prepared sheets. Bake for 8 – 12 minutes, or until the centers of the cookies are firm and the bottom of the cookie is golden brown. Cool for 5 minutes before transferring to a wire rack to cool completely.

Recipe from Evil Shenanigans

Tuesday, February 21, 2012

Chocolate Truffle Tartlets


This week’s Tuesdays with Dorie recipe is Chocolate Truffle Tartlets. The hosts this week are Spike from Spike Bakes, Steph of A Whisk and a Spoon, Jaime of Good Eats ‘n Sweet Treats, and Jessica of Cookbook Habit. Make sure you check out their sites to get the complete recipe for this tasty tart. You can also check out the links from all the Tuesdays with Dorie bloggers on the TWD site. There are lots of us so there are lots of lovely tarts and tartlets to discover.

This tart is all chocolate, all the time: chocolate pastry crust with a chocolate filling with additional chopped milk chocolate and white chocolate. Oh, and there are some chopped up cookies in there for good measure. I think you could add it different things to the filling; I think nuts would have been really great. I halved the recipe and got 4 tartlets, which was a fine number for just the two of us.

I made the pastry dough in the food processor, which makes quick work of making pastry. I chilled it and it was still quite sticky after chilling. I was able to roll it out but I did have to piece it together a bit after transferring to the tartlet pans. I then refrigerated them overnight and did the assembly the next day.

Once you start the baking, it goes fairly quickly. The filling was easy to make, although honestly I always worry a little bit when I have to fold in ingredients. My filling remained light after mixing everything together and they baked up perfectly. There were a little hard to remove from the pan, but came out with a little help from a pointy knife. These tarts are so good! The filling would be good on its own. I think I would have preferred a sweeter crust, as I felt the cocoa was too strong. I’d probably make it again with Dorie’s sweet pastry crust, which I like a lot. Still, I thought this was great and makes a very impressive dessert.

Recipe from Baking with Julia by Dorie Greenspan, pages 382-383

Friday, February 17, 2012

Chocolate-Macadamia Nut Clusters


In the dreary days of winter, it’s nice to think back to vacation. We went to Hawaii last September and we had such a good time. I’m born and raised in Washington State, so I am used to the rain and I usually don’t mind it at all. I am not a sun worshiper. But I sure had a great time in Hawaii. The weather was beautiful and it was nice to spend time with my husband, just doing what we wanted to do.


I brought back quite a few ingredients from Hawaii that I’ve been using up here and there. Nuts last a fairly long time but I was thinking that I should use those macadamias that we brought home with us. I’d used some in other recipes, but still had some left. I found a lot of macadamia nut recipes online and pinned several of them to my Pinterest board. I was planning what to make this week for the Friday cookies and these were calling my name.

These cookies are decadent, gooey and nearly flour free. Putting 3 tablespoons of flour in cookie dough seems wrong, but it worked out. There’s not much batter to the macadamia, chocolate chip and coconut add-ins, but what is there bakes up to this shiny exterior. They just melt in the center (and that’s a good thing, so don’t over bake!) These are certainly more special than a cookie just to use up ingredients. I’m sure they would be good with any combination of mix-ins, but I think this combination is just about perfect.

8 ounces bittersweet chocolate, chopped
1/4 cup butter
1 cup sugar
2 eggs
1 1/2 teaspoons vanilla
3 tablespoons flour
1/4 teaspoon baking powder
1 1/2 cups unsalted roasted macadamia nuts
1 cup semisweet chocolate chips
1 cup sweetened flaked coconut

Preheat oven to 350 degrees. Line two baking sheets with silicone baking mats.

In the top of a double boiler or a medium-sized bowl, combine the chopped chocolate and the butter. Place the bowl set over a pan of barely simmering water. Stir often until chocolate is melted and mixture is smooth. Remove from the heat and let cool to room temperature, about 15 minutes.

In a large mixer bowl, beat sugar, eggs, and vanilla until smooth. Add chocolate mixture and beat until well blended. Stir in flour and baking powder, and then beat just until moistened. Stir in macadamia nuts, chocolate chips, and coconut.

Drop dough in 1-tablespoon portions, about 2 inches apart on prepared baking sheets. Flatten the dough slightly. Bake cookies about 8 minutes, until firm on the edges but still soft when pressed in the middle. Let cookies cool on sheets for 5 minutes before removing to a wire rack to cool completely.

Recipe from Sunset

Wednesday, February 15, 2012

Chocolate Guinness Cake with Irish Cream Buttercream


I often make birthday cakes for the people at work. One of my colleagues has a birthday on Valentine’s Day. I don’t really think that he wants gobs of pink for his birthday, so I wanted to make a more masculine-looking cake. I came across this cake and figured it would be great. I’ve long wanted to make a Guinness cake, ever since I went to a cooking class that featured beer pairings with every course. This one looked great and how could you go wrong with Irish Cream buttercream? Yep, that’s right, you can’t!

This cake is truly easy to make: one saucepan and into the oven it goes. I converted the weight measurements to volume, as that may be easier for you. I luckily have a scale with grams so I typically use that. Sometimes there is more freedom when just using weights because I don’t have to perfectly level the measuring cup or anything. This only uses about 8 ounces of Guinness, which I doubt you can buy in that small of quantity. My husband was happy to help relieve the burden of the extra Guinness in the refrigerator.

The buttercream here is Swiss buttercream, which takes some time and effort. You warm the eggs whites and sugar and then whip in a lot of butter. The first time I made this type of buttercream I was sure I had ruined it, but if yours looks questionable, just keep whipping and it will come out! It’s very rich and you need to pair the buttercream with the cake or it’s almost too much. (Almost!) Irish Cream buttercream is awesome, in case you were wondering. I topped it with some red sprinkles, for Valentine’s Day and it’s the perfect cake for celebration.

8 fluid ounces Guinness
1 cup butter, cubed
2/3 cup cocoa
2 cups sugar
½ cup sour cream
2 eggs
1 tablespoon vanilla
1-2/3 cups flour
2-1/2 teaspoons baking soda

3 egg whites
3/4 cup sugar
1 cup butter, room temperature and cubed
About 2 tablespoons Bailey’s Irish Cream

Preheat the oven to 350 degrees. Butter and flour a 9-inch springform pan.

In a large saucepan, combine the Guinness and the butter and heat until the butter is melted. Whisk in the cocoa and sugar. Combine the sour cream, eggs and vanilla in a small bowl and then whisk it in to the butter mixture. Whisk in the flour and baking soda until combined.

Pour the batter into the prepared pan and bake for about 45 minutes, until the cake tests done. Cool completely in the pan; it’s fairly fragile and will break if you try to remove it from the pan before cooled.

Make the buttercream: combine the egg whites and sugar in a medium–sized bow. Place the bowl over a pan of simmering water, making sure that the bottom of the bowl does not touch the water. Whisk the egg mixture until it is warm to touch and no granules of sugar can be felt (about 160 degrees).

Transfer mixture to a large mixer bowl, and using a whisk, whip at medium-high speed until soft peaks form. Once soft peaks have formed, start adding the butter, one piece at a time. Make sure the butter is incorporated before adding more. Your mixture may become watery, separated, etc. as you add the butter. Don’t worry! Keep whipping and it will come together. Add the Irish Cream and whip until incorporated.

Once the cake is completely cooled, remove it from the pan and place on a cake plate. Top with the Irish Cream buttercream, spreading on the top of the cake.

Recipe from Miso Bakes (Cake recipe from Nigella Lawson)

Monday, February 13, 2012

Heart-Shaped Cinnamon Rolls


My husband requested cinnamon rolls for Valentine’s Day. We had both seen these cute heart-shaped cinnamon rolls on Pinterest and I figured that I could make those. With the new microwave oven that also works as a proofing oven, I’ve been very excited to make yeast breads. Yes they take time, but it’s really easy to get everything to work beautifully.

This dough was a little different than the bread I recently made for Tuesdays with Dorie: it was richer with more butter and the addition of eggs. This dough gave my mixer a good workout and I had to mix it on medium-low or it was going to end up all over the counter. This seemed a bit on the dry side and quite firm before putting it in the bowl to rise, but it was nice and fluffy after rising. It was hard to shape into a rectangle, as the dough was so elastic. I guess that means I made it properly! I eventually got it to some semblance of a rectangle.


This recipe called for a tiny bit of frosting, so I doubled the quantity (I’ve given you the doubled recipe here) and had plenty of frosting. Cinnamon rolls are all about the frosting, right? My frosting was runny so I added more powdered sugar. These are nice, big cinnamon rolls and they are really great with the extra frosting. I thought that they could have used a little more cinnamon, but I think that was because I made them heart-shaped and the cinnamon wasn’t evenly distributed. They were very good and I think my husband was happy!

¾ cup buttermilk, warm
6 tablespoons butter, melted and cooled until warm
3 eggs, beaten
4-1/4 cups flour
¼ cup sugar
1 envelope rapid-rise yeast
1-1/4 teaspoons salt

¾ cup brown sugar, packed
2 teaspoons cinnamon
¼ teaspoon cloves
1 tablespoon butter, melted

6 ounces cream cheese
3 cups powdered sugar
3-4 tablespoons milk

Make the dough: whisk together the buttermilk, butter and the beaten eggs. In a large mixer bowl combine 4 cups flour, the yeast, and the salt. Mixing with a dough hook, stir on low. Add the buttermilk/butter mixture and mix until the dough comes together, about 1 minute.

Increase the speed to medium and knead until the dough is smooth and elastic, about 10 minutes. Add more flour, 1 tablespoon at a time, after 5 minutes if needed.

Turn the dough out of the bowl and knead it into a ball. Place in a lightly oiled bowl and cover with plastic wrap. Allow to rise in a warm place until double, about 2 hours.

Make the rolls: In a small bowl combine the brown sugar, cinnamon, and cloves. Turn the dough out onto a lightly floured counter. Shape the dough into a 12” x 16” rectangle. Brush with melted butter and then sprinkle with the brown sugar mixture. Starting on both sides, roll the long ends of the rectangle towards the center. Slice into 12 rolls.

Place the rolls into a greased 9” x 13” pan, taking care to shape the rolls to resemble a heart. Cover with plastic wrap and allow to rise in a warm place until doubled, about 1 hour.

Preheat oven to 350 degrees. Remove the plastic wrap from the pan and bake the rolls until golden brown, about 25 minutes. Flip the rolls out onto a wire rack and cool for 5 minutes.

Make the frosting: beat the cream cheese, powdered sugar, and milk in a large mixer bowl. Add more powdered sugar if the frosting is too runny. Frost the slightly cooled rolls with the frosting.

Recipe from America’s Test Kitchen Family Cookbook

Friday, February 10, 2012

Dried Cherry and Almond Cookies


These were promoted as a Christmas cookie, but I thought that a cherry almond cookie would be perfect for Valentine’s Day! There are common desserts you see at Valentine’s Day: super decadent chocolate treats, Red Velvet Cake, etc. My favorite treats from Valentine’s that I remember both involve cinnamon: cinnamon chocolate truffles that my favorite chocolate shop Fran’s made one year and cinnamon red hot ice cream that I got years ago at Cold Stone. Next year I will plan ahead and make a cinnamon Valentine’s treat!

I particularly like baking anything with almond extract because it makes the house smell divine. That coupled with toasting the almonds (and making some other cookies with almond extract) made my house smell so good! I can’t always do refrigerator cookies on a weeknight, but I made the dough right when I got home from work and refrigerated it 2 hours exactly and it was just fine. The dough was just a tad flexible, but that worked out.

The recipe said to shape into a 12 inch log, 1-1/2 inches in diameter. There was too much dough for that small of log, so shape it how you’d like. I think next time I will cut them a little thinner, because they baked up a bit strangely. I think a thinner cookie would do better. They might not look picture perfect (but they don’t look bad) but they sure are good!

1/2 cup butter, room temperature
1/2 cup, plus 2 tablespoons sugar
1/2 teaspoon vanilla
1/2 teaspoon almond extract
1/4 teaspoon cinnamon
1/4 teaspoon salt
1 egg
1 1/4 cups flour
3/4 cup chopped dried tart cherries
1/2 cup blanched almonds, toasted and chopped

2 3/4 cups powdered sugar
2 teaspoons vanilla
3 tablespoons water

In a large mixer bowl, beat the butter, sugar, vanilla, almond extract, cinnamon, and salt until light and fluffy, about 2 minutes, then beat in the egg. Add the flour and beat on the lowest speed until just blended. Stir in the dried cherries and almonds.

Shape the dough into a log, about 1-1/2 inches in diameter. Wrap the dough in the plastic wrap and refrigerate for at least 2 hours.

Preheat the oven to 350 degrees. Line 2 baking sheets with silicone baking mats.

Cut the log into 1/2-inch thick slices and place the cookies on the baking sheets. Bake until the cookies are golden around the edges and puffed, about 15 minutes. Transfer the cookies to a wire rack to cool completely.

Make the icing: in a medium bowl combine the powdered sugar and vanilla. Gradually whisk in the water, adding more water, 1 teaspoon at a time, until the mixture becomes a drizzling consistency. Drizzle over the cooled cookies.

Recipe from Giada De Laurentiis, via the Food Network

Slow Cooker Sweet Potato Chili


The theme for this recipe swap was potatoes. Since I really just post baked things on my blog, it was a bit of a challenge to think of what I could bake with potatoes. I submitted Sweet Potato Cookies and in return I got this recipe for Sweet Potato Chili from Cathy’s Kitchen Journey. I do like sweet potatoes so I was looking forward to this one. Plus with the slow cooker, it makes my life easy.

I rarely use dried beans so that was a new thing for me. I bought a mix of beans at the store instead of buying several different types of beans. I soaked them overnight and figured all was good. I decided to cook this on high for the shorter amount of time. Well, I don’t ever use high on my slow cooker as I typically put it on in the morning and then let it cook while at work. The chili just never cooked. After 5 hours on high the sweet potatoes were still crunchy and so were the beans. Ok cook it longer! After 8+ hours on high it still wasn’t completely cooked and I’d kind of given up. It was cooked enough to taste though.

When I was mixing the spices, it seemed like a lot of chili powder. 2 tablespoons was way too much and this was so spicy that had it cooked properly, I still wouldn’t have been able to eat it. I looked at the original recipe and it had only called for 1 tablespoon, and I would have liked that more. While this wasn’t a success for me, I liked the idea of the recipe and I hope to try it again, using canned beans and less chili powder. You can’t win them all, but I still had fun trying something new.

3 cups assorted dried beans
¾ cup chopped onion
4 ounce can green chilies
4 garlic cloves, chopped
2 tablespoons chili powder (use less)
1 tablespoon ground cumin
2 teaspoon cocoa powder
1/4 teaspoon cinnamon
1 teaspoon salt
1/4 teaspoon pepper
1 28-ounce can diced tomatoes
3 medium sweet potatoes, peeled and cut into 1/2-inch pieces
2 cups water
Sour cream, cheese or other toppers

The night before, rinse the dried beans. Pick out any stones and discolored beans. Soak in cold water.

The next day: drain the beans and rinse in a colander. Put in the container of a slow cooker. Combine the onion, chilies, garlic, chili powder, cumin, cocoa, cinnamon, salt, and pepper and add it to the beans. Add the tomatoes (and their liquid), sweet potato, and water. Stir to combine.

Cover and cook until the sweet potatoes are tender and the chili has thickened, on low for 7 to 8 hours or on high for 4 to 5 hours.

Serve with sour cream, cheese or other desired toppings

Recipe from Cathy’s Kitchen Journey

Tuesday, February 7, 2012

White Loaves


This is the very first Tuesdays with Dorie recipe with the new book Baking with Julia! The first recipe was selected by Laurie from Slush and Jules from Someone’s in the Kitchen. They chose White Loaves, which is a classic white bread recipe and a great way to start this new group. Don’t forget to check out the posts from all the other Tuesdays with Dorie bakers (all 300 of us!) which are linked off of the Tuesdays with Dorie site.

I don’t bake with yeast that often, mainly because it takes more time. This book has more yeast bread recipes so I’m really looking forward to that. Last fall when my oven died, we replaced the microwave as well. We didn’t just get a normal microwave; we got a microwave/convection oven. It also is a proofing oven! I no longer have to find a warm place for dough to rise in the house. That has always been a problem as my house isn’t that warm typically. The proofing oven takes away all of the stress of making yeast dough.

With the proofing oven, this bread was so easy to put together. It rose beautifully. Although it takes a little longer with the rising time, it was not difficult to make. I was able to do other things while the bread was rising. I made these loaves to go with a soup in the slow cooker, but the soup never cooked all the way through and we ended up eating fresh bread for dinner. It was so good. My loaves looked great. And eating fresh bread for dinner is pretty great. Thanks for picking such a great recipe and I can’t wait for all the recipes to come.

Recipe from Baking with Julia by Dorie Greenspan, pages 81-82

Monday, February 6, 2012

Fudgy Nutella Brownies with Cream Cheese Frosting


Sunday was World Nutella Day! I had the best of intention to get these posted on time, but I am a day late. I usually hear about Nutella Day, chocolate cake day, etc. the day of the event and so I always miss out. But this time I planned ahead and got these made, but then our weekend plans changed and I wasn’t able to get everything together. I guarantee you that these are worth the wait.

I made many items with Nutella, if not that then a combination of chocolate and hazelnut. These flavors together have to be my absolute favorite and I find it hard to turn anything down with these flavors. I’ve started to follow a number of Nutella boards on Pinterest, so I was not lacking Nutella recipes. I decided on these bars, because you can’t beat a good brownie. People love brownies and these are extra special.

You make the brownies; drop the Nutella on top and the frost with cream cheese icing. I didn’t swirl in the Nutella, which you certainly could, but this way you get these great pockets of Nutella when you bite into the brownies. If you want super fudgy brownies, bake them a few minutes less. I baked mine for the total time and they are the perfect balance between fudgy and cakey. You can’t really go wrong with Nutella!

4 ounces bittersweet chocolate, chopped
3/4 cup butter or margarine
2 cups sugar
3 eggs
1 teaspoon vanilla
2 tablespoons coffee, optional
1 cup flour
About 2/3 cup Nutella

8 ounces cream cheese, room temperature
1/2 cup butter, room temperature
1 teaspoon vanilla
3-4 cups powdered sugar

Preheat oven to 350 degrees. Line a 9” x 13” baking pan with foil, allowing the ends to hang over the edges, and spray foil with cooking spray.

In a large microwaveable bowl (or in the top of a double boiler) combine the bittersweet chocolate and the butter. Microwave for 90 seconds or until butter is melted. Stir until chocolate is completely melted. If required, transfer the mixture to a large bowl. Whisk in the sugar. Add the eggs, vanilla, and coffee; stir to combine. Stir in flour until just combined, do not over mix. Spread in prepared pan.

Using two spoons, dot the top of the batter with Nutella. (I didn’t stir it or swirl it in, but you could if you wanted.)

Bake for 25 to 28 minutes, or until a toothpick comes out almost clean. Do not over bake. Allow to cool before frosting.

Make the frosting: In a large mixer bowl, beat the cream cheese and butter until smooth. Stir in the vanilla. Add the powdered sugar once cup at a time, until the frosting is of spreading consistency. Spread the frosting on the cooled brownies. Once set, grab the foil and remove the brownies from the pan. Cut into bars. Store in the refrigerator.

Recipe from Love Veggies and Yoga

Friday, February 3, 2012

Chai Bars with Honey Ginger Icing


I love the flavors of chai and I have another chai recipe that I’ve been waiting to make, but I saw these and made them within the course of a couple weeks. That’s pretty good for me! I thought the flavors in these sounded so good and the honey ginger icing, well, that would have to be good. These ended up taking no time to put together, too, so great all around.

The chai baked good recipes that I come across get the chai flavors through different means. Some use premade chai concentrate, either in liquid or powdered form. This recipe combines a number of spices together to create the chai. I think I like this approach, as the spices are likely something that you have in the cupboard and you can change the spices to fit your taste. The original spice mix for these cookies called for ground star anise. That was the only thing I didn’t have, so I substituted nutmeg. I don’t typically like cardamom, but I gave it a chance and hoped it wouldn’t be overpowering in the spice mixture. Yes, these do include ground pepper. Don’t worry, it’s good!

These bars are very thin, so don’t fret if you think there is barely enough dough to cover the bottom of the baking pan. Watch the time on the baking as they can get too browned very quickly. I found it easier to remove the bars from the pan before icing. I cut the cooked bars in two big pieces and it came out of the pan with no problem. The spice mix in these is really outstanding, which is nicely balanced with the sweet honey icing. These are fantastic!

1/2 cup sugar
1/2 cup brown sugar, packed
1 cup butter, room temperature
1 egg
2 cups flour
1 pinch salt
1 1/2 teaspoon ginger
1 1/2 teaspoon cinnamon
3/4 teaspoon ground cloves
3/4 teaspoon cardamom
1/4 teaspoon black pepper
1/4 teaspoon ground nutmeg

2 tablespoon honey
1 teaspoon ginger
1 cup powdered sugar
water

Preheat oven to 350 degrees. Grease a 9” x 13” baking pan.

In a large mixer bowl, cream the butter, sugar and brown sugars. Add the egg and mix well. Add flour, salt and spices and stir until the mixture is thoroughly combined. Press into the prepared pan. Bake for 20-25 minutes, until the cookies are a pale golden brown. Let cool.

Make the icing: mix the honey, ginger, and powdered sugar in a small bowl. Add water, ½ teaspoon at a time, until the icing is spreadable. Spread over the cookies and allow to set before cutting into squares.

Recipe from Sweet as Sugar Cookies