Friday, May 28, 2021

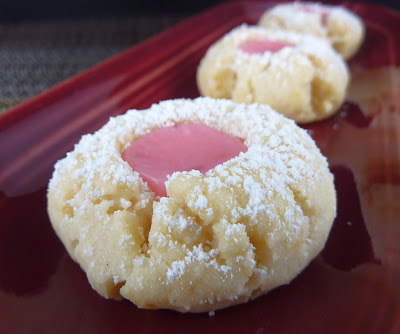
Pink Lemonade Thumbprint Cookies


Pink Lemonade Thumbprint Cookies

I have come across a couple of different pink lemonade cookies in my searches, but I have to be really careful when I look at the ingredients. So many recipes use a couple of tablespoons of pink lemonade concentrate, which isn’t something that I have on hand, nor do I want to buy it and only use a small portion. This recipe was different, as it used lemon juice, lemon zest, and raspberries. However, these cookies have its own oddity.

The filling for these cookies uses 2 raspberries. How on earth are you supposed to get two raspberries? It’s such a weird quantity, and stores certainly don’t sell anything less than a pint or so. I ended up making this recipe sooner than expected because I bought some prepared mixed fruit, and it had a few raspberries mixed in. It was a nice surprise and I set those aside for these cookies. What else are you going to do?

These cookies, as they are a lemon shortbread, bake for quite a long time. You partially bake them, make and indentation, then finish baking. That’s a different process for me but isn’t difficult unless you accidentally hit the hot baking sheet! I wasn’t too sure that the mashed raspberry would become a nice filling for these thumbprints, but the filling came together beautifully, with a lovely pink color. The cookies have a great lemon flavor, not too sweet. The filling adds a burst of sweetness that can’t be beat.

Pink Lemonade Thumbprint Cookies

2 1/2 cups flour
3/4 cup powdered sugar, divided
1 teaspoon salt
1 cup butter, room temperature
2 tablespoons lemon zest
3 tablespoons lemon juice

1 1/4 cups powdered sugar
2 tablespoons lemon juice
2 raspberries, crushed
Additional powdered sugar

Heat the oven to 325 degrees. Line two baking sheets with silicone baking mats.

In a medium bowl, whisk together the flour, ½ cup powdered sugar, and salt; set aside. In a large mixer bowl, beat the butter, ¼ cup powdered sugar, lemon zest, and lemon juice on medium until light. With the mixer running on low, add the flour mixture and stir until the dough comes together.

Shape the dough into 1-inch balls. Freeze the dough for 15 minutes.

Bake the cookies for 10 minutes. Remove the cookies from the oven and make an indentation in the top of each cookie using the end of a wooden spoon or similar tool.

Return the cookies to the oven and bake for an additional 16-18 minutes, until barely browned on the bottom. Allow the cookies to cool on a wire rack.

While the cookies cool, make the filling. In a small bowl, whisk the powdered sugar, lemon juice, and raspberries. Dust the cookies with powdered sugar and then pipe the filling into the center of each cookie. Allow the cookies to set before serving.

Recipe from Inspired by Charm

Friday, May 21, 2021

Nutella Biscotti

Hazelnut Biscotti

I really love the combination of hazelnut and chocolate! Sometimes that comes in the form of my own combination of ingredients, and sometimes it’s in the form of Nutella. I have made quite a few recipes with Nutella, and I continue to find new and different recipes to try. Now, I will be honest that biscotti aren’t my favorite cookies, but I have learned that make them more to my liking. I’m not a fan of dry cookies, so I tend to shorten the second baking time. They are drier, but not as dry as some biscotti.

The recipe for these biscotti is very simple, and it makes a petite batch. Honestly, 3 tablespoons of Nutella aren’t that much, so they don’t have a strong chocolate flavor. I did make one change to the recipe. The original recipe called for walnuts and it seemed very strange to use anything but chopped hazelnuts in this cookie. I know other nuts would work in a pinch, but hazelnuts are the appropriate choice here.

Biscotti is the cookie you want to make if you don’t have a lot of time. I think I had these started and finished in under an hour. They are simply mix, shape, and bake, and I suppose that chopping the nuts is the most labor-intensive part of this recipe. My dough was sticky, and I did end up adding a little extra flour to reduce the softness/stickiness. I baked mine just a few minutes less the second time, and they are crunchy but not so dry. As I said, they aren’t so sweet, but it doesn’t feel like you are missing anything!

Nutella Biscotti
3/4 cup sugar
3 tablespoons Nutella
1 egg +2 yolks
1 1/4 cup + 2 tablespoons flour
1/2 teaspoon baking powder
¼ teaspoon salt
1/3 cup chopped hazelnuts

Heat the oven to 350 degrees. Line a baking sheet with a silicone baking mat.

In a large mixer bowl, beat the sugar, Nutella, and eggs on medium until combined. Add the flour, baking powder, and salt and stir on low until the dough comes together. Stir in the chopped hazelnuts. If the dough is too liquid, add a small amount of flour and mix until the dough comes together.

Divide the dough into halves and shape each half into a log, about 3 inches wide.

Bake for 20 minutes. Remove the biscotti from the oven and cool 5 minutes. Reduce the oven temperature to 275 degrees.

Slice the logs into cookies, each about an inch thick. Return the cut biscotti to the baking sheet.

Bake for 15-20 minutes, until dried to your liking. Remove from the oven and cool before serving.

Recipe from Pickled Plum

Friday, May 14, 2021

Lemon Blackberry Cheesecake Bars

Lemon Blackberry Cheesecake Bars

Do you make cheesecake often? I think that cheesecake can be very challenging, and I have yet to make a cheesecake that didn’t have some sort of crack in the top. Some folks say that is completely normal, but I don’t see cracks in professionally made cheesecakes. I’ve tried so many things, water baths, etc. and nothing seems to help. I know many who make cheesecakes and that’s their thing. That isn’t the case for me.

The closest that I can successfully create is a cheesecake bar cookie, but I hadn’t made that in a while. There are less errors with a bar cookie, but the flavors are about the same. I came across this recipe and thought that lemon cheesecake combined with a berry topping would be great. The original recipe called for raspberry pie filling, but I had blackberry jam that my friend had made, so I chose to use that. I think any sort of berry topping, or even anything that works with lemon would be a good choice.

These bars take a little longer to bake than some cookies, but they are not nearly as involved as a cheesecake. They bake in two stages, but you can prepare the filling while the crust bakes. The swirl on top can be as simple as you want. I find that if you swirl in the jam/pie filling too much it becomes too uniform, and you don’t want that. The bars still jiggle in the middle when they come out of the oven, but the firm up as they cool. These bars are quite thick, and you could likely make them in a 9” pan for a slightly thinner bar. These are sweet, but have the tanginess of cheesecake mixed in, which is very nice.

Lemon Blackberry Cheesecake Bars
1 1/2 cups graham cracker crumbs
1/3 cup sugar
6 tablespoons butter, melted

16 ounces cream cheese, room temperature
Zest of 1 lemon
1 1/4 cup sugar
1/4 cup sour cream
1/4 cup flour
1 1/2 teaspoons vanilla
2 eggs
1 cup berry jam/pie filling

Heat the oven to 350 degrees. Line an 8” square baking pan with foil and spray the foil with nonstick spray.

In a medium bowl, stir together the graham cracker crumbs, sugar, and melted butter. Press the mixture evenly into the bottom of the prepared pan.

Bake for 8 minutes. Make the filling while the crust is baking.

In a large mixer bowl, beat the cream cheese, lemon zest, sugar, sour cream, flour, and vanilla on medium until smooth. Add the eggs and beat again to combine. Spread the mixture over the partially baked crust.

Spoon the berry jam/pie filling over the cheesecake layer in small dollops, and then swirl with a knife to make a decorative pattern.

Bake for 35 minutes. Allow to cool before refrigerating. Refrigerate for 2 hours before cutting into bars.

Recipe from My Incredible Recipes

Friday, May 7, 2021

Orange Creamsicle Cookies

Orange Creamsicle Cookies

In choosing recipes, especially around this time of the year when the weather starts to get better, I sometimes find variations that have a lot of similarities. I had planned on making these cookies this week, and the only ingredient I needed was the zest of an orange. I picked that up one evening so I would be prepared. Later on, I realized that I had the ingredients for another cookie as well, a bar cookie that also used orange zest. What to do? I texted my husband and asked if he wanted cookies or bars. Obviously, cookies won the day.

Now, I don’t bake a lot with orange as my friend at work doesn’t care for the flavor. She even gives me her orange Dots, we are quite the pair! But I am still working remotely from home so I take this opportunity to bake items that might not be loved by everyone. I have no idea when we will again be working in person, but I sure do miss folks.

These cookies, while in actuality are a variation of a chocolate chip cookie, taste completely different. I love orange creamsicles, and I also loved the orange/vanilla ice cream cups you got as a kid, with the horrible wooden spoons! Do they still have those? This recipe uses white chocolate chips and a hearty helping of orange zest to mimic the orange creamsicle flavors, and they are fantastic! These are so good and I’m glad I made a half batch because I think my husband and I would eat them all!

Orange Creamsicle Cookies
1 cup butter, room temperature
½ cup sugar
½ cup packed brown sugar
1 egg
1 teaspoon vanilla
2½ cup flour
¾ teaspoon baking soda
½ teaspoon salt
2 tablespoons orange zest
2 cups white chocolate chips

Heat the oven to 375 degrees. Line two baking sheets with silicone baking mats.

In a large mixer bowl, beat the butter, sugar, and brown sugar on medium until creamy. Add the egg and vanilla and mix to combine. With the mixer running on low, gradually add the flour, baking soda, and salt. When the dough has almost come together, stir in the orange zest and white chocolate chips.

Scoop the dough by tablespoons onto the prepared baking sheets.

Bake for 8-11 minutes, until barely golden around the edges. Allow the cookies to cool on the baking sheet for 5 minutes before removing to a rack to cool completely.

Recipe from Six Sisters’ Stuff