Showing posts with label No-bake. Show all posts
Friday, December 6, 2024
Peppermint Nanaimo Bars
I have been waiting to make these bars for a very long time. I pinned the recipe and then the URL of the post changed so I had to look again and find a viable recipe. I found it and saved it again. I had planned to make these bars last year, I had even started the write-up, but then I ended up changing what I made. I kept the recipe, because I knew that I would eventually make these.
This was the year that I made these bars! I am so glad that I did as I love Nanaimo Bars, and a holiday variety is not to be missed. A few years ago, my husband and I traveled to Vancouver Island, and stayed a couple of days in Nanaimo. We went to the museum there and thought that we would find out the origin of the Nanaimo Bar. Unfortunately, no one really knows who created the Nanaimo Bar. That’s ok, I’m just glad that someone created these wonderful bar cookies and made a cookie that is so adaptable.
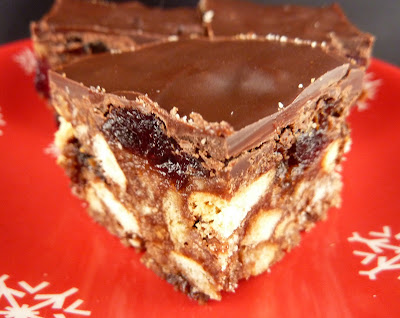
These no-bake cookies have a couple of layers, but they really don’t take long to make. I will admit that making a no-bake cookie in the winter, heating things up on the stove, is much better than making them in the summer. These are quite traditional, with the addition of peppermint extract and the topping. My only challenge was the topping, as the topping called for butter and that never works with chocolate! I substituted vegetable shortening and that was much better. These cookies have all the flavors of a Nanaimo Bar with the refreshing peppermint flavor!
Peppermint Nanaimo Bars
1/2 cup butter, cut into pieces
1/4 cup sugar
1/3 cup cocoa
1 egg, lightly beaten
1 cup graham cracker crumbs
1 cup shredded coconut
1/2 cup pecans, finely chopped
1/2 cup butter, at room temperature
3 tablespoons cream
2 tablespoons custard powder
2 cups powdered sugar
1 teaspoon peppermint extract
4 ounces chocolate, chopped
2 tablespoons vegetable shortening
2 ounces white chocolate
1 teaspoon vegetable shortening
Crushed peppermint candies
Line an 8” pan with foil and spray the foil with nonstick cooking spray.
In a medium saucepan, combine the butter, sugar, and cocoa. Heat over medium-high heat, whisking until the mixture is smooth. Add the egg, and quickly stir over the heat to set the egg. Remove from the heat and add the graham cracker crumbs, coconut, and pecans. Press into the base of the prepared pan.
In a large mixer bowl, beat the butter, cream, custard powder, powdered sugar, and peppermint extract. If needed add additional powdered sugar if too thin or extra cream if too thick. Spread over the graham cracker base and refrigerate for 30 minutes to an hour.
In a small microwave-safe bowl, melt the chocolate, stirring frequently. Pour the melted chocolate over the bars, smooth the top, and refrigerate until almost firm. Melt the white chocolate and then drizzle over the partially cooled chocolate. Sprinkle with crushed peppermint candies. Refrigerate overnight.
Remove the bars from the pan by lifting the foil. Cut into squares.
Recipe from Parents Canada
Labels:
Bar Cookies,
Chocolate,
Christmas Cookies,
No-bake,
Peppermint,
Pudding/Custard
Friday, July 12, 2024
No-Bake Honey Crunch Traybake
What is a traybake? If you visit this blog occasionally, you know that sometimes I make traybakes in the summer. Some traybakes are no-bake cookies, which is the case with these bars. Traybakes, when they are baked, often use up a smaller quantity of ingredients like sweetened condensed milk, so they can be great for using up odds and ends that you may have around.
Traybakes are typically a British/Irish/Australian bar cookie, and in this case the blogger is from Northern Ireland but now lives in the States. It can be hard to find no-bake cookies that are a little more interesting, so I have to search a lot more to find the right recipe. As this is an international recipe, it does call for a different biscuit/cookie. Rich’s Tea Biscuits are a plain cookie, and I ended up using Goya Marias. You could also use a plain digestive biscuit or a graham cracker in a pinch.
The bake for these cookies is simple, but I did change the topping. The original recipe called for a whipped cream topping, but that seemed too delicate for a warm day, so I just changed the topping to a powdered sugar icing. You can use any grated chocolate for the topping, or even leave it off if it looks good as is. These cookies are subtly sweet, and the icing adds that extra bit of sweetness that is appreciated!
No-Bake Honey Crunch Traybake
110 grams butter, room temperature
¾ cup powdered sugar
2 tablespoons honey
1 tablespoon cocoa powder
225 grams Rich Tea biscuits/Goya Maria cookies, crushed
½ cup powdered sugar
1 teaspoon honey
1-2 tablespoons milk
Grated chocolate, for topping
Line an 8” square pan with foil and spray with nonstick cooking spray.
In a large mixer bowl, combine the butter, powdered sugar, honey, and cocoa powder. Mix on medium until light and smooth. Stir in the crushed biscuits; if you’d like you can keep a few of the biscuits in larger chunks to add additional texture. Stir to combine and then press the mixture firmly into the prepared pan. Chill for at least two hours.
Once the base is chilled, make the topping. In a medium bowl, whisk together the powdered sugar, honey and a small amount of milk. Continue adding milk until the topping is a glazing consistency. Smooth the topping over the base and top with a small amount of grated chocolate. Refrigerate to allow the topping to set before cutting into bars.
Recipe from Traybakes & More
Friday, July 14, 2023
Frosted Graham Cracker Bars
Each summer I try and identify a couple of no-bake recipes that can be made without turning on the oven. I’m never quite sure what to think of no-bake recipes because you typically have to heat or melt ingredients on the stove and that can be worse than the oven. Thankfully I made these when the house wasn’t too warm, so I didn’t mind working with the stove. This recipe did come together very fast, so that was another bonus.
I did halve this recipe, making it in an 8” square pan. That slightly changes the quantity of graham crackers you need, but I found that 9 graham cracker squares fit the pan with little extra room or space between the crackers. The filling comes together fast, as the butter is quite warm and the mixture comes to a boil quickly when you add other ingredients. You technically should use ½ egg so I used the egg yolk. Using a full egg wouldn’t be the end of the world.
I topped the crackers with the filling and added more crackers. The dish is warm at this point so I put it in the refrigerator to cool about 30 minutes before I added the frosting. The frosting is simple but I needed more milk that expected to get it to a spreading consistency. I topped it and let it refrigerate for just over 24 hours. The time softens the crackers and I was worried they would be soggy, but that wasn’t the case at all! You get a sweet cookie with a crunchy filling that people
would never guess were a no-bake cookie.
Frosted Graham Cracker Bars
18 square graham crackers, divided
1/2 cup butter
1/2 cup sugar
1/4 cup milk
1 egg, beaten
3/4 cup coconut
1/2 cup chopped pecans
1/2 cup graham cracker crumbs
1/4 cup butter, room temperature
About 1 cup powdered sugar
1/2 teaspoon vanilla
⅛ teaspoon almond extract
About 2 tablespoons milk
Line an 8” pan with foil. Layer the bottom of the pan with graham crackers. You may need to break them apart to make an even layer.
Make the filling: in a medium saucepan, melt the butter. Once the butter is melted, add the sugar, milk, and beaten egg. Cook, stirring constantly, over medium high heat until the mixture boils. Remove the mixture from the heat and stir in the coconut, pecans, and graham cracker crumbs. Spread the mixture over the graham crackers in the pan. Top the bars with eight additional graham crackers, making another even layer.
Allow the bars to cool for an hour before topping with the frosting.
Make the frosting: in a large mixer bowl, beat the butter, milk, powdered sugar, vanilla, and almond extract on medium until combined. If required, you can add additional powdered sugar to thicken the frosting. Spread the frosting over the bars.
Refrigerate for at least 24 hours, which softens the graham crackers. Once fully refrigerated, cut into bars.
Recipe from Six Sisters’ Stuff
Friday, September 2, 2022
No Bake Peanut Butter Crispy Bars
As Seattle wraps up the summer and we head into fall, the weather is making one more push of warmth, but with shorter days and cooler nights, the impact isn’t at all the same. It’s still nice to make a no-bake treat from time to time. I had planned to make these a couple of days ago, but then I realized I had everything but the peanut butter. How on earth did I run low on peanut butter? I have now restocked with two big containers of peanut butter!
No bake cookies usually ask you to melt ingredients on the stove, which is not what I want to do on a warm day. Luckily, all of the melting required for these bars can be done in the microwave, which isn’t bad. You don’t necessarily have to use a mixer for the peanut butter layer, but it does make the mixture come together quickly and easily. It seems weird for me to make something and not use the mixer!
These start with the peanut butter layer, then refrigerate, then top with the chocolate/crispy cereal layer, and refrigerate some more. These aren’t great if you’re looking for instant gratification, because without the refrigeration you’d have a bit of a mess. Well chilled, these are soft for the peanut butter layer with a good chocolate crunch on top. It’s hard to go wrong with peanut butter and chocolate, and these bars are no exception.
No Bake Peanut Butter Crispy Bars
½ cup butter, melted
1-1/4 cups graham cracker crumbs
1 cup peanut butter
1 cup powdered sugar
1 cup chocolate chips
2 tablespoons peanut butter
1 teaspoon vegetable shortening
¾ cup crispy rice cereal
Line an 8” square pan with foil and spray the foil with nonstick cooking spray.
In a large mixer bowl, combine the melted butter, graham cracker crumbs, peanut butter, and powdered sugar. Mix on low until the mixture comes together. Press into the prepared pan and refrigerate for 1 hour.
In a medium microwave-safe bowl, combine the chocolate chips, peanut butter, and vegetable shortening. Microwave, stirring every 30 seconds, until the mixture is smooth. Add the crispy rice cereal to the chocolate mixture and stir to combine. Spread evenly over the chilled peanut butter layer.
Refrigerate until set, about 2 hours. Once set, remove from the pan and peel away the foil. Cut into bars.
Recipe from The Midnight Baker
Friday, July 29, 2022
No-bake Ginger Slice
Every year we get a spell of hot weather in the pacific northwest and it’s time for me to find no-bake cookies to make. Many recipes have you cook something on the stove, and I wonder if that’s really any cooler than using the oven. My house it too warm to do much of anything, so thankfully these are very quick to make and then just need time in the refrigerator.
This is a recipe that is easy to make gluten free, which is good since I try to make gluten free recipes occasionally. I found gluten free gingersnaps at the store, and that is the only component that contains gluten. Since these are ginger cookies and I love ginger, my husband suggested adding some finely diced candied ginger, and that adds a lot to these cookies.
There isn’t really anything difficult about these cookies. The ginger base is a little on the oily side, but not too bad. I let the base set for about 30 minutes before topping them with chocolate. Our house is so warm that even 10 minutes out on the counter was a challenge for these volatile cookies! I topped with chocolate, a little less than the original 200 grams that were called for, but I had plenty of topping. I did bring them out of the refrigerator to cut them, and they were soft enough to cut almost immediately. As hoped, these have a nice ginger flavor, highlighted by chunks of candied ginger!
No-bake Ginger Slice
250 grams gingersnaps
70 grams butter
80 grams sweetened condensed milk
1 tablespoon golden syrup
1 teaspoon ginger
2 tablespoons finely diced candied ginger
150 grams dark chocolate, chopped
45 grams butter
Line an 8” square pan with foil and spray the foil with nonstick cooking spray.
Place the gingersnaps in a food processor and pulse until the cookies become crumbs. Transfer the crumbs to a larger mixer bowl.
Melt the butter in a microwave safe bowl, stirring the butter every 30 seconds. Remove the bowl from the microwave and whisk in the sweetened condensed milk, golden syrup, and ginger. Pour this mixture into the mixer bowl with the gingersnap crumbs and mix to combine. Add the candied ginger and mix to incorporate.
Press into the bottom of the prepared pan and refrigerate while you make the topping.
In a medium microwave safe bowl, combine the chopped chocolate and butter. Microwave, stirring every 30 seconds, until the chocolate is melted and the mixture is smooth. Pour the chocolate over the gingersnap base and smooth to an even layer.
Refrigerate for at least 2 hours before cutting into squares.
Recipe from Chef Not Required
Friday, December 24, 2021
Christmas Chocolate Tiffin
What is a tiffin? I have had multiple people ask me what a tiffin is, and the short answer that it is a no-bake bar cookie whose main component is biscuits (or cookies, as we call them in the states). This is a great recipe in that it combines the ease of the tiffin with the flavors of Christmas such as brandy, chocolate, and candied cherries. Now I find all sorts of tiffin recipes that sound good, and I can’t wait to try some once the weather is warmer.
As is often the case with British recipes, I don’t convert grams to ounces or volume measure. In a way, I think this is easier as I have my scale and a single cup to measure. It makes for less washing and right now that is appreciated. I did buy glacĂ© cherries and the Rich Tea biscuits from the UK, and golden syrup is also British in origin. The British cherries looked so much better than the weird, bright red candied cherries that we get here in the states. I also wonder if the topping could be any sort of chocolate, or some sort of semi-sweet chocolate? I’m sure it would work.
I was slightly delayed in making this tiffin as I kept forgetting gallon sized Ziplock bags at the store! After what seemed like the twentieth trip to the store, I finally got them home with me. I had already soaked the candied cherries and raisins in brandy, but I figured that they would be just fine if they were in the brandy a little bit longer. Oh, and as sticky as candied cherries are, don’t forget to cut them in half. That was not fun when they were both sticky and soaked with brandy. This tiffin needs some time to chill in the refrigerator, to make sure it sets properly, so this isn’t the recipe to make at the last minute. These squares are very rich, with chocolate and candied cherries, but I love the bites with little bits of crushed tea biscuits!
Christmas Chocolate Tiffin
200 grams glacé/candied cherries
125 grams raisins
80 ml brandy
300 grams Rich Tea biscuits
150 grams butter
40 grams brown sugar
200 grams golden syrup
25 grams cocoa powder
100 grams dark chocolate
100 grams milk chocolate
Line an 8” square pan with aluminum foil and spray the foil with nonstick cooking spray.
Cut the candied cherries in half and place in a small microwaveable bowl. Add the raisins and the brandy and microwave for 30 seconds. Allow to stand for 5 minutes before proceeding.
Put the biscuits in a large ziplock bag and bash with a rolling pin or similar object until the biscuits are a combination of powdery bits and larger pieces. The powdery pieces help the tiffin stick together, so don’t be concerned with pulverizing the biscuits too much.
In a medium saucepan combine the butter, brown sugar, and golden syrup and heat on medium until smooth. Remove the pan from the heat and stir in the crushed biscuits and the cocoa powder, mixing until the tiffin has an even color. Add the fruit/brandy mixture and mix.
Press the mixture into the prepared pan and refrigerate until set.
Make the topping: remove the tiffin from the pan and remove the foil. In a medium bowl, microwave the dark and milk chocolate, stirring frequently, until smooth. Top the tiffin with melted chocolate, spreading evenly to ensure complete coverage. Allow the chocolate to set before cutting the tiffin into squares.
Recipe from Everyday Cooks
Friday, July 9, 2021
No-Bake Lemon Coconut Squares
Every summer, it feels like there is a week when the weather is just so warm that I can’t even think of turning on the oven. I have posted a number of no-bake cookies, and I often have my eye out for new ideas. Our weather was crazy the past week or so (110+ yikes!) and it was pretty miserable in the house. The power went out for a while, too, but we were able to escape the heat for a while. Thankfully, it has cooled down since to get some things done around the house. In fact, sometimes it seems almost too cool!
These lemon coconut squares likely contain ingredients that you have on hand. I simple picked up a lemon and I was good to go. This recipe uses a portion of a can of sweetened condensed milk, so now I need to find another recipe that also uses a partial can. I think the recipe was originally a British recipe, as it calls for desiccated coconut. It’s different than American coconut, as it isn’t sweetened, it’s drier, and is more finely ground. If you can’t find desiccated coconut, American coconut will work, just pulse it in the food processor before using it so that it will be more finely ground.
I do appreciate no-bake cookies that don’t require you to stand over the stove for an extended period of time, as that can be as warm as turning on the oven. These squares are mix and refrigerate, which is simple. I used one bowl and beater, just giving it a quick wipe with a paper towel between making the base and the frosting. These squares have a lovely lemon flavor, and the graham cracker/coconut base is firm yet soft. These are different no-bake, but really excellent! You could likely change up the flavors to fit your tastes, but you can’t go wrong with lemon!
No-Bake Lemon Coconut Squares
2 1/3 cups graham cracker crumbs
1 cup finely shredded/desiccated coconut
Zest of one lemon
1/2 cup butter, melted
1/2 cup sweetened condensed milk
2 cups powdered sugar
3 tablespoons butter, room temperature
3 tablespoons lemon juice
Additional coconut
Line an 8” square pan with foil and spray the foil with non-stick cooking spray.
In a large mixer bowl, combine the graham cracker crumbs, coconut, and lemon zest; stir to combine. Add the melted butter and sweetened condensed milk and mix on low until thoroughly combined. Press the mixture evenly into the bottom of the prepared pan. Place the pan in the refrigerator.
In the same mixer bowl, combine the powdered sugar, butter, and lemon juice. Mix on low until the frosting is creamy. If it is too thin, add additional powdered sugar. Spread the frosting on the graham cracker base and then sprinkle with additional coconut, pressing down slightly to adhere.
Refrigerate the bars for several hours, until completely set. When ready, remove from the pan and cut into squares.
Recipe from Constantly Cooking
Monday, December 7, 2020
Cherry Rum Balls
It’s not uncommon for me to make some sort of no-bake rum/bourbon balls, and I am frequently looking for new recipes to try. I came across this recipe a while ago, and it’s quite different from previous versions I have made. My go-to recipe uses gingersnap crumbs, and that is the predominant flavor. This version uses vanilla wafer cookies and is topped by a festive red candied cherry.
Since I am doing smaller batches this year, I had originally planned to make a half batch of these cookies. My husband asked if I could use the cranberry liqueur, as we had picked that up at a local distillery last year and we still had some available. I ended up making a full batch, but I divided it in two, adding rum to half of the mixture and cranberry liqueur to the other half. It doesn’t take any longer, but it sure did mess up more dishes!
Like other rum balls, these are best if you make them and the stick them in the refrigerator for a while for the flavors to come together. I’ve kept the two flavors separate, as the do taste a bit different. The strangest thing for me is that I almost never used candied fruit when baking. Occasionally I will use a little candied peel (which is common in British baking), but there was no way around the candied cherries in this recipe! They add a beautiful festive touch, and while the cookies could like without them, why would you want to do that?
Cherry Rum Balls
1 cup chocolate chips
½ cup rum
¼ cup light corn syrup
3 cups vanilla wafer crumbs
1 ½ cups chopped pecans
1 cup powdered sugar, divided
24 red candied cherries, halved
In a small saucepan over medium heat, melt the chocolate chips. Remove from the heat and stir in the rum and corn syrup; set aside.
In a separate bowl, stir together the vanilla wafer crumbs, pecans, and ½ cup of powdered sugar. Drizzle with the chocolate mixture and stir well to combine all ingredients.
Shape the dough into 1-inch balls and roll in the remaining powdered sugar. Top each ball with a cherry half, pressing down to adhere. Store the balls in an airtight container in the refrigerator. Allow the cookies to set for several days, allowing the flavors to develop.
Recipe from All Recipes
Friday, July 31, 2020
No-Bake Peanut Butter Oat Bars
I had a different recipe planned for today, using up some
ingredients that I had on hand. Out of the blue my husband sent me a link to
these bars, and he said that he was looking out for me since he didn’t want me
to have to turn on the oven. I do appreciate that, but sometimes cooking a mixture
on top of the stove is just as warm! I figured I could adapt this recipe and
make it my own and avoid turning on the oven.
The original recipe for these bars was a combination of
chocolate and oats, which is quite classic for a no-bake cookie. I’m not the
biggest fan of uncooked oats, but these are cooked slightly on the stove so I
thought that would be an improvement. I didn’t want to make another cookie with
chocolate filling, as I seem to have made a lot of those lately, so I changed
the milk chocolate chips to peanut butter chips. There was already peanut
butter in the filling, so I knew that would be a fine substitution.
I was getting ready to make the bars and I knew I was low
on oats, but I was REALLY low and didn’t have enough to make the recipe. I went
online and searched to see if ground almonds would be a good substitute, as I
had those on hand. The Internet was not helpful, and darn it, I don’t want to
make oat flour. I tried it anyway and it seemed to work ok, although perhaps a
little less butter would have been even better. I refrigerated my bars overnight
and I certainly recommend cutting the cookies when they are super cold. Peanut
butter and oats is a wonderful combination, but keep them stored in the
refrigerator or they will get melty.
No-Bake Peanut Butter Oat Bars
1 cup butter
½ cup packed brown sugar
1 teaspoon vanilla
2 cups old-fashioned oats
1 cup ground almonds
½ teaspoon cinnamon
¼ teaspoon salt
1 cup peanut butter chips
2/4 cup peanut butter
Line an 8” square pan with foil and spray the foil with
nonstick cooking spray.
In a medium saucepan, combine the butter, brown sugar,
and vanilla. Heat oven medium-low heat, stirring frequently, until melted. Add
the oats, ground almonds, cinnamon and salt and cook on medium-low for 5
minutes.
Press about 2/3 of the oat mixture evenly into the bottom
of the prepared pan. Set aside.
Make the filling: in a large glass measuring cup, combine
the peanut butter chips and peanut butter. Cover the measuring cup and
microwave the mixture in 30 second increments, stirring frequently, until
melted. Pour all but ¼ cup of the peanut butter mixture onto the prepared oat
crust.
Sprinkle the remaining oat topping over the bars, pressing
down slightly. Top with a drizzle of the remaining peanut butter mixture.
Refrigerate the cookies for at least 4 hours before
cutting into bars.
Recipe from My Incredible Recipes
Friday, July 24, 2020
No-Bake KitKat Squares
Some of the travel restrictions in my area have lessened a bit.
I still am not to sure about being around people, so my husband and I haven’t
done anything very extravagant. We work and stay at home a lot. A couple of weekends ago we did visit my parents
one afternoon and had lunch. We also exchanged gifts for Easter, my parent’s 50th
Wedding Anniversary, and Father’s Day. Needless to say, we were a bit behind on
things!
My parents gave me some KitKats for Easter, along with
some other things. One of the things they gave us were the homemade Take 5
candies that my dad made. They were so good and just perfect, and we ate those
up right away. I figured that I could find a recipe using KitKats, so I went
looking and found a couple of different options. This week I made these no-bake
squares, as I had all of the ingredients on hand.
Ok, so I did have to replace my very stale Vanilla Wafer
Cookies, but otherwise I was good. This is quick to come together and I didn’t
have to turn on the oven. I chose to melt the chocolate with the sweetened
condensed milk on the stove and the mixture got a touch warm, but ok. Maybe the
microwave would have been easier. I made these with KitKats, but you could
certainly use leftover candy as the original recipe suggests. These bars cut
best when cold, and if your house it at all warm, I’d store them in the
refrigerator.
No-Bake KitKat Squares
½ cup butter, melted
8 ounces vanilla wafer cookies
14 ounce can sweetened condensed milk
2 cups chocolate chips
4.5 ounces KitKat Bars (3 packages, or other candy)
Line an 8” square pan with foil and spray the foil with
nonstick cooking spray.
In a food processor, process the vanilla wafer cookies
until they are crumbs. Transfer the crumbs to a separate bowl and add the
melted butter. Mix until well combined. Press the mixture evenly into the
bottom of the prepared pan. Set the food processor aside as you will use it for
the topping.
In the microwave, or on the stove in a small saucepan,
melt the sweetened condensed milk and chocolate chips over low heat. Stir
frequently until the mixture is smooth. Spread the chocolate filling over the vanilla
wafer cookie crust.
To make the topping, place the KitKat Bars in the food
processor and process until crumbly. Top the bars evenly with the KitKat crumbs
and press slightly to adhere. Refrigerate the bars for several hours before
cutting into bars.
Recipe from A Baker’s House
Subscribe to:
Posts (Atom)