Showing posts with label British. Show all posts

Monday, December 16, 2024

Rum Raisin Fudge

Three pieces of British-style brown sugar fudge flaored with rum and raisins

One of the main requests in fudge making this year from my husband is his desire for me to make rum raisin fudge. On the west coast, rum raisin isn’t all that common, but I have seen more examples of it on the east coast and especially in the UK. This is a UK fudge recipe, flavored with rum and raisin, and it is quite different from traditional American-style fudge.

This fudge uses brown sugar (and a lot of it) for the base, which changes the overall texture of the fudge. The original recipe calls for muscovado sugar, which is a type of brown sugar. I was in the British shop and couldn’t recall if I needed muscovado sugar or demerara sugar, but I had already stocked up on regular brown sugar so I ended up using that. I do try to make different British recipes, but the best advice is to stay flexible and use what ingredients are available.

This is one of the fudge recipes that I made that does require the use of a candy thermometer. When I started doing that, I was so worried that I wouldn’t get the temperature correct, but it just requires a little patience to watch and make sure the fudge doesn’t get overcooked. You do want this fudge to crystallize somewhat, which is different than most of the fudge I made. This fudge is quite sticky and sweet, and has that grainy texture that is typical of British-style fudge.

Rum Raisin Fudge
100 grams raisins
3 tablespoons rum
14 ounce can sweetened condensed milk
100 grams butter
 500 grams brown sugar

Line an 8” square pan with parchment and spray the parchment with nonstick cooking spray.

Add the raisins and the rum to a small bowl and allow to soak for at least an hour.     

In a heavy-bottomed saucepan, combine the sweetened condensed milk, butter, and brown sugar. Bring to a boil, stirring all the time to dissolve the brown sugar. Continue stirring (while boiling) for about 10 minutes, until the mixture reaches 235-240 degrees (soft ball stage). The constant stirring will help avoid burning the mixture in the pan.

Once the mixture reaches temperature, remove it from the heat and add the rum/raisin mixture. Stir vigorously until the fudge begins to crystallize and thicken. Pour the mixture into the prepared pan and allow to cool in the refrigerator overnight.

When fully set, remove from the pan and cut into 1” squares. Store in the refrigerator.

Recipe from Woman & Home

Friday, September 6, 2024

Mini Treacle Tarts

A mini treacle tart with a pastry case and a filling of golden syrup and lemon zest, all baked in a mini muffin cup. Photographed on a white plate with blue flowers.

I love making cookies in mini muffin cups, and when I came across this recipe, I knew that it was meant to be. I think I have had a treacle tart before, but I’m not absolutely sure. This is a smaller version, quite simple to make once you get past the somewhat fussy stage of shaping the dough into mini muffin cups. I divide the dough and then use a tart tamper to help coax the dough into the proper shape. It isn’t perfect, but I end up only having to do the smallest of adjustment to the dough by hand.

These are treacle tarts, but the main ingredient is golden syrup. Golden syrup is also called light treacle, but that’s still confusing. I get a lot of questions about what can be used instead of golden syrup. Golden syrup is sugar cane based, whereas corn syrup is corn based, so they are different. Honey isn’t a bad option, and I did end up having to use a tiny bit of honey to make up a cup of golden syrup. It’s still not the same, so if you can find golden syrup at the store, it is best to use that.

You add a small quantity of breadcrumbs to give the filling some structure, so don’t skip that step. It was odd for me as I hadn’t used breadcrumbs in ages and in one week, I ended up making two recipes that needed them! Lemon is the predominant flavor of these tarts, with a subtle flavor of the golden syrup added in. You can top these with a dollop of whipped cream on top, but they were so good they didn’t need that!


Mini Treacle Tarts

10 tablespoons butter, room temperature
1/2 cup sugar
1 egg
1 teaspoon vanilla
1 1/2 cups flour
1/2 cup almond meal
3/4 teaspoon salt
1/2 teaspoon baking powder

1 cup golden syrup
1 tablespoon butter
1 egg
1 tablespoon heavy cream
Zest of 1 lemon
2 tablespoons lemon juice
1/8 cup breadcrumbs

In a large mixer bowl, beat the butter and sugar on medium until light. Add the egg and mix again to combine. In a separate bowl combine the flour, almond meal, salt, and baking powder. With the mixer running on low, gradually add the flour mixture until a dough forms. Remove the dough from the bowl, wrap in plastic, and refrigerate for 2 hours (or overnight).

Heat the oven to 400 degrees. Have a 24-indentation mini muffin pan ready.

Divide the dough between the 24 mini muffin cups. Press the dough into the cup, making sure that the bottom and sides are covered.
In a small saucepan over low heat, warm the golden syrup. Remove from the heat and stir in the butter. Once the butter is melted, allow the mixture to cool for 5 minutes. In a small mixing bowl, whisk the egg and heavy cream. Add the syrup mixture, lemon zest and juice, and breadcrumbs, mixing well. Transfer the filling to a vessel with a pouring spout.

Fill each dough cup about half full, any more than that and they will overflow.

Bake for 10-12 minutes, until the tarts are golden. Allow the tarts to cool in the pan for 10 minutes before removing the tartlets and cooling completely on a wire rack.

Recipe from International Desserts Blog

Friday, August 30, 2024

Chocolate Covered Hobnobs

Hobnobs, a classic British oat cookie, half dipped in chocolate. Photographed on a blue plate.

I was at home the other day, and the house is getting more temperate and I wanted to bake. I really wanted to make Hobnobs, but I had made those already for the blog. I figured I could make the cookies and make change and that would be different. I did a little searching and found that many Hobnobs are chocolate covered, so I thought I would try that. It made sense, as I have seen chocolate covered Digestive Biscuits and other similar items.

This is the classic Hobnob cookie/biscuit recipe that I have used many times. They are the easiest thing to make and I think that they taste better than the packaged variety. I’m always nervous when I look at the recipe and they bake for quite some time, but you do use a lower oven temperature and it always works out. In this case I made the cookies and let them cool, then topped with chocolate.

I used a small amount of chocolate, perhaps less then 100 grams, as I don’t really measure when I am melting chocolate. I typically have extra, but that’s ok. You melt the chocolate and spoon it on the backs of the Hobnobs, and then you want that to set before you drizzle on additional chocolate. I put the Hobnobs in the refrigerator to set the base layer of chocolate, and that made the process very efficient. These cookies are great with the chocolate, great in their original form, just great overall!

Chocolate Covered Hobnobs

140 grams butter
140 grams sugar
1 tablespoon milk
1 teaspoon golden syrup
140 grams flour
1 1/4 teaspoon baking soda
1 teaspoon baking powder
¼ teaspoon salt
110 grams rolled oats
100 grams chocolate, chopped
1 tablespoon vegetable shortening

Heat oven to 300 degrees. Line two baking sheets with silicone baking mats.

In a large mixer bowl, beat the butter and sugar on medium until light. Add the milk and golden syrup and mix again on medium. Whisk together the flour, baking soda, baking powder, and salt. With the mixer running on low, gradually add the flour mixture and then the oats. Stir just until the mixture comes together.

Shape the dough into 1-1/2 tablespoon balls and place on the prepared baking sheets.

Bake for 22-25 minutes, until the cookies are light brown. Allow the cookies to cool on the baking sheet for 10 minutes and then remove to a wire rack to cool completely.

Once the cookies are cool, place the chocolate and vegetable shortening in a medium bowl. Microwave in 30 second increments, stirring frequently, until the chocolate is smooth. Spoon a small amount of melted chocolate on the backs of the cookies and use a small metal spatula to smooth the chocolate over the back of the cookie. Allow the chocolate layer to cool slightly and then drizzle the remaining chocolate over the chocolate layer of the cookies.

Recipe adapted from The English Kitchen

Friday, December 22, 2023

Sticky Toffee Spice Cookies

A row of sticky toffee pudding cookies, spiced cookies with dried fruits and drizzled with white chocolate. Photographed on a white plate with a red and green border.

Sticky Toffee Pudding is a classic British dessert, but I suppose this time of year it is more common to have a Christmas pudding with a festive meal. I like both, but honestly, you can’t eat too much Christmas pudding as it is so rich. One time when my husband and I were in England we went to Betty’s Tearoom and got a Christmas pudding. It was absolutely wonderful, and it is traditional to light it afire. Nothing says Christmas like lighting something on fire!

I love Sticky Toffee Pudding just as much, although it uses dates rather than a mixture of dried fruits. I did have chopped dates (because you certainly don’t want to cut dates yourself!) but I had the mix of dried fruits used for fruitcake right on the counter, so I used that. The fruitcake blend has a lot of dates, so I figured I would be good. This recipe is flexible so you can use what is available to you.

I also changed the spices somewhat. I don’t like cardamon, so I used ginger instead. I also used Chinese Five-Spice in place of garam masala. Again, use what you like! I ended up making a double batch of these, about 60 cookies, so my husband could take some to a lunch gathering at work. These cookies are SO GOOD! They do taste like the holidays, and they were good with the mixed dried fruit. I’m glad there were a lot of these left, as they are tasty and you just keep eating them.

Sticky Toffee Spice Cookies

1/4 cup rolled oats
1 1/4 cups flour
3/4 teaspoon baking soda
1/2 teaspoon salt
1/2 teaspoon cinnamon
1/2 teaspoon ginger
1/2 teaspoon cloves
1/4 teaspoon Chinese Five-Spice
1/2 cup butter, room temperature
1/4 cup sugar
1/2 cup packed brown sugar
1 egg
2 tablespoons molasses
1 teaspoon vanilla
1 cup chopped pecans
1/2 cup toffee bits
1/2 cup caramel bits
1/2 cup chopped dates (or dried fruit)

1/2 cup white chips
1 teaspoon shortening

Heat the oven to 350 degrees. Line two baking sheets with silicone baking mats.

Place the oats into a food processor and finely grind the oats. Combine the oats in a medium bowl with the flour, baking soda, salt, cinnamon, ginger, cloves, and the Chinese Five-Spice.

In a large mixer bowl, beat the butter, sugar, and brown sugar on medium until light. Add the egg, molasses, and vanilla and stir until blended, about one minute. With the mixer running on low, gradually add the oat/flour mixture. Fold in the pecans, toffee bits, caramel bits, and dates with a spatula.

Shape the dough into 1-1/2” balls and place on the prepared baking sheets.

Bake for 12-14 minutes, until beginning to brown along the edges. Allow the cookies to cool on the baking sheet for 10 minutes before removing to a wire rack to cool completely.

Once the cookies are cool, make the drizzle: in a small microwave-safe bowl, combine the white chips and shortening. Melt in the microwave, stirring frequently, until the mixture is smooth. Drizzle over the cooled cookies.

Recipe from Go Bold with Butter

Monday, December 19, 2022

Mincemeat Shortbread

Three Mincemeat Shortbread Bars, photographed on a red and green mitten-shaped plate

Christmas Cookie #9! I recently took a cooking class at the King Arthur Flour baking school in the Skagit Valley, which was so much fun! I find that it’s odd that King Arthur has two cooking schools, and one is in a little-known location that is close to me. I’m not complaining, and I learned how to make (American) biscuits and scones. All of the baking was done without a mixer, and I tried that with this shortbread.

This is a simple recipe, cut in the butter and then add the other elements. At the class, they used a pastry cutter, but it was different than the one I remember. The teacher explained that the pastry cutter that has wires is meant for lard, where the sturdier ones are good for butter. The wire doesn’t hold up to butter near enough.

I mixed this in a bowl, using my modern pastry cutter, but I think that my bowl was a little too small and it was hard to get the butter fully cut in. The mixture was crumbly when I was done, so I ended up adding a couple tablespoons of heavy cream to bring it together. It baked up just fine, and as shortbread it is on the crumbly side. This is a great way to use some extra mincemeat that you have around!

Mincemeat Shortbread
225 grams flour
1 teaspoon baking powder
¼ teaspoon ginger
110 grams butter, room temperature
50 grams brown sugar
Zest of half an orange
140 grams mincemeat
Heavy cream or milk

Heat the oven to 350 degrees. Line an 11” x 7” pan with foil and spray the foil with nonstick cooking spray. You could also use a 10” diameter round pan if you would prefer.

In a medium mixer bowl, whisk together the flour, baking powder, and ginger. Cut the butter into small pieces and add to the mixture. Mix on low until the dough becomes crumbly. Add the brown sugar and orange zest and stir to combine. Add the mincemeat and stir on low until the dough comes together. If needed, add heavy cream to help the dough come together. Press the dough into the prepared pan.

Bake for 25-30 minutes, until golden. Cool before cutting into bars in the pan.

Recipe from Falcondale Life

Wednesday, December 7, 2022

Candied Fruit Cookies

Two spiced cookies flavored with currants and candied peel, photographed on a white plate with a small green tree with a gold star.

Christmas Cookie #4! For those who read this blog regularly, it shouldn’t be a surprise that I like fruitcake. I often make some cookies that have fruitcake ingredients, and I now make a fruitcake bar cookie instead of a large Christmas cake, as it is a lot easier, and you don’t have the crazy-sweet icing to contend with. I saw these fruitcake cookies and liked them, but they used the red and green (American) candied fruit that you can find this time of year. I don’t like that, but I knew I could substitute something I did like.

This recipe called for 1 cup of the red/green candied fruit, but we rarely use candied fruit at all, instead use raisins, currants, dates, dried cherries, and that sort of thing. I did have some mixed candied peel from Marks and Spencer, so I used half a cup. I love currents and added those as well, to make 1 cup. The nuts were original to the recipe, and I do think they add a nice crunch.

I had thought about making a half a batch, and that would have been a good idea as this made about four dozen cookies. I’m not sure if it is due to the use of vegetable shortening, but these cookies are the most perfect looking treats that I have ever made! I love the flavors of the season: cinnamon, nutmeg, and the currants and candied peel add just enough sweetness. They aren’t over-the-top sweet and I prefer that. Use whatever dried/candied fruits you like, but don’t miss out on these!

Candied Fruit Cookies
2 1/2 cups flour
1 teaspoon baking soda
1 teaspoon salt
1/2 teaspoon cinnamon
1/2 teaspoon nutmeg
1/4 teaspoon ground cloves
1/4 teaspoon all spice
1 cup vegetable shortening
3/4 cup sugar
3/4 cup packed brown sugar
2 eggs
1 teaspoon vanilla
1/2 cup candied mixed peel
1/2 cup currants
1/2 cup chopped pecans

Heat the oven to 350 degrees and line two baking sheets with silicone baking mats.

In a medium bowl, whisk together the four, baking soda, salt, cinnamon, nutmeg, cloves, and all spice; set aside. In a large mixer bowl, combine the vegetable shortening, sugar, and brown sugar. Mix on medium until light. Add the eggs and vanilla and mix on medium to combine. With the mixer running on low, gradually add the flour mixture, about ½ cup at a time, until almost completely incorporated. Add the mixed peel, currants, and pecans and mix with a spatula until the dough comes together.

Scoop the dough onto the prepared baking sheets, making about a 1 ½-inch ball.

Bake for 11-13 minutes, until very lightly browned. The cookies will bake a little more as they cool, so do not over bake. Allow to cool on the baking sheets for 5 minutes before removing to a wire rack to cool completely.

Recipe from Simply Whisked

Monday, December 5, 2022

Mincemeat Oatmeal Thumbprints

Oat Cookie with a Mincemeat Filling. Photographed on a holly leaf plate.

Christmas Cookie #3! One of my greatest sadness is that mincemeat isn’t something that is around all the time. I suppose I understand if you don’t like raisins, and don’t want to deal with mincemeat, but otherwise, I don’t really worry a lot about seasonality. Our local British shop does make and sell mince pies all year round, and I usually have some mincemeat in the refrigerator, so I am never at a loss.

This year, my husband purchased a couple of varieties of mincemeat from Marks & Spencer, which thankfully we can get shipped to the States. These thumbprint cookies used the classic mincemeat, but we also have brandy and clementine mincemeat that we will use for other recipes. This didn’t use very much mincemeat, so I have some left over for another purpose. I would like to try making my own mincemeat, but I haven’t had the time to do that yet.

From starting out not being the biggest fan of thumbprint cookies, I have grown to love them. Making an oatmeal cookie into a thumbprint is a great idea, and the oat balances the sweetness of the mincemeat. When you shape the thumbprint, you have to hold on to the dough and reshape it into a circle after making the indentation. That makes a rustic looking cookie, which is fine by me! The oat cookie is crunchy, but the mincemeat maintains its softness, which makes for a wonderful holiday cookie.

Mincemeat Oatmeal Thumbprints
1/2 cup butter, room temperature
1/2 cup sugar
1/2 cup packed brown sugar
1 egg
1/2 teaspoon vanilla
1 1/2 cups oats
1 cup flour
1/4 teaspoon salt
1/2 teaspoon cinnamon
1/2 teaspoon baking powder
1/2 teaspoon baking soda
About ½ cup mincemeat

In a large mixer bowl, add the butter, sugar, and brown sugar. Mix on medium until combined. Add the egg and vanilla and mix again on medium to incorporate. In a separate bowl, whisk together the oats, flour, salt, cinnamon, baking powder, and baking soda. With the mixer running on low, gradually add the oat/flour mixture and mix until the dough comes together. Wrap the dough in plastic wrap and refrigerate an hour, or overnight.

Heat the oven to 375 degrees. Line two baking sheets with silicone baking mats.

Shape the dough into 24 pieces, forming a ball about 1-1/2 inches in diameter. Flatten the balls slightly and make an indentation in the center of each with your thumb or similar implement. Fill each indentation with about 1 teaspoon of mincemeat.

Bake for 11-13 minutes, until the cookies start to brown along the edges. Allow the cookies to cool on the baking sheets for 10 minutes before removing to a wire rack to cool completely.

Recipe from A Pretty Life

Friday, April 22, 2022

Ginger Layer Shortbread

Shortbread cookie with a ginger filling, pictured on an orange plate

I occasionally browse British and similar ex-pat blogs for recipes that are just a little different. I usually can find new and interesting recipe, and oftentimes I have the ingredients I need on hand, something similar, or ask for an ingredient that I can buy at the local British shop. This recipe falls into that category and was one of the easiest recipes that I have ever made.

While the originator of this recipe is Irish, although they now live in the states. Typically, seeing the word “traybake” tells me that the person comes from the British Isles or perhaps Australia, and that is the name of their blog. I suppose in Australia it is more common to see “slices” but traybake is not a term used here in the states. The recipe measurements are in grams, which I think makes everything easier. The original recipe called for ginger marmalade, which they have at the British store, but I already had ginger curd on hand, so I used that.

The strangest thing about this recipe is that it called for a 7” square pan, which isn’t a size I have. I do have an 8” square pan, but that’s a third more volume than the original pan would be. The easiest solution was to simply make 1.3 times the recipe and use my 8” pan. That leads to some strange quantities, but in grams it matters little. Even with the slightly larger pan, this recipe makes a petite quantity, about 15 cookies. These bars are the perfect shortbread, not too sweet, with the ginger providing an extra element of flavor. Yes, they are slightly crumbly, but worth the crumbles.

Ginger Layer Shortbread
290 grams flour
¼ teaspoon salt    
143 grams butter, cut into pieces
110 grams sugar
About ½ cup ginger curd/marmalade

Heat the oven to 350 degrees. Line an 8” square pan with foil and spray the foil with nonstick cooking spray.

In a large mixer bowl, mix the flour and salt. Add the sugar and butter and mix until the dough is crumbly. Divide the dough into two halves, and press half of the dough into the prepared pan. Dot the bottom crust with ginger curd/marmalade and spread as evenly as possible. Crumble the remaining dough on top of the ginger filling and press down slightly.

Bake for 40-45 minutes. The bars will be slightly golden but do not brown significantly.

Remove the bars from the pan and cut into squares.

Recipe from Traybakes & More

Friday, April 8, 2022

Browned Butter Peanut Caramel Chocolate Chip Cookies

Chocolate Chip Cookie made with browned butter, chopped chocolate, peanuts, and caramel, pictured on a blue flower-shaped plate

A while ago, I picked up a bag of Nestle Mix-ins, which was a combination of chocolate chips, caramel pieces, and peanuts. Previously, I had only seen holiday themed varieties, and that just wasn’t right at the time. I knew I could do something with this combination and took them home with me. They have been in the kitchen and my husband sent me a couple of recipes that we thought we could adapt to what we had. This one was great as it had many of the same elements. My bag of mix-ins was 225 grams, which was less than the 425 grams in the original recipe. I added some chopped chocolate, and if I would have had peanuts on hand that would have also been good. They were absolutely fine as they were.

The first step of this recipe is to make a simple caramel by melting sugar. I’ll be honest, caramel can be fussy. Sometimes the sugar burns before it melts! This time I stirred the sugar when partially melted, and this helped so that nothing burned. It cooled beautifully on the baking sheet. When you bash it up or cut it up, the pieces are quite sharp! They also break and go everywhere, so now my kitchen is covered with shards of sticky caramel.

The original recipe warns that you shouldn’t refrigerate these much longer than the two hours specified in the recipe, as they caramel starts to soften. I baked the cookies in two halves, one after two hours and the next day. Honestly, I didn’t notice much of a difference. It didn’t seem like the caramel softened, and the cookies retained their crunch. The caramel bits on the edges of the cookies do get a little oddly shaped, but you can quickly reshape the cookies while they are warm. These cookies have a great combination of different flavors, and each bite is a little different. I’d be curious how tasty they are with even more peanuts, but they are great as it is.

Browned Butter Peanut Caramel Chocolate Chip Cookies
200 grams sugar

225 grams butter
150 grams sugar
150 grams brown sugar
2 eggs
2 egg yolks
1 teaspoon vanilla
350 grams flour
3/4 teaspoon baking powder
3/4 teaspoon baking soda
1 teaspoon salt
225 grams/1 package Nestle Chocolate/Peanut/Caramel Mix-ins
125 grams dark chocolate, chopped

Make the caramel: place the 200 grams of sugar in a medium-large saucepan. Heat over medium-low heat, until the sugar is melted. I found it best to stir the sugar once it was partially melted, otherwise it could burn. When melted, the sugar will be a deep amber color. Spread the mixture on a baking sheet lined with a silicone baking mat. Allow to cool for 30 minutes, until it hardens.

Make the cookie dough: in a medium saucepan over medium-low heat, melt the butter. Once the butter has melted, continue to cook the butter, stirring occasionally, until the butter smells nutty and is golden brown. Don’t look away as the mixture can go from golden to burnt very quickly. Pour the browned butter and any browned bits into a bowl and cool for 10 minutes.

In a large mixer bowl, beat the browned butter, sugar, and brown sugar on medium to combine. Add the eggs, egg yolks, and vanilla and stir to combine. With the mixer running on low, gradually add the flour, baking powder, baking soda, and salt.

Add the Nestle mix-ins and chopped chocolate. Bash/chop the cooled caramel into small pieces and add to the dough. Stir on low until the additional ingredients are incorporated.

Wrap the dough in plastic wrap and refrigerate for two hours.

Heat the oven to 350 degrees and line two baking sheets with silicone baking mats.

Shape the dough into mounds, about 1-1/2 tablespoons and place on the prepared baking sheets. I placed about 8 cookie per baking sheet, so they would have space.

Bake for 12-16 minutes, until set. You don’t want to over bake the cookies, as the caramel gives the cookies a good crunch. Cool on the baking sheet for 10 minutes before removing to a wire rack to cool completely.

Recipe from The Boy who Bakes

Friday, February 4, 2022

Bakewell Blondies

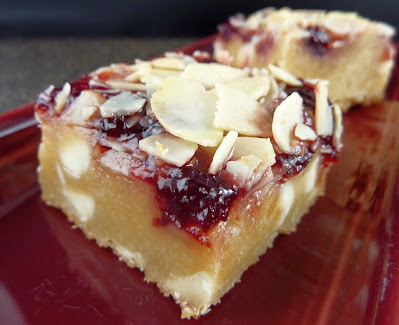
Photo of a Bakewell Blondie: a cookie base with white chocolate chips, topped with cherry jam and sliced almonds. Photographed on a burgundy plate.

Welcome to February! I thought that for this month I would pick recipes that include cherries or berries in some form. I have some great items picked out. I actually have more recipes than I need for this month, but it is always nice to have options. I’m surprised that many of the cookies are listed as Christmas cookies, but I don’t think so at all. If you make a Christmas cookie in February, is it still a Christmas cookie?

This blondie is not one of the recipes that described itself as a Christmas cookie. The Bakewell Tart is one of my favorites, and when I visit the British shop, I almost always buy one of their Bakewell Tarts. I have made another cookie version of the Bakewell Tart, but not a blondie like this one. As it is a British recipe, the measurements are in grams, which is actually easier to work with as long as you have the appropriate scale.

For the Bakewell Blondies, you can use any type of jam. I suppose that raspberry jam is the most classic choice, but I ended up using cherry jam as I really like cherry jam. The original recipe called for three medium (British) eggs, so I changed that to two large (US) eggs. I don’t think that I would have wanted any more than that. I baked these for 30 minutes, and when I cut them, I think they could have baked slightly longer. None the less, they cut beautifully and taste great. They have all of the great flavors of a Bakewell Tart: the jam, ground almonds, and the sliced almonds. I’m also a big fan of icing, so perhaps that is the only way I could improve these, but maybe that would just be too much.

Bakewell Blondies
250 grams butter, melted
125 grams sugar
125 grams brown sugar
2 eggs
1/2 teaspoon almond extract
100 grams ground almonds
200 grams flour
1 tablespoon cornstarch
200 grams white chocolate chips
250 grams berry Jam
50 grams sliced almonds

Heat the oven to 350 degrees. Line a 9” square pan with foil and spray the foil with nonstick cooking spray.

In a large mixer bowl, combine the melted butter, sugar, and brown sugar. Beat on medium until smooth. Add the eggs and almond extract and beat again to combine. Add the flour, ground almonds, and cornstarch and mix on low until the dough comes together. Stir in the white chocolate chips with a spatula.

Spread the mixture evenly into the prepared pan. Top with dollops of jam and lightly swirl through the blondie mixture. Top with sliced almonds.

Bake for 25-30 minutes, until there are baked but still have a slight wobble in the center of the blondies. Cool completely, then chill in the refrigerator before cutting into bars.

Recipe from Jane’s Patisserie

Friday, January 14, 2022

Malteser Biscuits

Malteser Biscuits

I have a couple of recipes planned for this month. One of the recipes that I am planning to make had a couple of ingredients that I still need to purchase, so I looked at the alternatives. We had recently visited our local British shop and had picked up a couple of items that I would use for baking. One of the potential recipes used the Maltesers that I had picked up and I had all of the other ingredients, so that was my choice for this week.

This is an Australian recipe, which is an interesting combination of weight measurements and volumetric measurements and also used self-rising flour. Since this used a combination of plain and self-rising flour, I just translated it to plain flour, baking powder, baking soda, and salt. The original recipe called for 250 grams of butter, which is more than two sticks of butter. Two sticks seemed like a lot, so I used one cup and the recipe turned out fine.

If you are unfamiliar with Maltesers, they are chocolate covered malt balls, similar to Whoppers sold in the states. Since the Maltesers are round, they are very hard to chop! Instead, I crushed them with the side of my chef’s knife and that was very easy. The addition of sweetened condensed milk is unusual, but the cookies aren’t too sweet, which is typical of recipes from the UK and Australia. I really like these cookies, crunchy but not too sweet, perfect with a cup of tea.

Malteser Biscuits
1 cup butter, room temperature
1/3 cup sugar
1/3 cup packed brown sugar
½ cup sweetened condensed milk
2 teaspoons vanilla
2-1/2 cups flour
2 teaspoons baking powder
½ teaspoon baking soda
½ teaspoon salt
165 grams Maltesers, chopped

Heat the oven to 350 degrees. Line two baking sheets with silicone baking mats.

In a large mixer bowl, combine the butter, sugar, and brown sugar. Beat on medium until light. Add the sweetened condensed milk and vanilla and beat again on medium to incorporate. With the mixer running on low, gradually add the flour, baking powder, baking soda, and salt. Fold in the crushed Maltesers with a spatula.

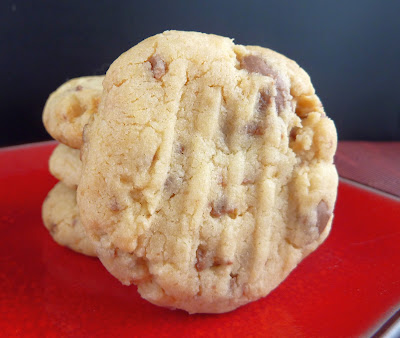
Shape the dough into balls and place on the prepared baking sheets. With the tines of a fork, press the biscuits down slightly, also making a decorative pattern.

Bake for 12-14 minutes, until lightly golden. If baking more than one sheet of cookies at a time, rotate the baking sheets half-way through the bake. Allow the cookies to cool on the baking sheet for 10 minutes before removing to a wire rack to cool completely.

Recipe from Taste.com (Australia)

Friday, December 24, 2021

Christmas Chocolate Tiffin

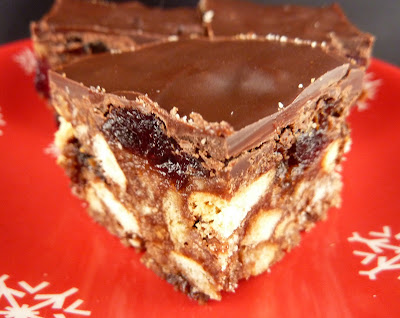
Christmas Tiffin: a no-bake bar cookie with brandy, candied cherries, and crushed tea biscuits, topped with chocolate.

What is a tiffin? I have had multiple people ask me what a tiffin is, and the short answer that it is a no-bake bar cookie whose main component is biscuits (or cookies, as we call them in the states). This is a great recipe in that it combines the ease of the tiffin with the flavors of Christmas such as brandy, chocolate, and candied cherries. Now I find all sorts of tiffin recipes that sound good, and I can’t wait to try some once the weather is warmer.

As is often the case with British recipes, I don’t convert grams to ounces or volume measure. In a way, I think this is easier as I have my scale and a single cup to measure. It makes for less washing and right now that is appreciated. I did buy glacé cherries and the Rich Tea biscuits from the UK, and golden syrup is also British in origin. The British cherries looked so much better than the weird, bright red candied cherries that we get here in the states. I also wonder if the topping could be any sort of chocolate, or some sort of semi-sweet chocolate? I’m sure it would work.

I was slightly delayed in making this tiffin as I kept forgetting gallon sized Ziplock bags at the store! After what seemed like the twentieth trip to the store, I finally got them home with me. I had already soaked the candied cherries and raisins in brandy, but I figured that they would be just fine if they were in the brandy a little bit longer. Oh, and as sticky as candied cherries are, don’t forget to cut them in half. That was not fun when they were both sticky and soaked with brandy. This tiffin needs some time to chill in the refrigerator, to make sure it sets properly, so this isn’t the recipe to make at the last minute. These squares are very rich, with chocolate and candied cherries, but I love the bites with little bits of crushed tea biscuits!

Christmas Chocolate Tiffin
200 grams glacé/candied cherries
125 grams raisins
80 ml brandy
300 grams Rich Tea biscuits
150 grams butter
40 grams brown sugar
200 grams golden syrup
25 grams cocoa powder

100 grams dark chocolate
100 grams milk chocolate

Line an 8” square pan with aluminum foil and spray the foil with nonstick cooking spray.

Cut the candied cherries in half and place in a small microwaveable bowl. Add the raisins and the brandy and microwave for 30 seconds. Allow to stand for 5 minutes before proceeding.

Put the biscuits in a large ziplock bag and bash with a rolling pin or similar object until the biscuits are a combination of powdery bits and larger pieces. The powdery pieces help the tiffin stick together, so don’t be concerned with pulverizing the biscuits too much.

In a medium saucepan combine the butter, brown sugar, and golden syrup and heat on medium until smooth. Remove the pan from the heat and stir in the crushed biscuits and the cocoa powder, mixing until the tiffin has an even color. Add the fruit/brandy mixture and mix.

Press the mixture into the prepared pan and refrigerate until set.

Make the topping: remove the tiffin from the pan and remove the foil. In a medium bowl, microwave the dark and milk chocolate, stirring frequently, until smooth. Top the tiffin with melted chocolate, spreading evenly to ensure complete coverage. Allow the chocolate to set before cutting the tiffin into squares.

Recipe from Everyday Cooks

Wednesday, December 22, 2021

Mince Pie Bakewell Squares

Mince Pie Bakewell Squares

I love a Bakewell Tart. It was the first recipe that I posted on my blog! Someday, when the time is right to travel again, I hope to visit Bakewell, England where the tart originated. In the meantime, it’s fun to come across different recipes that are inspired by the Bakewell Tart. While I most commonly have the Bakewell as a little tartlet, there are quite a few bar cookie Bakewell recipes. I love that in Australia they are called slices. If I see the word slice in a recipe, I know it’s likely from there.

This is a British recipe, through and through. Some of the ingredients I do buy from British companies, such as the Mincemeat. I use the Rum and Brandy version from Crosse & Blackwell. I know there are other brands, but I stick with what works. Each year my husband and I plan to make our own mincemeat, but that never happens. And if you’re worried, there is no meat in mincemeat. Think of it as a spicy applesauce with raisins.

You top these squares with sliced almonds, which are called flaked almonds in the UK. While this may not sound any different, there is a difference to be aware of. The sliced almonds that you get in the States have the skin on them, where the flaked almonds in the UK do not have skins. I think they look better without the skins, but for a small quantity either will work. I think that this is a wonderfully festive version of the Bakewell Tart, and it really isn’t Christmas unless you have something with mincemeat!

Mince Pie Bakewell Squares
150 grams cold butter, cut into cubes
300 grams flour
35 grams sugar
3 tbsp ice water

250 grams butter, room temperature
250 grams sugar
3 eggs
1 teaspoon almond extract
125 grams self-rising flour*
125 grams ground almonds
½ tsp baking powder
400 grams mincemeat
50 grams flaked/sliced almonds

3 tablespoons powdered sugar
Water to make a thick paste

Line a 9” x 13” baking pan with foil and spray the foil with nonstick cooking spray.

Make the pastry: in a large food processor, combine the butter cubes, flour, and sugar. Pulse to combine. Add the ice water and pulse until the dough comes together. Press the dough into the bottom of the prepared pan and prick all over with a fork. Chill for 30 minutes.

Heat the oven to 350 degrees.

Bake for 15 minutes, until beginning to brown. Remove from the oven but leave the oven on.

Make the cake: In a large mixer bowl, beat the butter and sugar on medium until light. Stir in the eggs and almond extract. With the mixer running on low, gradually stir in the flour, ground almonds, and baking powder.

Spoon the mincemeat evenly over the partially baked pastry. Carefully top the mincemeat with the cake batter, and then sprinkle with flaked almonds.

Bake for 35 minutes, until golden brown. Cool completely on a wire rack. Once the bars are cool, mix the powdered sugar and water and pipe over the bars in a zig zag pattern. Allow the icing to set before cutting into bars.

*I make my own self-rising flour by combining 2 cups of flour, 2 teaspoons baking powder, ½ teaspoon baking soda, and ½ teaspoon salt

Recipe from The Baking Explorer

Friday, March 19, 2021

Simple Jammy Biscuits

Jammy Biscuits: thumbprint cookie filled with red jam to celebrate Red Nose Day

We sure have had all sorts of weather here in the Pacific Northwest: rain, snow, some sun, even hail! I think everything keeps adding up: the weather, staying home, not seeing people, etc. I went to a meeting and there was an interesting conversation about what our work would look like after the pandemic, and that’s an interesting question. Some of my work involves people directly, but some of it doesn’t. One thing is for sure: I can’t wait to bake for people again!

There are lots of recipes out there that make small batches, and I have found that British cookbooks/recipes are a good source as most folks in the UK have a smaller oven, which leads to smaller batches. This recipe was in one of the British food magazines that we get, and it was beautifully simply. The cookie is for Red Nose Day, which is in today March 19! Red Nose Day is a fundraiser, primarily in the UK, uses the power of laughter as they base of their fundraising. For information, you can visit https://comicrelief.com.

For these cookies, and jam would work, but I used some tasty huckleberry jam that I got for Christmas. I made the dough in the food processor and it was too crumbly to form into a log, so I mixed in an additional egg yolk, shaped the dough, and then refrigerated it for a bit. The dough is a touch stickier, but it worked. I cut just 12 cookies, and they were quite thick! They spread a lot so next time I will not make them so thick. Like many British recipes, these cookies aren’t too sweet, but the jam adds that extra touch of sweet. They are on the big side, but very tasty none the less!

Simple Jammy Biscuits
200 grams self-rising flour*
100 grams sugar
100 grams butter
1 egg, beaten
4 tablespoons jam

Heat the oven to 375 degrees. Line a baking sheet with a silicone baking mat.

In a food processor, pulse the flour, sugar, and butter until the mixture is crumbly. Add the egg and pulse until a stiff dough comes together. Shape the dough into a log, about 2 inches in diameter. Cut into ½ inch slices and place on the prepared baking sheet.

Make a small indentation in the top of each cookie and fill with about a teaspoon of jam. 

Bake for 10-15 minutes until golden. Remove to a wire rack to cool completely.

*I make my own self-rising flour by combining 2 cups of flour, 2 teaspoons baking powder, ½ teaspoon baking soda, and ½ teaspoon salt

Recipe from BBC Easy Cook


Friday, January 22, 2021

White Chocolate and Caramel Blondies

Photo of White Chocolate and Caramel Blondies

I’ve said it before and I will say it again, I am SO looking forward to a time when I can go out and do things and see people. I am fortunate that my job continues, but I miss many parts of life before lock down. I am hopeful that the vaccine will be what we are waiting for and folks I know are starting to get their doses. I can’t wait to go to a restaurant, to a shop, to see my parents, or to travel. I hope we have started to turn the tide.

I had some white chocolate that I wanted to use in a recipe, so I went searching for some different options. It’s not unusual that I bake with white chocolate, but it can be so sweet that it is critical to mix it with other flavors. I thought about some sort of white chocolate blondie, and I found a couple of ideas. I ended up choosing this one, as it also contained caramel, and I had some of that remaining in the refrigerator. This recipe ended up calling for more white chocolate than I originally had, but it was just the perfect amount for that opened bag of white chocolate chips I had!

As this is a British recipe, the measurements are in grams. This is more accurate, and if you don’t have a metric scale, I really encourage you to get one! You can also use Google to get equivalents, but that lacks some of the sparkle. It seems like most things I make these days is quick, and this is no exception. Swirling the caramel on top of the bars will look different, depending on how much you swirl it about. To avoid too much stickiness, I decided to refrigerate the bars before cutting. That does make the bars quite solid, but it takes care of the bars being too sticky to cut. These bars are on the sweet side, but the caramel adds other flavors as well. Perhaps I would use one less egg, as US eggs are typically bigger than UK eggs, but really, I wouldn’t change much.

White Chocolate and Caramel Blondies

200 grams butter, melted and slightly cooled
125 grams sugar
125 grams brown sugar
3 eggs
275 grams flour
1 tablespoon cornstarch
200 grams white chocolate Chips
150 grams caramel sauce

Heat the oven to 350 degrees. Line a 9” square pan with foil and spray the foil with nonstick cooking spray.

In a large mixer bowl, bear the butter, sugar, and brown sugar on medium until smooth. Add the eggs and beat on medium again, until incorporated. Add the flour and cornstarch and mix on low to combine. Fold in the white chocolate chips.

Spread the mixture evenly in the prepared pan. Top with dollops of caramel sauce and swirl the caramel through the batter.

Bake for about 25-30 minutes, until they are set along the edges. The center may still be slightly soft. Cool completely on a wire rack before cutting into blondies.

Recipe from Jane’s Patisserie

Friday, January 15, 2021

Coconut and Jam Macaroon Bars

Photo of Coconut and Jam Macroon Bars

The gloomy and rainy weather here makes it hard to get motivated to get a lot accomplished, but I have good days and less productive days. I often think that I just want to bake, but I really don’t need that many baked goods around the house. We’re still working through the last of the Christmas items! I’ve had this recipe bookmarked for a while and it makes a fairly small batch. I haven’t made macaroons for a while, and never as a bar cookie.

Desiccated coconut is probably something that you aren’t very familiar with. It’s very common in recipes from the UK, but not so much here in the states. It is a finer ground coconut than you typically find at the store, and it is unsweetened. I have a European market fairly close that carries it, but not everyone is so lucky. If you can’t get desiccated coconut, you can put “American” coconut in the food processor and process it until it’s more finely ground. It may be a touch sweeter, but it will work.

These bars come together quickly, as I was able to mix them up in the time it takes me to make breakfast. Honestly, weighing ingredients and separating the eggs takes the longest and that’s pretty quick. These bars are also easy to make dairy-free, as long as the chocolate you use doesn’t contain dairy. Getting the jam nestled into the bars is…interesting, but don’t worry if it isn’t perfect. They look great when baked. They are on the sticky side, and a little challenging to cut, but they are certainly worth the effort.

Coconut and Jam Macaroon Bars
250 grams sugar
4 beaten egg whites
1 teaspoon vanilla
¼ teaspoon salt
300 grams desiccated coconut
25 grams flour
About ½ cup raspberry jam
3 ounces dark chocolate
1 tablespoon vegetable shortening

Heat the oven to 350 degrees. Line a 20- by 30-centimeter pan with foil and spray the foil with nonstick cooking spray.

In a large mixer bowl, combine the sugar, egg whites, vanilla, and salt and stir to combine. Add the coconut and flour and mix on medium until thoroughly combined. The mixture will be thick. Spread the mixture evenly in the prepared pan. Dot the jam over the cookie base with a teaspoon, nestling the jam into the bars.

Bake for about 23-25 minutes, until the bars are golden around the edges. Allow the bars to cool on a wire rack completely.

Combine the chocolate and shortening in a microwave-proof bowl and melt the chocolate in the microwave, stirring frequently. Drizzle the melted chocolate over the cooled bars and allow the chocolate to cool before cutting into bars.

Recipe from BBC Good Food

Friday, August 28, 2020

Custard Cream Blondies


I have two blondie recipes that are quite similar, both from Olive Magazine and both using classic British biscuits/cookies. I posted one a couple a weeks ago, and this is the second recipe. This recipe uses custard cream biscuits, which as the classic tea cookie in the UK. I normally have little trouble finding custard creams, but when I first looked everyone was sold out. Thankfully, they were available on my most recent trip to the British store. I know that I can have difficulty finding some items during the COVID Pandemic, and I am sure that it true for stores as well.

This recipe, like many British recipes, calls for two different types of sugar. It calls for Muscovado sugar and golden caster sugar. I thought I was good, but I actually have Demerara sugar, which is not what this recipe uses. Caster sugar is like our regular sugar, or perhaps superfine sugar, so I just substitute sugar. The “golden” part indicates some molasses, but brown sugar is too moist. Muscovado sugar is sugar with molasses, so for that you could use brown sugar. In the end, I simply used (caster) sugar for the two different types of sugar.

This recipe has you make the dough on top of the stove and then bake them. I melted the butter, sugar, and custard powder and then let it cool. I added the first egg and I immediately got scrambled eggs. Obviously, my mixture was too warm, so I tried it a second time and gave the mixture lots of time to cool. That worked, although it had slightly crystallized and I had to stir it a lot to get it mixable. Mixing this by hand is quite the workout, but I suppose it is good for me to do that occasionally. My pan is slightly smaller (20 x 29 cm, and a tart pan) so I baked mine on a cookie sheet and had a small amount of spillage. They came out great and they are very tasty, with a good custard flavor. It would be interesting to see how these differed if you used different sugars, but that’s a job for another day.

Custard Cream Blondies

175 grams butter
325 grams sugar
¼ cup custard powder
2 eggs
2 teaspoons vanilla
250 grams self-rising flour*
15 custard cream biscuits, chopped and divided
150 grams white chocolate chips

Heat the oven to 355 degrees. Line a 20 x 30 cm baking pan with foil and spray the foil with nonstick cooking spray.

In a large saucepan, melt the butter, sugar, and custard powder over medium-low heat until smooth. Remove from the heat and allow to cool for 10 minutes. Stir in the eggs, one by one, combining well after each addition. Add the vanilla and flour and mix with a spatula until smooth. The mixture will be very thick.

Stir in 2/3 of the chopped custard creams and the white chocolate chips and stir to incorporate throughout the batter. Spread the mixture evenly in the prepared pan and top with the remaining chopped custard cream biscuits.

Bake for about 30 minutes, until the cookies are golden, and a thin knife inserted into the blondies comes out almost clean. Allow the blondies to cool before cutting into squares.

* I make my own self-rising flour by combining 2 cups flour, 2 teaspoons baking powder, ½ teaspoon baking soda, and ½ teaspoon salt.

Recipe from Olive Magazine