Showing posts with label Christmas Cookies. Show all posts

Friday, December 19, 2025

Christmas Smash Sugar Cookies

Sugar cookies rolled in holiday sprinkles and smashed down before baking, then drizzles with glaze.

When I choose cookies to make for the holidays, I inevitably pick a recipe that I end up not making. I find a different recipe, or I end up not having a needed ingredient, or something else happens. That’s fine with me- there are lots of cookie recipes out there that I want to try. I got a Food Network email about the Top 100 cookies. How could I resist that?

This recipe was the one featured in that email, but there are lots of other interesting cookie recipes. I did one other “smash” recipe, and those turned out well, so this was intriguing. These cookies are a basic sugar cookie that you then roll them in sprinkles. I compiled several different types of sprinkles, and that seemed to work. 

My challenge was to find room in my refrigerator for two baking sheets. I ended up making my refrigerator a giant game of Jenga, shuffling stuff around and balancing one baking sheet on the top of my egg carton. Whatever works! You then smash down the cookies before baking and then drizzle with powdered sugar glaze. These are super festive and cheerful, and I’m really glad that I made these this year.

Christmas Smash Sugar Cookies
3/4 cup butter, room temperature 
1 cup sugar
2 teaspoons vanilla 
2 eggs, lightly beaten 
2 1/2 cups flour
1/4 teaspoon baking powder 
1/4 teaspoon salt 
Holiday sprinkles

3/4 cup powdered sugar 
1-2 tablespoons milk/cream

In a large mixer bowl, beat the butter and sugar on medium until light. Add the vanilla and eggs and mix again on medium to combine. The mixture may look curdled. With the mixer running on low, gradually add the flour, baking powder, and salt. Stir until the dough just comes together.

Shape the dough into 24 equal balls. Shape each piece into a ball and roll the ball in holiday sprinkles. Place on a Silpat-lined baking sheet and refrigerate for one hour.

Heat the oven to 350 degrees.

Remove the baking sheets from the refrigerator. With measuring cup, flatten each cookie to about 3” in diameter. The edges will crack- that is what you want. If the measuring cup sticks to the cookies, dip the cup in flour.

Bake for 12-14 minutes, until the cookies begin to brown along the edges. Allow the cookies to cool for 10 minutes on the baking sheet before removing them to a wire rack to cool completely.

Once the cookies are cool, make the glaze: in a small bowl, whisk together the powdered sugar and milk until the glaze is smooth and thick. Drizzle the glaze randomly over the cooled cookies. Allow the glaze to set before serving.

Recipe from The Food Network


Wednesday, December 17, 2025

Cranberry & White Chocolate Shortbread

One piece of shortbread flavored with white chocolate and dried cranberries. Photographed on a pedestal with a red rim

I have had this recipe saved for a long time and I couldn’t believe that I hadn’t made them previously. This is a Canadian recipe, from Robin Hood Flour, which is a big vendor there. They also sponsor the Canadian Baking Show, so I am also familiar for that reason. I really like the Canadian Baking Show, it’s similar to the British show, but with different hosts and judges. And the challenges are a bit different and reflect the mosaic that is truly Canadian.

I haven’t made anything with dried cranberries recently, but it’s one of those things that I always have on hand. The ones that I have are a bit different, and while they are dried, they look almost like they are freeze-dried. The berries are whole, and not wrinkly like a raisin. Different, but I don’t recall that they tasted different last time I used them.

I followed this recipe as posted, but my bars were super crumbly. I know they are shortbread, which is always a bit crumbly, but these were extreme! I think I baked them for a couple of minutes longer than needed; it’s hard to tell as they don’t brown much. I also didn’t cut them after 30 minutes- it’s busy this time of year and I was doing something else! So these don’t look as polished as I had hoped, but they are still very tasty.

Cranberry & White Chocolate Shortbread
1-3/4 cups flour
1/2 cup cornstarch
1/2 teaspoon salt
1 cup butter, room temperature
3/4 cup powdered sugar
1 teaspoon vanilla 
1/2 cup dried cranberries
1/2 cup white chocolate chips

Heat the oven to 300 degrees. Line a 9” x 13” pan with foil and spray the foil with nonstick cooking spray. 

In a medium bowl, whisk together the flour, cornstarch, and salt; set aside. In a large mixer bowl, beat the butter, powdered sugar, and vanilla on medium until creamy. With the mixer running on low, gradually add the flour mixture. Fold in the dried cranberries and white chocolate chips. 

Pat evenly into the prepared pan. Prick the top of the bars with a fork.

Bake for 40-50 minutes, until the bar begin to turn golden along the edge. Allow to cool for 30 minutes before cutting into bars. Lift the bars from the pan and peel away the foil. Cut into squares while still warm. Dust with additional powdered sugar before serving.

Recipe from Robin Hood Flour

Friday, December 12, 2025

Mincemeat Blondies

Two bar cookies, flavored primarily with mincemeat and brown sugar, photographed on a white plate with a small green tree.

It doesn’t seem like it’s Christmas unless I make something with mincemeat! I always make mince pies, but I like to make some sort of cookies that also include mincemeat. What mincemeat you use and how it tastes varies a lot. I usually pick up what I can, as long as it’s from England. Some folks make it from scratch, but I don’t usually have that much time. Thankfully, store bought mincemeat is good, and I think of it as spicy, chunky applesauce.

This is a quick and easy recipe and came together in a snap. I’ve used weight measurements here rather than volumetric measures, and it is much more accurate. A kitchen scale that measures both grams and ounces is one of the most used devices I own! I seem to use fewer measuring cups as well when I use my kitchen scale.

This is a British recipe, and there is a learning curve with recipes from abroad. You can translate oven temperature and similar things, but some baking instinct is still needed. These bars were to bake for about 25 minutes, but mine were far from done. I baked them closer to 35 minutes, and they are still quite soft. My foil stuck a bit as well, but I have no idea why! None the less, these bars are lovely and have the spices of mincemeat, which is so warming this time of year.

Mincemeat Blondies 
115 grams butter, melted
210 grams brown sugar
150 grams mincemeat
1 teaspoon vanilla
1 egg 
125 grams flour
1 teaspoon baking powder
1/8 teaspoon salt

Heat the oven to 355 degrees. Line an 8” square baking pan with foil and spray the foil with nonstick cooking spray. 

In a large mixer bowl, combine the melted butter and brown sugar. Using medium speed, beat until smooth. Add the egg, mincemeat, and vanilla and stir again on medium to incorporate. With the mixer running on low, gradually add the flour, baking powder, and salt. Stir just until the flour disappears into the batter.

Spread in the prepared pan, smoothing the top with a spatula.

Bake for 30-35 minutes, rotating the pan after 15 minutes, until set. The bars will be soft but should not be liquid in the center. Allow the bars to cool before cutting them into squares. 

Recipe from Fuss Free Flavours


Wednesday, December 10, 2025

Christmas Crinkle Cookies

Red and green crinkle cookies, photographed on an oblong plate with a vintage reindeer.

I was online looking for a certain recipe that I remember from growing up, and while I didn’t find quite what I was looking for, I came across this recipe. There are many variations of similar cookies online, but there is also a lot of fake information out there. I have fairly good baking instincts, but some recipes just don’t seem like they will work. Also, I come across recipes where the picture and the recipe don’t match, which is a huge warning. 

This recipe is so simple, and since it contained oil rather than butter, I knew I could make it dairy free, except for the eggs. The cake mix that I had initially purchased did contain milk ingredients, so I did a quick web search to identify dairy-free cake mixes. There are several, so I noted them down and headed to the store. To their credit, my local store had all three of the options that I had written down. I chose a French Vanilla cake mix, as I thought it would add nice flavor to the cookies. 

For the food coloring, you will want to use a paste or gel food coloring in order to get vibrant colors. The colors do fade a bit during baking, so don’t fret when you look at the garishly colored dough. Mixing in the food color takes some effort, but you want the dough to be an even color. These cookies are so soft, but they baked up so well. They are chewy and have a lovely vanilla flavor. 

Christmas Crinkle Cookies
13-14  ounce white/vanilla cake mix
 2 eggs
1/3 cup oil
Red and Green food coloringPowdered sugar    

Heat the oven to 375 degrees. Line two baking sheets with silicone baking mats.

In a large mixer bowl, beat the cake mix, eggs, and oil on medium until the dough comes together. Divide the dough evenly between two bowls. Color one bowl of dough red, and the other green. 

Using a small cookie scoop, scoop 1-inch balls of dough, then roll in powdered sugar and roll to reform a ball. Place on the prepared baking sheets. It’s best to work through one color of dough before working with the other colored dough.

Bake for 10-12 minutes, until the cookies are set. They may be slightly browned along the edges. Cool on the baking sheet for 10 minutes before removing to a wire rack to cool completely.

Recipe from Mommy Hates Cooking


Friday, December 5, 2025

Peppermint Patty Cookies

Chocolate cookies with a peppermint patty in the center, topped with holiday sprinkles. Photographed on a holly-shaped plate

Peppermint with chocolate is a fantastic combination, especially this time of year. I have made a variation of this recipe before, where I made the dough from scratch. This year, in trying to find easier recipes, I came across this one that uses a chocolate cake mix as the base. While this does make for a thick dough, it comes together quickly. You’ll need that as shaping these cookies does take some time.

I had the option of using mini York Peppermint Patties or York Thins, which are the same diameter as the mini Patties, but are thinner. As I was hoping to make a few more than the 16 that the original recipe stated, I chose to use the York Thins. Other than the dough being sticky, they worked great!

Did I mention that the dough is sticky? I’m not kidding! I measured out all of the dough and had the York Thins ready to go, but the dough wants to stick to your hands. I had to completely wash and dry my hands after shaping three cookies. Don’t try to shape them with damp hands, that was a complete mess! Shaping them takes a bit, but they look great when they come out of the oven, and will be perfect for my cookie exchange coming up.

Peppermint Patty Cookies
1 package dark chocolate fudge cake mix (15.25 ounces)
1 egg + 1 yolk
4 ounces cream cheese, room temperature
1/4 cup butter, room temperature
16-24 snack size York Peppermint Patties
Holiday Sprinkles

Heat the oven to 350 degrees. Line two baking sheets with silicone baking mats.

In a large mixer bowl, mix the cake mix, egg and yolk, cream cheese, and butter on medium until combined. The mixture will be thick. 

Shape the dough into 16-24 portions. Flatten the dough with your hands and place a peppermint patty in the center of each piece of dough. Wrap the dough around the peppermint patty, sealing completely. Place the cookies on the prepared baking sheet and top with holiday sprinkles.

Bake for 10-12 minutes, until set. Allow to cool on the baking sheet for 10 minutes before removing them to a wire rack to cool completely. 

Recipe from Tastes of Lizzy


Monday, December 1, 2025

Christmas Rolo Pretzels

Pretzels topped with a Rolo candy and decorated with holiday sprinkles. Photographed on a tree-shaped plate.

This year I am focusing on easy to make items, and I think that this recipe is about as simple as they come! When friends ask me about what holiday treat they should make with their children, I usually suggest something like these Rolo pretzels. Pretzel, Rolo, Chocolate candies and you are done. Add some fun holiday sprinkles! You are working together to create something but there is no stress.

The recipe I found used a couple of different pretzel shapes, and you can use what you would like. I used square pretzels, and round ones would also be good. I did see a different recipe with triangles, topped to candies to make it look like little trees. You have the option of using candies other than Rolos, and you could make quite a few different varieties with all of the special flavors out there right now.

The hardest part of this recipe is pressing the chocolate candies into the Rolo after softening it in the oven! It’s pretty sticky. The large sprinkles I used are a little too small, so I think I will make some more and top them with chocolate candies (M&Ms or Smarties). They are small, but cute, and are a fun addition to any gathering you may have this time of year. 

Christmas Rolo Pretzels
30 pretzels
30 Rolo candies/Hershey’s Kisses
30 chocolate candies/large holiday sprinkles
Holiday sprinkles

Heat the oven to 250 degrees. Line a baking sheet with a silicone baking mat.

Place the pretzels on the baking sheet. Top with a Rolo candy.

Place in the oven for about 5 minutes, until the candy starts to get soft. Remove from the oven and top each pretzel with a chocolate candy or holiday sprinkles, pressing down as you add the candy. 

Sprinkle with additional holiday sprinkles if desired. Allow the chocolate candies to cool completely before serving.

Recipe from Courtney’s Sweets


Friday, November 28, 2025

Cookie Cups with Christmas Preserves

Cookie cups filled with Christmas preserves. Photographed on a white plate with a small green Christmas tree

Ah, it’s time for Christmas and Holiday baking! This year I am focusing on recipes that are generally quick and easy. Folks don’t have a lot of time, with everything that is happening, so quick is often what you need. This is a perfect recipe to start my holiday baking as it is ultimately flexible.

I love cookie cups, and I think they are perfect for the holidays. They are easy but they look quite fancy on a holiday cookie platter. When I made these, I had a couple of different Christmas preserves on hand, a spiced preserves flavored with port and also black currant jam. You can use anything that you have available, and this would work with any standard jam/preserves, as long as it is appropriately holiday colored!

For the cookie cups, this is the easiest recipe that you will find. Make the dough, shape it into balls, put it in the mini muffin cup, and you are done. You make the indentation in the cups after baking, which is quick. This recipe makes a lot of cookies, so keep that in mind! I hope that you enjoy making this cookie cups as much as I did.

Cookie Cups with Christmas Preserves
1 cup butter, room temperature
1¼ cups sugar
1 egg
1 teaspoon vanilla
2¾ cups flour
1 teaspoon baking soda
½ teaspoon baking powder
½ teaspoon salt
Christmas preserves
Powdered sugar

Heat the oven to 375 degrees. Spray a mini muffin tin with nonstick cooking spray.

In a large mixer bowl, combine the butter and sugar and beat on medium until light. Add the egg and vanilla and mix again to combine. In a separate bowl, whisk together the flour, baking soda, baking powder, and salt. With the mixer running on low, gradually add the flour mixture, stirring until the dough comes together.

Shape the dough into 1” balls and place in the prepared mini muffin tin.

Bake for 8-10 minutes, until golden. Once the cookies come out of the oven, make an indentation in each cookie with a https://findthelostkitchen.com/products/wooden-tart-tamper tart tamper or similar tool. Allow to cool for 10 minutes and then remove the cookie cups from the mini muffin pan.

Once cool, fill each cookie cup with preserves. Dust with powdered sugar.

Cookie cup recipe from Six Sisters’ Stuff

Wednesday, December 25, 2024

Chocolate Mint Truffle Snowball Cookies

Chocolate cookie dough wrapped around a mint Hershey's Kiss, topped with white chocolate and Christmas sprinkles. Photographed on a holly-shaped plate.

Merry Christmas to all who celebrate! I try to make something that looks very festive for the Christmas holiday. By the time I get to Christmas, I have done a lot of baking, and then cooking for Christmas Eve and Christmas Day. We also celebrate Boxing Day, so I will be making something for that as well, but I plan that to be easy. This year I also remade a couple of recipes that were in great demand. I’m tired!

These cookies look fancy, but they really were easy to make. The dough is simple and doesn’t have any leavening, which means the cookies end up being the same size as when you start. I did add an extra egg yolk, as the dough seemed a little dry, and that was perfect. Shaping the dough around the Kisses was easy, as there was plenty of dough.

My only issue is melting the white chocolate, as I have discovered some brands melt well, and others don’t seem to melt at all. I need to remember this for the future! My first batch of melted chocolate didn’t work at all, so I tried again with different chips, and while there weren’t a lot of those chips, they were fine. I bought some fancy sprinkles so these would be extra nice, and I think they are a fun cookie for a holiday selection. Enjoy!

Chocolate Mint Truffle Snowball Cookies

24 mint truffle Hershey kisses
½ cup butter, room temperature
1 cup powdered sugar
1 egg
1 teaspoon vanilla
2 cups all flour
¼ teaspoon salt
¼ cup cocoa powder
3-4 ounces white chocolate
1 teaspoon vegetable shortening
 Sprinkles

Heat the oven to 350 degrees. Line two baking sheets with silicone baking mats.

Unwrap the Hershey Kisses and place in the freeze while you make the cookie dough. In a large mixer bowl, beat the butter and powdered sugar on medium until combined. Stir in the egg and vanilla. With the mixer running on low, gradually add the flour, salt, and cocoa powder; mix just until a thick dough forms.

Roll the dough into 24 balls. Flatten each dough ball slightly and place a frozen Hershey Kiss in the center of each. Wrap the dough around the Kiss and seal it in completely. Reroll the cookies and place on the prepared baking sheets.

Bake for about 10 minutes, until set. Allow to cool on the baking sheets for 5 minutes before removing to a wire rack to cool completely.     

Once the cookies are cool, melt the chocolate and vegetable shortening in a small microwave bowl. Dip the tops of the cookies in the melted chocolate and finish with sprinkles.

Recipe from Inside Bru Crew Life

Sunday, December 22, 2024

Berlinerkranser

Berlinerkranser- a Norwegian Wreath Cookie with hard boiled egg yolks in the dough. Shaped as a wreath and sprinkled with coarse Pearl Sugar

When I make cookies for the holidays, they are often new recipes that I have never tried before. I think about the main categories of flavors (like mint, eggnog, spiced) but then I give myself the flexibility to find recipes that look interesting to me that still fall into holiday flavor categories. This cookie is one that I actually have made before, but it was a different recipe and many, many years ago.

When I started baking, I didn’t have as many recipe choices as I do now. I had some cookie cookbook that included these Norwegian Christmas Cookies, and they looked interesting. I made them, and when I served them, my uncle said that they were a cookie he’d had growing up but hadn’t had them in years. The recipe has changed over time, as the accessibility of ingredients differs. When I first made these, the only topping I could come up with was to crush sugar cubes. Now I am able to find pearl sugar at the store.

This dough is simple but does require the super unusual ingredient of hard boiled egg yolks. I have the worst luck peeling hard boiled eggs, so I did buy ones that were cooked (and I needed some others for a different recipe). I made the dough, let it chill and I ended up dividing the dough into 15 pieces. In shaping the dough, this made for big, hefty cookies, which cracked a little when shaping. Thankfully that is easy to fix, and next time I may make them smaller, but still shape them into a 7” log. They bake nicely, and there are a very different choice for a holiday cookie plate!

Berlinerkranser (Norwegian Wreath Cookies)

2 hard-boiled egg yolks
2 (raw) egg yolks
1/2 cup sugar
2 1/2 cups flour
1 cup butter, room temperature

2 egg whites, lightly beaten
Pearl sugar    

In a medium mixer bowl, mash the hard-boiled egg yolks with a fork. Add the raw egg yolks and sugar and mix on medium until light. Alternate adding the flour and butter, starting and ending with the flour. The dough will be soft; be careful not to overwork the dough.

Chill the dough for one hour.

Heat the oven to 375 degrees. Line two baking sheets with silicone baking mats.

Shape the dough into balls, then into a rope about 6-7” long. Twist the dough into a wreath shape, crossing the ends of the dough. Brush each cookie with beaten egg white and then sprinkle with pearl sugar.

Bake for 10 minutes, until slightly browned on the bottom and set on top. Cool completely.

Recipe from Adamant Kitchen

Friday, December 20, 2024

Gingerbread Thumbprints with Cranberry Jam

Perfectly round gingerbreat cookies with a thumbprint filled with cranberry jam. Photographed on an oblong burgundy plate

While I tend to plan my holiday baking a bit in advance, it seems that I never quite bake according to the list I develop. This can be for many reasons; sometimes I find a recipe that I just have to make, or something ends up taking more time than I have, and sometimes recipes don’t quite turn out and I need to take the time to tweak the recipe before I try it again. I hadn’t planned on making these cookies, but I saw them and was convinced. Oh, and that other recipe needs some tweaking as well.

I saw this recipe and the only thing I needed to see if we had on hand was cranberry jam. We buy different jams all the time, so I was fairly confident! We did have a jar of Christmas jam, which was cranberry with some orange flavor added in, which sounded perfect for these cookies! The only difficult was the original recipe called for “walnut-sized balls” and I honestly don’t have a good reference for that. I just made each cookie weigh 25 grams. 

These cookies were fun to make, but they do take a little time and patience to get them shaped right. I found that shaping the cookies and then flattening slightly on the baking sheet helped maintain their shape when I make the indentation in the cookies. I also don’t list a quantity for the jam. I made about 30 cookies, and each cookie uses about 1/4 teaspoon, so you don’t use a lot. These are the most beautiful ginger cookies with a perfect, and perhaps unexpected, flavor or cranberries. This recipe is not one to miss.

Gingerbread Thumbprints with Cranberry Jam
1/2 cup butter, room temperature
100 grams sugar
1 egg
160 grams molasses
420 grams flour
1 teaspoon ginger
1 teaspoon cinnamon
1/4 teaspoon ground cloves
1/4 teaspoon ground nutmeg
1/2 teaspoon baking soda
1/4 teaspoon salt
Cranberry/Christmas jam

In a large mixer bowl, beat the butter and sugar on medium until well combined. Add the egg and molasses and mix until incorporated. It may look slightly lumpy, but it will work once all of the ingredients have been added. In a separate bowl, whisk together the flour, ginger, cinnamon, cloves, nutmeg, baking soda, and salt. With the mixer running on low, gradually add the flour mixture and stir until the dough comes together.

Wrap the dough in plastic wrap and refrigerate for about an hour.

Heat the oven to 350 degrees. Line two baking sheets with silicone baking mats.

Shape the dough into 1-1/4 inch dough balls. Round them in your hands and then flatten them slightly. With your thumb or other tool, make an indentation in each cookie, pressing the edges back together if the cookies split slightly. Fill each indentation with a small amount of jam.

Bake for 12 minutes, until set. Allow the cookies to cool on the baking sheet for 10 minutes and then remove them to a wire rack to cool completely.

Recipe from Polabaker

Wednesday, December 18, 2024

Paradise Slice

Paradise Slice- a Scottish bar cookie with a pastry base and a filling of currents, glacé cherries, and almond flour. A single cookie photographed on a red pedestal.

I have waited and waited to make these bars! Any recipe with “slice” in the title usually tells me that the recipe originated in Australia or Scotland, and these bars are from Scotland. My friend was asking me about Scottish cookies, and while shortbread immediately comes to mind and maybe a few tiffin recipes, it is hard to think of other recipes. This recipe is from a Scottish blog, and I am really interested in exploring more of the site.

Another reason that I had to wait to make these was due to the fact that they used glacé cherries. When I order products from the UK, I often buy candied or glacé cherries, since they are so difficult to find in the States. I didn’t order anything this year, so I was at the mercy of American grocery stores, and they finally carried some glacé cherries. They are crazy neon red, but I figured mixed in with other ingredients they wouldn’t be quite so glaring.

These are interesting bars, or perhaps they are more of a dessert? You make pastry for the base, top it with jam, and then top it with a cherry, current, and almond flour filling. I don’t make pastry often, but I used to, so I have that down to a science. I used cherry preserves since the filling also contains cherries. The filling goes together well, although glacé cherries are very sticky. I baked them for 25 minutes then topped them with a generous amount of sugar, which partially melted into a lovely topping. These bars are great; a fabulous mix of festive flavors!

Paradise Slice
200 grams flour
100 grams cold butter, cubed
30 grams sugar
4-5 tbsp cold water
100 grams berry/cherry preserves

200 grams butter, room temperature
200 grams sugar
2 eggs
100 grams ground almonds
100 grams flour
120 grams currants
100 grams glacé cherries, halved
Additional sugar

Make the pastry: add the flour and butter to a food processor. Pulse until the mixture looks like breadcrumbs. Add the sugar and pulse to combine. Add about three tablespoons of water, mixing and adding additional water until the dough comes together. Wrap in plastic wrap and refrigerate for 15 minutes.

Heat the oven to 390 degrees. Line an 8” or 9” square pan with foil and spray the foil with nonstick cooking spray.

Remove the pastry from the refrigerator and roll it out on a floured surface until it is about ¼” thick. The pastry should roughly be the size of your baking pan. Place the pastry into the prepared pan and trim away any excess. You do not want the pastry stretching up the sides of the pan. Prick the dough with a fork, then cover with parchment and pastry beans.

Bake for 10-12 minutes, until golden. Allow to cool partially before proceeding.

While the pastry is cooling, make the topping: in a large mixer bowl, mix the butter and sugar at medium speed to combine. Stir in the eggs. With the mixer running on low, gradually add the ground almonds and flour. Stir in the currants and glacé cherries.

Spread the raspberry jam over the partially cooled pastry base. Spoon the topping over the jam, smoothing with a spatula as needed.

Bake for 25-30 minutes, until golden. Remove from the oven and sprinkle with additional sugar. Allow to cool completely on a wire rack.

Recipe from Scottish Scran

Friday, December 13, 2024

German Nussecken Bars

Two German Nut Corners, triangle shaped cookies topped with hazelnuts with chocolate dipped corners. Photographed on a retro Christmas plate with reindeer.

When I was selecting cookies to make this season, I kept coming across European cookie recipes and they just sounded so good. Germany is known for their baking, and to this day I am sad that a local German bakery/café closed without them releasing a cookbook. Some of those recipes aren’t easy to replicate, but if I know what I am looking for it helps.

This recipe is for German Nut Corners (Nussecken) and it uses hazelnuts, a favorite of mine. You can use either almond or hazelnut flour, and while I used whole hazelnuts, I used almond flour as I had that on hand. The other ingredients are somewhat flexible. The original recipe called for apricot jam, and I ended up using apricot/pineapple preserves, and it was great. The jam just adds a little bit of flavor, and I think many different jams would work.

My biggest struggle with this recipe, if you can call it that, was what pan to use. The recipe called for a jelly roll pan, which the recipe said was 13” x 18”. That is a contradiction (unless sizes are different elsewhere) as a jelly roll pan is 10” x 15”. The other size is a half sheet pan. I knew it would be hard to spread the dough, so I used the jelly roll pan. That worked fine, and thankfully the cookies didn’t boil over while baking. It takes a little time to cut these and dip in chocolate, but it’s worth it. They aren’t as sweet as many American cookies, which is refreshing this time of year.

German Nussecken Bars

½ cup butter, room temperature
½ cup sugar
2 eggs
2 teaspoon vanilla
1 teaspoon baking powder
1/4 teaspoon salt
2 ½ cups flour
⅓ cup apricot jam

1 cup butter
5 tablespoon rum
1 cup light brown sugar
2 teaspoon vanilla
1 cup whole hazelnuts, roasted and roughly chopped
2 cups almond/hazelnut flour

1 cup dark chocolate chips
1 teaspoon vegetable shortening

Heat the oven to 350 degrees. Line a jelly roll pan (10” x 15”) with aluminum foil and spray the foil with nonstick cooking spray.

In a large mixer bowl, combine the butter and sugar and mix until smooth. Add the eggs and vanilla and stir to combine. Stir in the baking powder and salt, and then gradually add the flour, until the dough comes together. Press the dough evenly into the prepared pan. Dock the surface of the dough with the tines of a fork and then spread the base layer evenly with the apricot jam. If needed, you can heat up the jam slightly to ease in spreading.

Make the topping: in a medium saucepan, combine 1 cup butter, the rum, brown sugar, and vanilla. Heat over medium until the sugar is dissolved, but do not bring to a boil. Add the roasted and chopped hazelnuts and the almond/hazelnut flour to the melted butter mixture and stir to combine.

Spread the topping mixture evenly over the base crust.

Bake for 25-30 minutes, until the bars are golden. Allow the bars to cool completely, ideally overnight.

Using a sharp knife, cut the bars into squares and then triangles.

If desired, melt the chocolate a vegetable shortening to make a glaze and dip the corners of the cookies in the glaze or drizzle over part of the cookies. Allow the glaze to set before serving.  

Recipe from Bake It With Love

Friday, December 6, 2024

Peppermint Nanaimo Bars

No-bake Nanaimo Bars, made festive for the holidays with peppermint extract added to the filling and topped with crushed peppermints. Photographed on a red mitten-shaped plate.

I have been waiting to make these bars for a very long time. I pinned the recipe and then the URL of the post changed so I had to look again and find a viable recipe. I found it and saved it again. I had planned to make these bars last year, I had even started the write-up, but then I ended up changing what I made. I kept the recipe, because I knew that I would eventually make these.

This was the year that I made these bars! I am so glad that I did as I love Nanaimo Bars, and a holiday variety is not to be missed. A few years ago, my husband and I traveled to Vancouver Island, and stayed a couple of days in Nanaimo. We went to the museum there and thought that we would find out the origin of the Nanaimo Bar. Unfortunately, no one really knows who created the Nanaimo Bar. That’s ok, I’m just glad that someone created these wonderful bar cookies and made a cookie that is so adaptable.

These no-bake cookies have a couple of layers, but they really don’t take long to make. I will admit that making a no-bake cookie in the winter, heating things up on the stove, is much better than making them in the summer. These are quite traditional, with the addition of peppermint extract and the topping. My only challenge was the topping, as the topping called for butter and that never works with chocolate! I substituted vegetable shortening and that was much better. These cookies have all the flavors of a Nanaimo Bar with the refreshing peppermint flavor!

Peppermint Nanaimo Bars
1/2 cup butter, cut into pieces
1/4 cup sugar
1/3 cup cocoa
1 egg, lightly beaten
1 cup graham cracker crumbs
1 cup shredded coconut
1/2 cup pecans, finely chopped

1/2 cup butter, at room temperature
3 tablespoons cream
2 tablespoons custard powder
2 cups powdered sugar
1 teaspoon peppermint extract

4 ounces chocolate, chopped
2 tablespoons vegetable shortening
2 ounces white chocolate
1 teaspoon vegetable shortening
Crushed peppermint candies

Line an 8” pan with foil and spray the foil with nonstick cooking spray.

In a medium saucepan, combine the butter, sugar, and cocoa. Heat over medium-high heat, whisking until the mixture is smooth. Add the egg, and quickly stir over the heat to set the egg. Remove from the heat and add the graham cracker crumbs, coconut, and pecans. Press into the base of the prepared pan.

In a large mixer bowl, beat the butter, cream, custard powder, powdered sugar, and peppermint extract. If needed add additional powdered sugar if too thin or extra cream if too thick. Spread over the graham cracker base and refrigerate for 30 minutes to an hour.

In a small microwave-safe bowl, melt the chocolate, stirring frequently. Pour the melted chocolate over the bars, smooth the top, and refrigerate until almost firm. Melt the white chocolate and then drizzle over the partially cooled chocolate. Sprinkle with crushed peppermint candies. Refrigerate overnight.

Remove the bars from the pan by lifting the foil. Cut into squares.

Recipe from Parents Canada

Wednesday, December 4, 2024

German Almond Paste Cookies

Round Almond Paste Cookies topped with slivered almonds. Photographed on a white plate with a tiny tree.

When I was looking for holiday recipes this year, I found quite a few cookies that were from different European countries. Most of them sounded fantastic so I have included a number of those recipes to this year’s baking. This recipe, for Almond Paste Cookies, is German in origin. I love anything with almond paste, but you might not be all that familiar with it. It is common in Europe, but less so here.

This recipe called for marzipan originally, and if you were in Germany that would be what you’d want to use. In the States, marzipan is a little different, and almond paste is a better choice. It is also softer and easier to work with. There is a difference in the quantities of sugar between almond paste and marzipan, but American grocery stores seem to ignore this. I have even seen marzipan in the almond paste display box! Yes, they are close, but they are not the same.

Grating the almond paste is a bit tricky, I used my food processor, but it was still a challenge. Other than that, these come together very easily. The dough is sticky, and I wasn’t quite sure how big to shape the cookies, so each cookie weighed 20 grams. I baked them for 12 minutes and they looked great. They wanted to stick to the silicone mat when they were warm, but I had no problems removing them once they cooled a couple of minutes. These have a wonderful almond flavor, with the subtle addition of cinnamon. These aren’t as sweet as some other holiday cookies, but sometimes you just want a little less sugar.

German Almond Paste Cookies

200 grams almond paste or marzipan
80 grams powdered sugar
110 grams flour
100 grams ground almonds
1 egg, divided
1 teaspoon cinnamon
2 tablespoons amaretto
1/4 teaspoon salt
Slivered/sliced almonds

Place the almond paste in the freezer for 30 minutes. Remove from the freezer and grate the almond paste.

Heat the oven to 350 degrees. Line a nonstick baking pan with a silicone mat.

In a large mixer bowl, combine the grated almond paste, powdered sugar, flour, ground almonds, egg white, cinnamon, amaretto, and salt. Mix the ingredients on low until a dough forms. Shape the dough into small balls, about the size of a walnut, 1-1/2 inches. Press down each ball of dough with a fork or the palm of your hand.

Whisk the egg yolk with a small amount of water and brush over the dough. Sprinkle with slivered almonds.

Bake for 12-14 minutes, until golden. Allow to cool on the baking sheets for 5 minutes before removing to a wire rack to cool completely. Once cooled, sprinkle with powdered sugar.

Recipe from Cinnamon and Coriander

Friday, November 29, 2024

Cranberry Crumble Bars

Bar cookies with a cranberry/orange zest filling, topped with more cookie dough and a vanilla glaze. Photographed on a green holly leaf-shaped plate.

It’s the 12 Days of Holiday Recipes! Over the next few weeks I will be posting 12 cookie and fudge recipes that I have discovered this year.

As I mentioned recently, the area where I live was hit hard with heavy winds, knocking out the power at home for four days. Our cats were so confused as to why we were sitting in the dark and the cold, and I am sure they were thinking that we just needed to turn on the heat!. We are glad that the power has been restored, but we had to throw away nearly everything in the refrigerator and freezer. I had just stocked up for holiday baking, but thankfully only a few things are refrigerated. I do feel like it has put me horribly behind schedule, but what can you do?

I had planned to make these Cranberry Crumble Bars last week, but that didn’t happen! I thought that they are a nice transition between Thanksgiving and the holiday season. With the fresh cranberries, they are nice and tart, but have the balance of the cookie dough to keep them sweet. I did have to restock a few things before I could make these, but that was minimal.

This recipe called for an 8” pan, but it has a lot of ingredients so I used my 9” pan. I still had plenty of dough! Adjusting the pan size, I knew I needed to watch the baking time but I didn’t have any issue. I had reserved two cups of dough for the topping and didn’t need all of it, I used a little over a cup, so you could adjust the ratio of base and topping if you’d like. Your house will smell magical when you bake these, the cranberries are tart but pair so well with the other flavors.

Cranberry Crumble Bars
1 cup butter, room temperature
1/2 cup sugar
1/2 cup packed brown sugar
1 egg
2 teaspoons vanilla
3 1/4 cups flour
3/4 teaspoon baking powder
1 teaspoon cinnamon
1/4 teaspoon salt

2 1/2 cups fresh or frozen cranberries
2/3 cup sugar
1 tablespoon cornstarch
1 tablespoon orange zest
1 tablespoon orange juice
1 teaspoon vanilla

3/4 cup powdered sugar
4 tablespoons heavy cream
1/2 teaspoon vanilla

Heat the oven to 350 degrees. Line a 9” square baking pan with foil and spray the foil with nonstick cooking spray.

In a large mixer bowl, add the butter, sugar, and brown sugar. Beat on medium until light. Add the egg and vanilla and beat again until the ingredients are combined. With the mixer running on low, gradually add the flour, baking powder, cinnamon, and salt. Stir on low until a dough forms.

Set aside about 2 cups of dough for the topping. Press the remaining dough evenly into the prepared pan. Use a measuring cup to help flatten the dough.

Bake for 15 minutes, until the center is set. Remove the pan from the oven but keep the oven on.

In a large bowl combine the cranberries, sugar, cornstarch, orange zest and juice, and vanilla. Stir with a spatula, then pour the mixture over the partially baked crust.

Break up the reserved 2 cups of dough with your hands and randomly place on top of the cranberry filling, making a crumble. This should not be a solid layer, you want to be able to see the cranberry filling in different places.

Bake for an additional 45 minutes. You may need to cover the bars after 30 minutes or the bars will brown too much. Cool the bars completely before adding the glaze.

Make the glaze: in a medium bowl, whisk together the powdered sugar, heavy cream, and vanilla. Add additional heavy cream if the glaze is too thick. Drizzle over the cooled bars.

Recipe from Browned Butter Blondie

Friday, December 22, 2023

Sticky Toffee Spice Cookies

A row of sticky toffee pudding cookies, spiced cookies with dried fruits and drizzled with white chocolate. Photographed on a white plate with a red and green border.

Sticky Toffee Pudding is a classic British dessert, but I suppose this time of year it is more common to have a Christmas pudding with a festive meal. I like both, but honestly, you can’t eat too much Christmas pudding as it is so rich. One time when my husband and I were in England we went to Betty’s Tearoom and got a Christmas pudding. It was absolutely wonderful, and it is traditional to light it afire. Nothing says Christmas like lighting something on fire!

I love Sticky Toffee Pudding just as much, although it uses dates rather than a mixture of dried fruits. I did have chopped dates (because you certainly don’t want to cut dates yourself!) but I had the mix of dried fruits used for fruitcake right on the counter, so I used that. The fruitcake blend has a lot of dates, so I figured I would be good. This recipe is flexible so you can use what is available to you.

I also changed the spices somewhat. I don’t like cardamon, so I used ginger instead. I also used Chinese Five-Spice in place of garam masala. Again, use what you like! I ended up making a double batch of these, about 60 cookies, so my husband could take some to a lunch gathering at work. These cookies are SO GOOD! They do taste like the holidays, and they were good with the mixed dried fruit. I’m glad there were a lot of these left, as they are tasty and you just keep eating them.

Sticky Toffee Spice Cookies

1/4 cup rolled oats
1 1/4 cups flour
3/4 teaspoon baking soda
1/2 teaspoon salt
1/2 teaspoon cinnamon
1/2 teaspoon ginger
1/2 teaspoon cloves
1/4 teaspoon Chinese Five-Spice
1/2 cup butter, room temperature
1/4 cup sugar
1/2 cup packed brown sugar
1 egg
2 tablespoons molasses
1 teaspoon vanilla
1 cup chopped pecans
1/2 cup toffee bits
1/2 cup caramel bits
1/2 cup chopped dates (or dried fruit)

1/2 cup white chips
1 teaspoon shortening

Heat the oven to 350 degrees. Line two baking sheets with silicone baking mats.

Place the oats into a food processor and finely grind the oats. Combine the oats in a medium bowl with the flour, baking soda, salt, cinnamon, ginger, cloves, and the Chinese Five-Spice.

In a large mixer bowl, beat the butter, sugar, and brown sugar on medium until light. Add the egg, molasses, and vanilla and stir until blended, about one minute. With the mixer running on low, gradually add the oat/flour mixture. Fold in the pecans, toffee bits, caramel bits, and dates with a spatula.

Shape the dough into 1-1/2” balls and place on the prepared baking sheets.

Bake for 12-14 minutes, until beginning to brown along the edges. Allow the cookies to cool on the baking sheet for 10 minutes before removing to a wire rack to cool completely.

Once the cookies are cool, make the drizzle: in a small microwave-safe bowl, combine the white chips and shortening. Melt in the microwave, stirring frequently, until the mixture is smooth. Drizzle over the cooled cookies.

Recipe from Go Bold with Butter

Friday, December 15, 2023

Gingerbread Snowballs

A tower or round gingerbread snowballs, covered in powdered sugar.

I have made a couple of different recipes that are similar to this, that are reminiscent of a Russia Teacake or Mexican Wedding Cake. It is a butter cookie rolled in powdered sugar, and you can change up the flavors in any way that you want. I have used different fruits, nuts, and I even made a brown sugar spice variety. This one is gingerbread flavor- which is consistently excellent.

One of the hallmarks of these cookies is that they melt in your mouth. To ensure that’s the case, this cookie, like most that are similar, uses powdered sugar as the sweetener. They don’t have much sugar in them, but since the final cookie is rolled in powdered sugar, they are not lacking any sweetness. They also don’t contain any leavening, so this is one recipe that you can put the cookies closer together on the baking sheet.

Since these cookies are small, this recipe makes about three dozen. I love the combination of spices, but I would likely add more ginger, since I am such a fan! I was happy that rolling them in powdered sugar while they were warm covered the cookies completely, which isn’t always the case. These do melt in your mouth, and I know that gingerbread doesn’t usually have nuts, but I keep thinking that these need some nuts to be proper. Maybe next time!

Gingerbread Snowballs
1 cup butter, room temperature
½ cup powdered sugar
1 teaspoon vanilla
½ teaspoon salt
1 teaspoon cinnamon
1 teaspoon ginger
½ teaspoon nutmeg
¼ teaspoon allspice
¼ teaspoon cloves
1 tablespoon molasses
2 ¼ cups flour
Powdered sugar

Heat the oven to 350 degrees. Line two baking sheets with silicone baking mats.

In a large mixer bowl, beat the butter until light. Add the powdered sugar, vanilla, salt, cinnamon, ginger, nutmeg, allspice, cloves, and molasses and stir until smooth. Add the flour and mix until the dough comes together, which may take a few minutes.

Shape the dough into 1-1/4” balls and place them on the prepared baking sheets.

Bake for 10-12 minutes, until the cookies are set and begin to brown on the bottom. Allow the cookies to cool on the baking sheet for 2-3 minutes and then immediately roll in powdered sugar. Cool completely on a wire rack. Once cookies are cool, reroll the cookies in powdered sugar if desired.

Recipe from Crazy for Crust

Friday, December 8, 2023

Lemon Cranberry Cookies

Cookies topped with a lemon glaze and a single cranberry. Photographed on a red mitten-shaped plate.

So often, cookies this time of year are hearty and full of chocolate. When I choose recipes, I try to mix up the types of cookies I make. Cookies containing cranberries are perfect this time of year, so I try not to forget to include something with either fresh or dried cranberries. This is a lovely recipe, fruity and refreshing with the combination of lemon and cranberry.

I was reading through the recipe, and it calls for one single cranberry per cookie, so that told me that these cookies are petite. The original recipe called for fresh cranberries, but I had cranberries I had frozen on hand, and I figured those would work. Although the cranberry color seeped out in a couple of cookies, the frozen berries worked well.

These cookies are small, but they really pack a punch! The lemon glaze, which is simply powdered sugar and lemon juice, is tart and pairs perfectly with the tart cranberry. The cookie itself is similar to shortbread, rich and slightly crumbly. These cookies are wonderful for the holidays, especially if you are wanting something slightly different!

Lemon Cranberry Cookies
2/3 cup sugar
Zest of one lemon
1 cup butter, room temperature
2 egg yolks
1 teaspoon vanilla
2 1/3 cups flour
Sanding sugar
Fresh cranberries

1 1/2 cups powdered sugar
2-4 teaspoons lemon juice

Heat the oven to 350 degrees. Line two baking sheets with silicone baking mats.

In a large mixer bowl, bear the sugar and lemon zest on medium to make lemon sugar. The sugar will be fragrant and pale yellow. Add the butter and beat on medium until light. Stir in the egg yolks and vanilla.
With the mixer running on low, stir in the flour.

Shape the dough into 1-inch balls and roll in sanding sugar. Push a cranberry into the top of each cookie.

Bake for 10 minutes. Allow the cookies to cool on the baking sheets for 5 minutes before removing to a wire rack to cool completely.

Once the cookies are cool, make the glaze: in a small bowl, whisk together the powdered sugar and two teaspoons lemon juice to make a glaze. Add additional lemon juice if needed to thin the glaze. Drizzle the glaze over the cooled cookies.

Recipe from Lord Byron’s Kitchen

Friday, December 1, 2023

Gingerbread Brownies

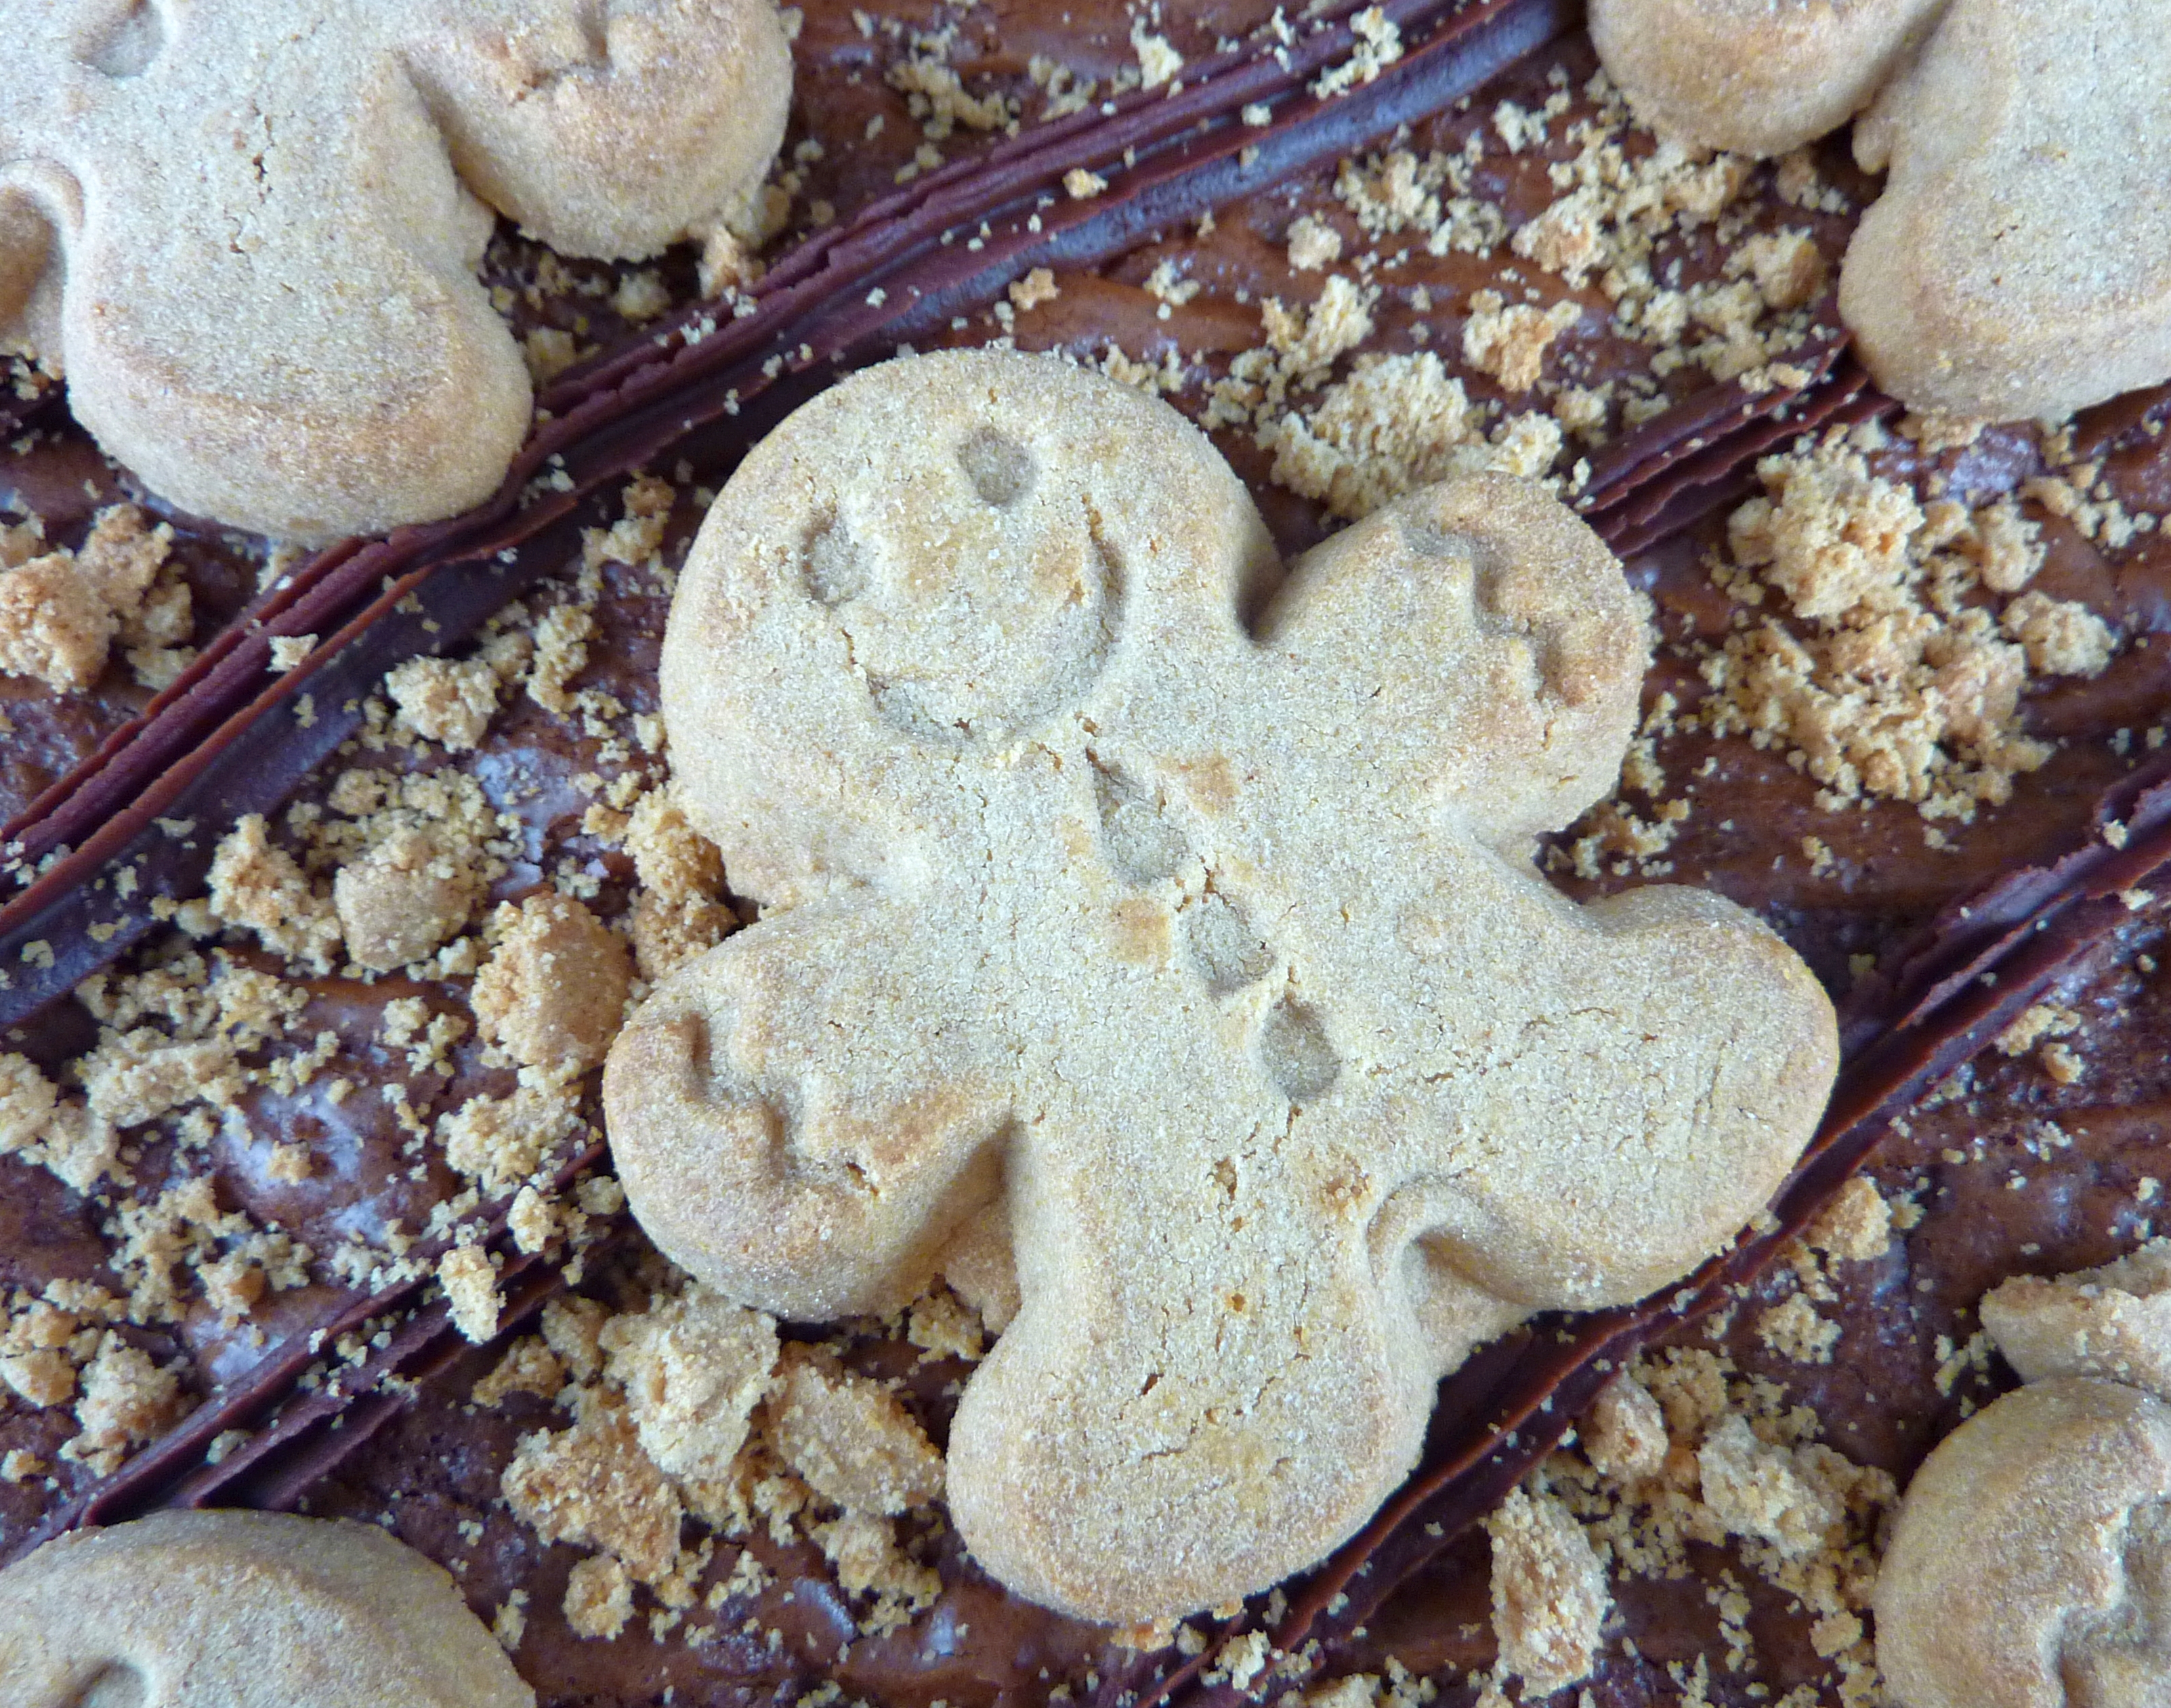
A gingerbread figure atop chocolate and spiced brownies

Nothing says the holidays like gingerbread figures! I was looking at a couple of gingerbread brownies from this site, although I guess one was gingerbread rocky road. I like this one as it is a spiced brownie then topped with gingerbread cookies, gingerbread crumbs, and chocolate. As you will note, the recipe gives the quantities in weight measurements, which I find to be a lot easier and is generally more precise. This is a British recipe, and since I use a lot of British cookbooks and blogs, I have learned to love weight measurements!

The challenge I had for these cookies was finding the gingerbread cookies for the top. I envisioned a bag of small gingerbread people, but all I could find was Walker’s Shortbread Gingerbread. Don’t get me wrong, they are excellent, but they are a little bit big and there were only 8 in the package. I used two for crumbs, 5 to top the brownies, and one for the baker. Perhaps smaller cookies come out closer to the actual holiday?

This makes a fairly thick brownie, which is ok, but I did find I needed to bake mine longer than I had initially expected. I melted the chocolate for the topping, and it started to seize, which was frustrating, so I ended up piping that on rather than drizzling. The cookies are quite large, which was tricky. I photographed the brownies as a whole, as they looked quite strange once cut. None the less, these a lovely moist brownies with a balance of chocolate and spice flavors!

Gingerbread Brownies
200 grams butter
200 grams dark chocolate
3 eggs
275 grams brown sugar
90 grams flour
35 grams cocoa powder
3 teaspoons ginger
2 teaspoons cinnamon
1/2 teaspoon nutmeg
250 grams chocolate chips

Gingerbread Cookies
Melted Chocolate

Heat the oven to 355 degrees. Line a 9” square pan with foil and spray the foil with nonstick cooking spray.

Place the butter and dark chocolate in a microwave-safe bowl. Microwave in 30 second increments, stirring frequently, until the mixture is smooth. Allow the mixture to cool slightly.

In a large mixer bowl, combine the eggs and brown sugar. Whisk for several minutes, until the mixture doubles in size and becomes pale. Whisk until the mixture is similar to a mousse in consistency. Fold in the melted chocolate mixture, then the flour, cocoa powder, ginger, cinnamon, and nutmeg. Stir in the chocolate chips. Spread in the prepared baking pan.

Bake for 25-35 minutes, until a cake tester inserted into the brownies comes out clean. Allow the brownies to cool in the pan.

Once cool, drizzle with melted chocolate and top with gingerbread cookies. Cut into squares.

Recipe from Jane’s Patisserie

Wednesday, November 29, 2023

Rum Nut Thumbprints

Two nut-covered thumbprint cookies topped with a star of rum filling. Photographed on a plate with a vintage reindeer.

It’s time for holiday baking! Over the next month or so, I have selected 12 different treats to make. This year is a little different, for many reasons, but this year I plan to bake 6 holiday cookies and 6 different types of fudge! I have been declared the fudge maker for the family, and I figured it would be good to share those recipes with everyone.

This first recipe is a Rum Nut Thumbprint cookie. It was originally an Eggnog Thumbprint, but it contains rum and virtually no eggnog. I know that anything with rum or rum flavor paired with nutmeg becomes eggnog, but I don’t think that it is quite that simple. I decided to just call them “rum” since that is obviously there. It still isn’t a strong flavor, but that’s ok.

This dough does need time in the refrigerator, so don’t skip that step! The cookies still aren’t the easiest to shape because the dough is either sticky or too firm. Rolling any cookie in egg whites is quite a messy prospect, but it does help the nuts stick. I carefully made an impression on the top of the cookie, but then refined the impression when the cookies were done baking. I piped the rum filling since that is quick and easy. This recipe made about two dozen cookies, less than expected, but that was ok. The combination of rum, nuts, and the filling all come together to make a lovely cookie!

Rum Nut Thumbprints
¾ cup butter, softened
½ cup sugar
⅛ teaspoon nutmeg
2 egg yolks
1 teaspoon vanilla
1 ½ cup flour
2 egg whites, beaten
1 ½ cup finely chopped nuts

¼ cup butter, softened
1 cup powdered sugar
1 teaspoon rum
1-3 teaspoons milk/eggnog

In a large mixer bowl, beat the butter, sugar, and nutmeg on medium until light. Add the egg yolks and vanilla and mix on medium to combine. With the mixer running on low, gradually add the flour. You may need to mix the last bit of flour by hand. Wrap the dough in plastic wrap and refrigerate for an hour.

Heat the oven to 375 degrees. Line two baking sheets with silicone baking mats.

Place the whipped egg whites in one bowl and the chopped nuts in another. Shape the dough into 1-inch balls, roll in the egg white and then the chopped nuts. Place the cookies on the prepared baking sheet. Make an indentation in the top of each cookie with your thumb or similar tool.

Bake for 12-15 minutes until the cookies are lightly browned. If needed, reshape the indentation in the top of each cookie. Allow the cookies to cool on the baking sheet for 10 minutes before removing to a wire rack to cool completely.

Once the cookies are cool, make the rum filling: in a mixer bowl, beat the butter and powdered sugar together on medium. Beat in the rum and 1 teaspoon milk, adding more milk until the filling is of a spreadable consistency.  Spoon or pipe the rum filling into the indentation of each cookie.

Recipe from Better Homes & Gardens