Friday, May 30, 2025
Candy Cookies with Maple
One of my favorite candy companies is https://www.purdys.com/ Purdys Chocolates, and using a hedgehog as their mascot makes me like them even more! The biggest issue is that they are in Canada, and I am not. I try to get there when I can, and they do ship to the states, but it’s not the easiest candy to acquire. I follow them on social media and they recently posted a cookie recipe that called for two of their chocolates: Sweet Georgia Browns and their Blond Maple Bar. While I hope to get to Canada this summer, I needed to figure out how to make them sooner.
Since I had weights, I knew I could find something. I went to the Puyallup Farmer’s Market and bought chocolate caramel clusters from Amy’s Decadent Chocolates. At home I had picked up some chocolate/caramel smores square, since I had never seen such a thing before. While not a maple candy bar, it would work. They very subtle maple flavor was still there with the presence of maple syrup.
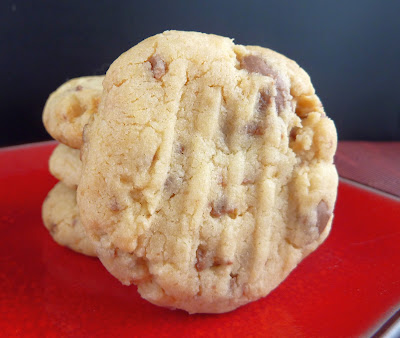
Different stages of chilling is a critical part of this recipe. Once you have chopped up the candy, refrigerate it so it’s cold. This was especially critical since the chocolate/caramel square got caramel everywhere! I made the dough and then chilled it again. I ended up with lovely, puffy cookies, with few blowouts from melting chocolates. The cookies are soft and cakey, with a subtle maple flavor. I need to check out what other recipes Purdys has!
Candy Cookies with Maple
85 grams Purdys Maple Candy Bar, chopped
2 chocolate caramel clusters (34 grams each), chopped
½ cup butter, melted
¼ cup packed brown sugar
½ cup maple syrup
1 egg
1-1/2 cups flour
½ teaspoon baking soda
½ teaspoon salt
Chop the Maple Candy bar and the chocolate caramel clusters into pieces. Put the chocolates on a plate and refrigerate while you make the dough.
In a large mixer bowl, combine the melted butter, brown sugar, and maple syrup. Mix on medium until the mixture comes together. Add the egg and stir to combine. With the mixer running on low, gradually add the flour, baking soda, and salt. Remove the bowl from the mixer and fold in the chilled chopped chocolate with a spatula.
Wrap the dough in plastic wrap and refrigerate for at least an hour.
Heat the oven to 375 degrees. Line two baking sheets with silicone baking mats.
Shape the dough into 24 balls, each weighing about 30 grams. Place on the prepared baking sheets.
Bake for 9-13 minutes, until the cookies are puffy and golden brown around the edges. Cool on the baking sheet for 10 minutes and then remove to a wire rack to cool completely.
Recipe from Purdys Chocolate
Friday, April 11, 2025
Chocolate Cookies with Reese’s Pieces Bunnies
I came across this recipe from Practically Homemade on Pinterest, and I was inspired! We had recently bought a large bag of Reese’s Pieces from nuts.com, and my husband had said that we had those available for baking. The original recipe used M&Ms, but Reese’s Pieces are nearly the same and I figured I would be fine. The colors worked, but I wanted to use a chocolate cookie.
The most difficult part of this recipe was finding a pill splitter to cut the Reese’s Pieces in half. I could have just cut them, but I had read a comment about using a pill splitter and that seemed easier. I went to two stores to find a pill splitter, and I was finally able to find one when I asked someone. I guess people often get them when they pick up a prescription, so the tool was not easy to find. I was happy that I eventually found one.
I altered the recipe slightly, as I didn’t want Reese’s Pieces in the dough, so I added mini chocolate chips instead. I baked them before adding the Reese’s Pieces, as I didn’t know what would happen and how the dough would shift while baking. I had the cut Reese’s Pieces ready to go once the cookies came out of the oven, and that’s really important. These cookies are super soft and chocolatey! The Reese’s Pieces add a subtle peanut butter flavor, which is just perfect.
Chocolate Cookies with Reese’s Pieces Bunnies
12 tablespoons butter, softened
½ cup sugar
½ cup packed brown sugar
2 teaspoon molasses
1 teaspoon vanilla
1 egg
1 ⅓ cups flour
½ cup cocoa powder
1 teaspoon salt
½ teaspoon baking soda
1 cup mini chocolate chips
Reese’s Pieces, whole and half, for decoration
In a large mixer bowl, beat the butter on medium until very creamy. Add the sugar, brown sugar, and molasses and mix on medium to combine. Add the egg and vanilla and stir to incorporate. In a separate bowl, whisk together the flour, cocoa powder, salt, and baking soda. With the mixer running on low, gradually add the flour mixture; mixing until just combined. Add the chocolate chips and stir with a spatula to incorporate.
Shape the dough into 1-1/2 inch balls. Place on a parchment-covered baking sheet. Once all the cookies are formed, cover with plastic wrap and refrigerate for 30-60 minutes.
Heat the oven to 325 degrees. Line two baking sheets with silicone baking mats.
Place the chilled cookies on the baking sheet. They don’t rise a lot, so there is no need for extra space between the cookies.
Bake for about 10 minutes, until set and firm around the edges. Once the come out of the oven, immediately top the cookies with Reese’s Pieces (whole and half pieces) to resemble bunnies.
Recipe from Partylicious and inspiration from Practically Homemade
Friday, October 27, 2023
Toffifee Brownie Bites
I have wanted to make these brownie bites for a while now, as you all know how much I love making cookies in mini muffin pans! I had all of the ingredients with the exception of Toffifee candies, which are something that I pick up from time to time. I adore hazelnuts and there are very few candies in the States that contain hazelnuts, so anything with hazelnuts makes it into my shopping cart at the store.
Toffifee were very difficult to find, and I finally found them at the 7th or 8th store that I visited. I was beginning to worry that they were not to be found. I have had that experience with other baking ingredients, but these candies aren’t that uncommon. For the small amount of chocolate, I found a small piece of bittersweet chocolate and used my microplane to grate in some chocolate. I didn’t want chunks of chocolate, so that was the easiest approach.
This is a German recipe, which is why the quantities are in grams. I think it makes baking easier as I just get out my scale and I don’t mess up a bunch of measuring cups. It does make a small quantity; I was able to eek out 15 brownie bites, which is a fairly petite number. They were quick to make and look picture perfect topped with a Toffifee candy. The brownie bite tastes very much of dark chocolate, so it’s good to have the balancing caramel, hazelnut, and nougat flavors in these bites.
Toffifee Brownie Bites
60 grams butter
100 grams brown sugar
1/2 teaspoon vanilla
1 egg
45 grams flour
40 grams cocoa powder
1/4 teaspoon baking powder
Pinch of salt
30 grams chocolate, chopped/grated
Toffifee Candies
Heat the oven to 350 degrees. Spray a mini muffin pan with nonstick cooking spray. You will need a mini muffin pan with about 15 indentations.
Melt the butter and allow to cool for 5 minutes. In a large mixer bowl, beat the melted butter, brown sugar, and vanilla on medium until thoroughly combined. Add the egg and stir to incorporate. In a medium bowl, whisk together the flour, cocoa powder, baking powder and salt. With the mixer running on low, gradually add the flour mixture. Fold in the chopped/grated chocolate.
Transfer the brownie mixture to a piping bag and fill the mini muffin cups about ¾ full.
Bake for 10-12 minutes, until a cake tester inserted in the center of the brownie bit comes out clean. Once the brownie bites come out of the oven, press a Toffifee candy into the top of each warm brownie bite. Allow the brownies bites to cool for 15 minutes before removing from the pan.
Recipe from Bake to the Roots
Friday, March 24, 2023
Rolo Chocolate Chip Blondies
My time has been limited this week, and I wanted to find a cookie that wouldn’t take too long to make. I had found this recipe a couple of weeks ago, and they looked like they would be quick to put together. There are a couple of varieties of Rolos out there, everything from leftover Halloween candy (which are smaller), to a regular candy bar, to bags of Rolos in the candy aisle. I found ones in the candy aisle, but they were wrapped which was unfortunate.
This recipe makes a small amount of dough, which includes chocolate chips. Chocolate chips are lumpy, and Rolos are also kind of square, which makes it difficult to put those two things together. When I tried to put the Rolos on top of the chocolate chip-infused dough, that just didn’t work. I did the bottom layer and then topped it with Rolos and did my best to cover the Rolos. It wasn’t great, but while the bars baked the layers evened out, which was nice.
The original recipe said that the blondies would be baked after about 20 minutes, but that wasn’t the case at all. I baked mine closer to 30 minutes, and perhaps they could have used even a couple more minutes in the oven. Once they cooled they were fine, but they do remain gooey in the center. The edges were nice and crispy, so it just depends on what you prefer.
Rolo Chocolate Chip Blondies
½ cup butter, melted
1 egg
1 cup packed brown sugar
1 teaspoon vanilla
1 cup flour
1/2 teaspoon salt
1 cup chocolate chips
About 30 Rolos
Heat the oven to 350 degrees. Line an 8” pan with foil and spray the foil with nonstick cooking spray.
In a large mixer bowl, mix on medium the melted butter, egg, brown sugar, and vanilla. With the mixer running on low, gradually add the flour and salt. Fold in the chocolate chips with a spatula.
Spread half of the batter in the prepared pan. Top with the (unwrapped) Rolos. Top with the remaining batter. I was unable to create a full top layer, but the blondies evened out as they baked.
Bake for 25-30 minutes, until set and crispy along the edges. Allow the blondies to set for at least an hour before cutting into bars.
Recipe from 4 Sons “R” Us
Friday, February 17, 2023
Kit Kat Cookies
I recently participated in our school’s open house for prospective students and it was really fun to interact with future students and families. I did get a bit of a chuckle that there were some reluctant future students there, but they came and that’s what is important! Before the event I wanted to get some candy to have at the table. My husband calls these bribes and perhaps they are, but most tables offered bribes to the attendees.
I didn’t think we would go through all of the candy, and I came home with a selection of candies that included Kit Kats. I love these and probably would have just eaten them had I not set some aside as I knew I could bake with them. I went to Pinterest and I had already found two Kit Kat recipes, so I measured what I had and made the cookies that called for that amount.
These cookies are basically chocolate chip cookies with some Kit Kats added in. The only difference in the preparation for these cookies is that you shape them and then chill them. I suppose they would turn out without chilling, but it was easier for me. When my husband got home (and I was still in a meeting), he was SO excited that I had finally made chocolate chip cookies. He did think they had an extra crunch, but he was so happy. If you love Kit Kats, and love chocolate chip cookies, these are the ones for you!
Kit Kat Cookies
½ cup butter, room temperature
⅓ cup sugar
½ cup packed brown sugar
1 egg
1 teaspoon vanilla
1 ½ cups flour
½ teaspoon baking soda
½ teaspoon salt
1 ¼ cups chopped Kit Kats
½ cup chocolate chips
In a large mixer bowl, combine the butter, sugar, and brown sugar. Mix on medium until well combined. Add the egg and vanilla and mix on medium to incorporate. With the mixer running on low, add the flour, baking soda, and salt, until almost incorporated. Fold in the chopped Kit Kats and chocolate chips with a spatula.
Using a medium cookie scoop, shape the dough into balls about 1-1/2”in diameter. Place on a large plate or similar surface and refrigerate for at least an hour.
Heat the oven to 350 degrees. Line two baking sheets with silicone baking mats.
Remove the cookie dough from the refrigerator and place on the prepared baking sheets. I usually bake 9-12 cookies at a time, so that there is room to spread.
Bake for 12-15 minutes, or until the edges are golden. Cool on the baking sheet for 10 minutes before removing to a wire rack to cool completely.
Recipe from Crazy for Crust
Friday, January 14, 2022
Malteser Biscuits
I have a couple of recipes planned for this month. One of the recipes that I am planning to make had a couple of ingredients that I still need to purchase, so I looked at the alternatives. We had recently visited our local British shop and had picked up a couple of items that I would use for baking. One of the potential recipes used the Maltesers that I had picked up and I had all of the other ingredients, so that was my choice for this week.
This is an Australian recipe, which is an interesting combination of weight measurements and volumetric measurements and also used self-rising flour. Since this used a combination of plain and self-rising flour, I just translated it to plain flour, baking powder, baking soda, and salt. The original recipe called for 250 grams of butter, which is more than two sticks of butter. Two sticks seemed like a lot, so I used one cup and the recipe turned out fine.
If you are unfamiliar with Maltesers, they are chocolate covered malt balls, similar to Whoppers sold in the states. Since the Maltesers are round, they are very hard to chop! Instead, I crushed them with the side of my chef’s knife and that was very easy. The addition of sweetened condensed milk is unusual, but the cookies aren’t too sweet, which is typical of recipes from the UK and Australia. I really like these cookies, crunchy but not too sweet, perfect with a cup of tea.
Malteser Biscuits
1 cup butter, room temperature
1/3 cup sugar
1/3 cup packed brown sugar
½ cup sweetened condensed milk
2 teaspoons vanilla
2-1/2 cups flour
2 teaspoons baking powder
½ teaspoon baking soda
½ teaspoon salt
165 grams Maltesers, chopped
Heat the oven to 350 degrees. Line two baking sheets with silicone baking mats.
In a large mixer bowl, combine the butter, sugar, and brown sugar. Beat on medium until light. Add the sweetened condensed milk and vanilla and beat again on medium to incorporate. With the mixer running on low, gradually add the flour, baking powder, baking soda, and salt. Fold in the crushed Maltesers with a spatula.
Shape the dough into balls and place on the prepared baking sheets. With the tines of a fork, press the biscuits down slightly, also making a decorative pattern.
Bake for 12-14 minutes, until lightly golden. If baking more than one sheet of cookies at a time, rotate the baking sheets half-way through the bake. Allow the cookies to cool on the baking sheet for 10 minutes before removing to a wire rack to cool completely.
Recipe from Taste.com (Australia)
Wednesday, December 1, 2021
Blossom Cookies
My husband and I were recently at Target, and I had to step away, leaving him to go through the check stand. We were done shopping, but in the car, he mentioned things we had bought that I did not know about. When we unpacked the items at home, I discovered that we were the proud owners of two different types of holiday Hershey’s Kisses: Hot Cocoa and Sugar Cookie Kisses. My husband thought I could bake something with them.
Having two types of Kisses was a challenge for me. Should I make a chocolate dough or a shortbread dough? In the end, I made two different doughs, and made each type of dough with have Hot Cocoa Kisses and half Sugar Cookie Kisses. I think a bit of contrast is nice with the cookies, and I do have to say that the shortbread blossoms with the two types of Kisses looked quite plain. They were still tasty, so I guess that is ok?
The chocolate cookies were easy to put together and the dough wasn’t quite as crumbly. In reading the original recipe, it suggested allowing the cookies to rest slightly before topping with a Hershey’s Kiss. This is a good idea, especially as the Hot Cocoa Kisses are filled with marshmallow and thus very soft. Some of those Kisses melted a bit with the shortbread cookies, but it wasn’t an issue with the chocolate cookies. Overall, both cookies were good, but the chocolate ones are certainly prettier.
Chocolate Blossoms
2 cups flour
1/2 cup cocoa powder
1 teaspoon baking powder
1/4 teaspoon salt
1/2 cup butter, room temperature
1/2 cup sugar
1/2 cup packed brown sugar
1 egg
1 egg yolk
1 teaspoon vanilla
1-3 tablespoons milk
Additional sugar/sanding sugar/sprinkles
Hershey’s Kisses, unwrapped
Heat the oven to 350 degrees. Line two baking sheets with silicone baking mats.
In
a medium bowl, whisk together the flour, cocoa powder, baking powder,
and salt; set aside. In a large mixer bowl, combine the butter, sugar,
and brown sugar. Beat on medium until light. Add the egg, yolk, and
vanilla and mix again on medium to incorporate. With the mixer running
on low, gradually add the flour mixture. Add milk, one tablespoon at a
time, until the dough comes together.
Shape the dough into balls and roll in the additional sugar. Place on the prepared baking sheets.
Bake for 10 minutes, until set. Allow the cookies to cool 5-6 minutes before topping each with an unwrapped Hershey’s Kiss.
Recipe from Garnish and Glaze
Shortbread Blossoms
1 cup butter, room temperature
2 cups flour
1/8 teaspoon salt
1/3 cup powdered sugar
2 teaspoons vanilla
Extra sugar/sanding sugar/sprinkles
Hershey's Kisses, unwrapped
Heat the oven to 350 degrees. Line two baking sheets with silicone baking mats.
In
a large mixer bowl, combine the butter, flour, salt, powdered sugar,
and vanilla. Beat on medium to combine. The mixture may be crumbly but
with come together with further mixing.
Shape the dough into
balls and roll in the additional sugar. Place on the prepared baking
sheets and flatten slightly with the palm of your hand.
Bake for
12-14 minutes, until set. Remove from the oven and allow the cookies to
set for a few minutes before topping each cookie with an unwrapped
Hershey’s Kiss.
Recipe from It’s Always Autumn
Friday, September 11, 2020
Kit Kat Crackle Cookies
Now that we are heading into fall, I am happy that I can start looking at recipes that have oats and spice and apple and all of those great flavors of fall. These cookies aren’t particularly full of fall flavors, but they aren’t really summery, either. I’ve seen many recipes where the cookies are rolled in powdered sugar and they are immediately labelled as holiday cookies. I think that’s taking it a step too far, but these cookies are certainly turning the corner.
I’ve had the ingredients on hand for these cookies for a while, but I haven’t been sure when was the right time to make them. I wasn’t sure how many cookies it would make, and I worried that it would make more cookies than I would want at home, but in the end, it wasn’t bad at all. This recipe made 2 dozen cookies, although I did make them slightly larger than typical.
Since these cookies use a cake mix, they contain very few ingredients and come together quickly. I always melt butter in the microwave, and even though I cover the dish, more often than not the butter explodes all over the place. That was true for this recipe, and I really doubt that I used 6 tablespoons of butter, but it made no difference. The first batch I didn’t flatten, and I believe that they bake better when slightly flattened. Since I wasn’t sure how long to bake these, I had to guess, and they are on the chewy side. (The blog with the recipe was generally difficult overall.) These are a wonderful soft cookie with the added crunch of Kit Kats.
Kit Kat Crackle Cookies
1 box white cake mix
2 eggs
6 tablespoons butter, melted
4 Kit Kat bars, chopped
Powdered sugar
Preheat the oven to 350 degrees. Line two baking sheet with silicone baking mats.
In a large mixer bowl, mix the cake mix, eggs, and melted butter on medium to combine. When the mixture almost comes together, add the chopped Kit Kats and stir on low until the dough comes together.
Shape the dough into balls and roll the balls in the powdered sugar. Place on the prepared baking sheets. Flatten the cookies slightly with the palm of your hand.
Bake for 12-14 minutes, until set and golden. The center of the cookies may still be soft. Allow the cookies to cool on the baking sheet for 10 minutes before moving to a wire rack to cool completely.
Recipe from Oh Bite It!