Friday, August 29, 2025
Spiced Caramel Pear Cookie Cups
A friend of mine recently brought me some really interesting preserves. While most folks would likely just have the preserves with their morning toast, my first thought was “what type of cookies can I make?” Since this spiced caramel pear preserves were something special, I wanted that to be the highlight of the cookie. Cookie cups were the perfect solution, just needed to find the right base.
This cookie base was originally part of a lemon curd-based cookie cup. The jar of preserves I had was small and I thought that it would make about 24 cookies. I knew I had other preserves on hand if needed. Well, this recipe made nearly 4 dozen cookies, and I used lots of different preserves! The cookies were perfect and will likely be the base for many cookies to come.
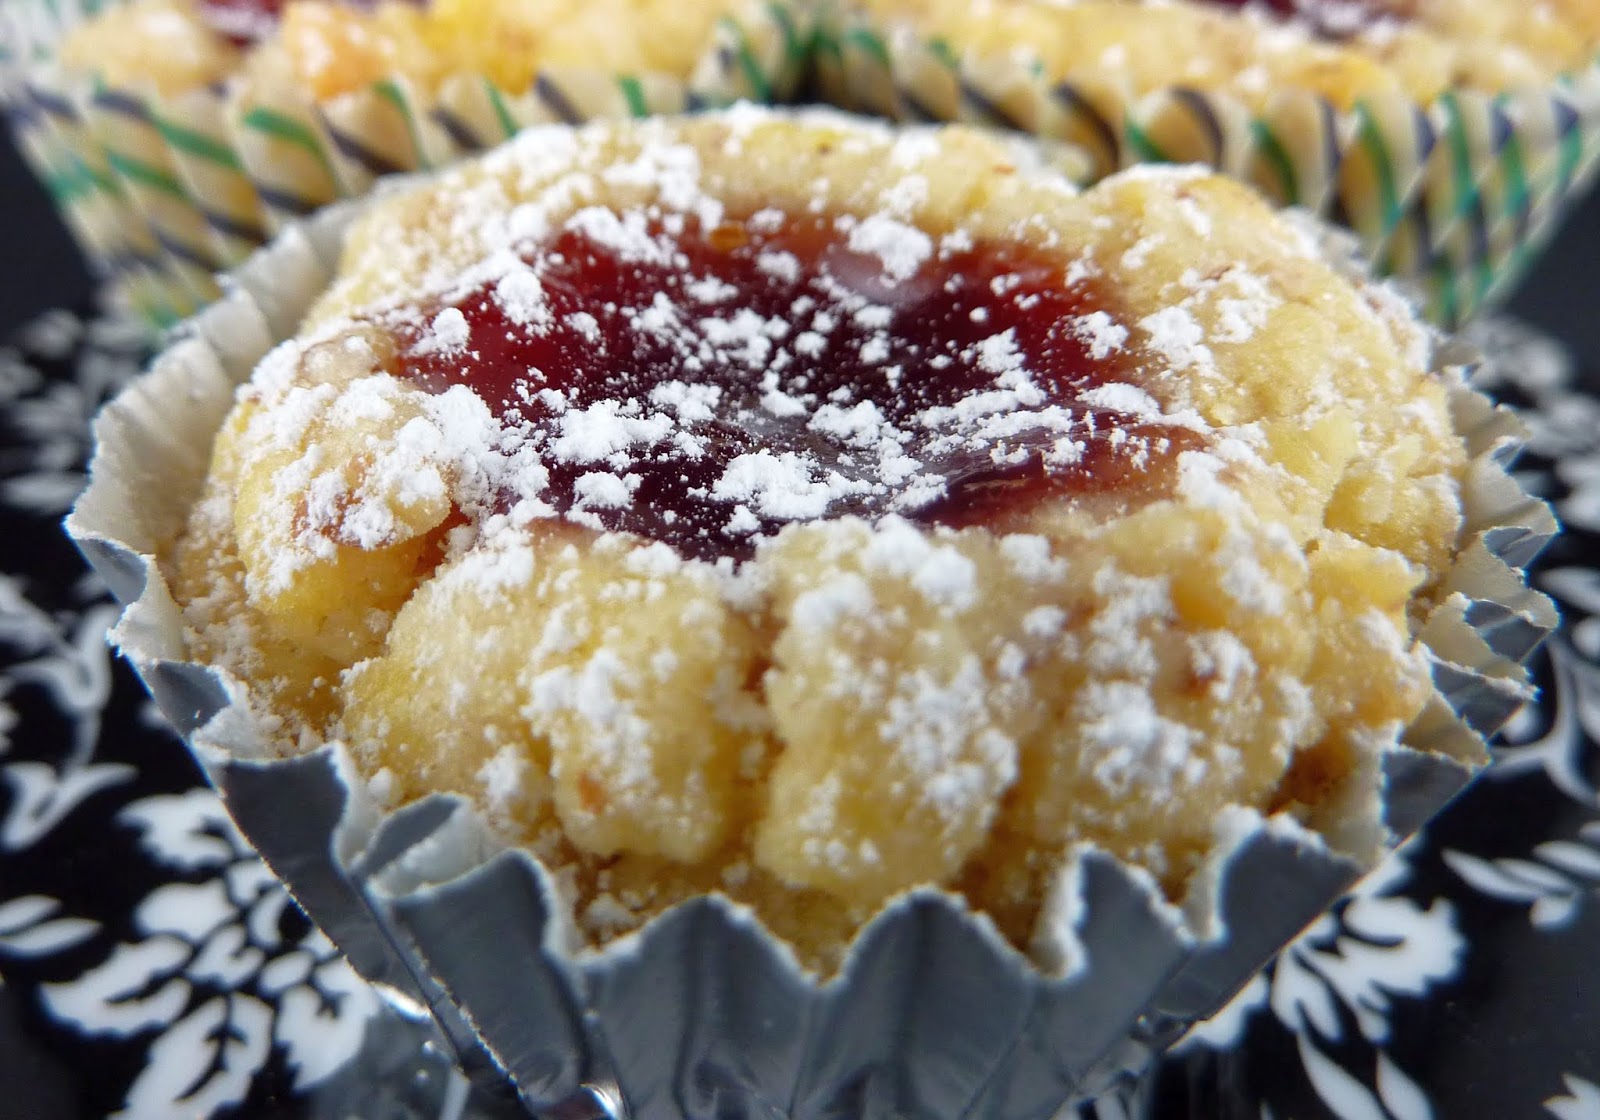
The base is so simple, make the dough, shape into balls, place in mini muffin cups, and bake. You don’t even need to make an indentation until after the cookies come out of the oven, which is very convenient. I let them cool a bit in the pan and then they came out, no problem at all! I did not need to worry about them being fussy. The spiced caramel pear preserves were the icing on the cake, sweet with interesting notes of pear, spices, and a subtle caramel flavor.
Spiced Caramel Pear Cookie Cups
1 cup butter, room temperature
1¼ cups sugar
1 egg
1 teaspoon vanilla
2¾ cups flour
1 teaspoon baking soda
½ teaspoon baking powder
½ teaspoon salt
Spiced Caramel Pear Preserves
Heat the oven to 375 degrees. Spray a mini muffin tin with nonstick cooking spray.
In a large mixer bowl, combine the butter and sugar and beat on medium until light. Add the egg and vanilla and mix again to combine. In a separate bowl, whisk together the flour, baking soda, baking powder, and salt. With the mixer running on low, gradually add the flour mixture, stirring until the dough comes together.
Shape the dough into 1” balls and place in the prepared mini muffin tin.
Bake for 8-10 minutes, until golden. Once the cookies come out of the oven, make an indentation in each cookie with a tart tamper or similar tool. Allow to cool for 10 minutes and then remove the cookie cups from the mini muffin pan.
Once the cookie cups are cool, fill each with a small amount of caramel pear jam.
Cookie recipe from Six Sisters’ Stuff
Friday, September 6, 2024
Mini Treacle Tarts
I love making cookies in mini muffin cups, and when I came across this recipe, I knew that it was meant to be. I think I have had a treacle tart before, but I’m not absolutely sure. This is a smaller version, quite simple to make once you get past the somewhat fussy stage of shaping the dough into mini muffin cups. I divide the dough and then use a tart tamper to help coax the dough into the proper shape. It isn’t perfect, but I end up only having to do the smallest of adjustment to the dough by hand.
These are treacle tarts, but the main ingredient is golden syrup. Golden syrup is also called light treacle, but that’s still confusing. I get a lot of questions about what can be used instead of golden syrup. Golden syrup is sugar cane based, whereas corn syrup is corn based, so they are different. Honey isn’t a bad option, and I did end up having to use a tiny bit of honey to make up a cup of golden syrup. It’s still not the same, so if you can find golden syrup at the store, it is best to use that.
You add a small quantity of breadcrumbs to give the filling some structure, so don’t skip that step. It was odd for me as I hadn’t used breadcrumbs in ages and in one week, I ended up making two recipes that needed them! Lemon is the predominant flavor of these tarts, with a subtle flavor of the golden syrup added in. You can top these with a dollop of whipped cream on top, but they were so good they didn’t need that!
Mini Treacle Tarts
10 tablespoons butter, room temperature
1/2 cup sugar
1 egg
1 teaspoon vanilla
1 1/2 cups flour
1/2 cup almond meal
3/4 teaspoon salt
1/2 teaspoon baking powder
1 cup golden syrup
1 tablespoon butter
1 egg
1 tablespoon heavy cream
Zest of 1 lemon
2 tablespoons lemon juice
1/8 cup breadcrumbs
In a large mixer bowl, beat the butter and sugar on medium until light. Add the egg and mix again to combine. In a separate bowl combine the flour, almond meal, salt, and baking powder. With the mixer running on low, gradually add the flour mixture until a dough forms. Remove the dough from the bowl, wrap in plastic, and refrigerate for 2 hours (or overnight).
Heat the oven to 400 degrees. Have a 24-indentation mini muffin pan ready.
Divide the dough between the 24 mini muffin cups. Press the dough into the cup, making sure that the bottom and sides are covered.
In a small saucepan over low heat, warm the golden syrup. Remove from the heat and stir in the butter. Once the butter is melted, allow the mixture to cool for 5 minutes. In a small mixing bowl, whisk the egg and heavy cream. Add the syrup mixture, lemon zest and juice, and breadcrumbs, mixing well. Transfer the filling to a vessel with a pouring spout.
Fill each dough cup about half full, any more than that and they will overflow.
Bake for 10-12 minutes, until the tarts are golden. Allow the tarts to cool in the pan for 10 minutes before removing the tartlets and cooling completely on a wire rack.
Recipe from International Desserts Blog
Friday, October 27, 2023
Toffifee Brownie Bites
I have wanted to make these brownie bites for a while now, as you all know how much I love making cookies in mini muffin pans! I had all of the ingredients with the exception of Toffifee candies, which are something that I pick up from time to time. I adore hazelnuts and there are very few candies in the States that contain hazelnuts, so anything with hazelnuts makes it into my shopping cart at the store.
Toffifee were very difficult to find, and I finally found them at the 7th or 8th store that I visited. I was beginning to worry that they were not to be found. I have had that experience with other baking ingredients, but these candies aren’t that uncommon. For the small amount of chocolate, I found a small piece of bittersweet chocolate and used my microplane to grate in some chocolate. I didn’t want chunks of chocolate, so that was the easiest approach.
This is a German recipe, which is why the quantities are in grams. I think it makes baking easier as I just get out my scale and I don’t mess up a bunch of measuring cups. It does make a small quantity; I was able to eek out 15 brownie bites, which is a fairly petite number. They were quick to make and look picture perfect topped with a Toffifee candy. The brownie bite tastes very much of dark chocolate, so it’s good to have the balancing caramel, hazelnut, and nougat flavors in these bites.
Toffifee Brownie Bites
60 grams butter
100 grams brown sugar
1/2 teaspoon vanilla
1 egg
45 grams flour
40 grams cocoa powder
1/4 teaspoon baking powder
Pinch of salt
30 grams chocolate, chopped/grated
Toffifee Candies
Heat the oven to 350 degrees. Spray a mini muffin pan with nonstick cooking spray. You will need a mini muffin pan with about 15 indentations.
Melt the butter and allow to cool for 5 minutes. In a large mixer bowl, beat the melted butter, brown sugar, and vanilla on medium until thoroughly combined. Add the egg and stir to incorporate. In a medium bowl, whisk together the flour, cocoa powder, baking powder and salt. With the mixer running on low, gradually add the flour mixture. Fold in the chopped/grated chocolate.
Transfer the brownie mixture to a piping bag and fill the mini muffin cups about ¾ full.
Bake for 10-12 minutes, until a cake tester inserted in the center of the brownie bit comes out clean. Once the brownie bites come out of the oven, press a Toffifee candy into the top of each warm brownie bite. Allow the brownies bites to cool for 15 minutes before removing from the pan.
Recipe from Bake to the Roots
Friday, September 8, 2023
Chocolate Hazelnut Tassies
If you have followed my blog for a long time, you will know that I adore hazelnuts and I love making cookies in mini muffin cups. They look so perfect, and I think hazelnut is one of the best flavors out there. I hadn’t made anything with Nutella recently, and it was time to do so. I had taken a photograph of this recipe in a magazine, which typically means I will forget about it. This time, I wrote up the recipe right away, so it’s been waiting to be made.
I halved this recipe. The quantities given here are the original, and said it made about seven dozen cookies. These cookies are small but that is still a lot of cookies! I ended up making two dozen with the half recipe. I did have some dough left over, but two dozen was plenty. I didn’t change anything else otherwise, but I didn’t have hazelnuts to use as a garnish. They really didn’t need anything extra.
Since you shape the cookies and roll them in sugar, I was able to use my tart tamper to spread the dough up the sides of the cup. After baking, I reshaped the cookies with the tart tamper dipped in sugar. It worked great. I was afraid the cookies would be brittle, but they were fine! For the filling, I think I could have added slightly more liqueur, as the filling was a challenge to pipe. These cookies are SO GOOD. I don’t know how you could beat the fantastic flavor of Nutella, but in this tassie is the best.
Chocolate Hazelnut Tassies
2/3 cup butter, room temperature
1/3 cup Nutella
1-1/2 cups sugar
1-1/2 teaspoons baking powder
½ teaspoon salt
2 eggs
1 teaspoon vanilla
3 cups flour
Sugar
¾ cup Nutella
3 ounces cream cheese
3 tablespoons butter, room temperature
1 teaspoon vanilla
2-1/2 cups powdered sugar
2-3 teaspoons hazelnut liqueur
Heat the oven to 350 degrees. Have several (4 dozen+) mini muffin cups ready.
In a large mixer bowl beat the butter and Nutella until smooth. Add the sugar, baking powder, and salt and stir on medium to incorporate. Beat in the eggs and vanilla. With the mixer running on low, gradually add the flour, mixing until the dough comes together.
Shape the dough into 48-72 balls and roll in sugar. Place each ball into a mini muffin cup and press into the bottom and up the sides of the mini muffin cups.
Bake for 8-9 minutes, until firm. Reshape with a teaspoon if necessary. Allow to cool for 5 minutes before removing from the pan.
Make the filling: in a large mixer bowl, beat the Nutella, cream cheese, butter, and vanilla until light. Gradually add the powdered sugar and then enough hazelnut liqueur to reach piping consistency. Place the filling in a piping bag and fill each cookie cup.
Recipe from Better Homes and Gardens Christmas Cookies
Friday, December 23, 2022
Peppermint Chocolate Bites
Christmas Cookie #11! I had originally planned a different peppermint cookie for today, a very beautiful thumbprint cookie, with swirled dough and peppermint sprinkles. But let’s be honest, this close to the actual holiday you are likely super busy and if you want to bake something, it needs to be quick. When we were at the store doing our general Christmas grocery shopping, I came across this bag of Morsels & More, which contained pieces of peppermint bark, chocolate chips, and marshmallows.
I figured that mixture would be a good combination, and looked a little for recipes. When the products are so new, it can be difficult to find many recipe options. I noticed that the recipe on the back of the package was for brownie bites, made in mini muffin pans, and I love making those!
This recipe starts with melting together ingredients which eventually become brownie batter. My chocolate was a little slow to melt, but with patience it came together. You add in part of the Morsels & More and then save the rest to top the brownie bites. I probably could have baked mine another minute or so, which made them a bit tricky to remove from the pan, but they sure look good! If you are looking for a quick recipe that is super tasty, this is the one for you!
Peppermint Chocolate Bites
1-1/3 cups chocolate chips
1 cup sugar
1/3 cup butter
1 tablespoons water
2 eggs
¾ cup flour
¼ teaspoon salt
8 ounce package Peppermint Hot Chocolate Morsels & More, divided
Heat the oven to 325 degrees. Spray 24 mini muffin cups with nonstick cooking spray.
In a medium saucepan, combine the chocolate chips, sugar, butter, and water. Heat over low heat, stirring frequently until the mixture is melted and smooth. Cool slightly and then transfer to a large mixing bowl.
Add the eggs, one at a time, then add the flour and salt and mix on low to combine. Stir in one cup of the peppermint hot chocolate morsels. Divide the dough between the 24 mini muffin cups. Top each cup with the remaining peppermint chocolate morsels.
Bake for 15-18 minutes, until done around the edges but still slightly sticky in the middle. Cool in the pan for 15 minutes before removing to a wire rack.
Recipe from Nestle
Friday, November 11, 2022
Apricot Tassies
For Halloween this year, my husband bought some little packages of different snacks to be given to the students in the library. One of the items in the mix were packages of diced apricots. They looked to perfect for me to include them as Halloween candy, so I set the apricots aside and I knew I would be able to use them in a recipe. I occasionally bake with apricots, but not nearly enough!
I love anything made in a mini muffin cup, so when I came across this recipe it wasn’t much of a decision for me to know I was going to make them. They are a simple cream cheese dough base filled with apricot jam, but in this case, you make the apricot jam. The jam is not difficult, just some time simmering on the stove and then adding a handful of ingredients. My jam was chunky, which I didn’t mind, but you could also puree it with an immersion blender if you wanted a smooth texture.
The dough for these cookies is so simple, mainly flour, butter, and cream cheese. I would add some salt to the dough, as I think it needs it. The original recipe stated that it made four dozen cookies. I made a little over three dozen, but I think I could have used less dough for each cookie. The dough is fairly thick on the bottom, so I would want that to be thinner next time. The flavor of the jam is just wonderful and the chopped apricots were perfect for this recipe.
Apricot Tassies
1 cup chopped dried apricots
water
¼ cup sugar
1 tablespoon butter
¼ teaspoon ground cinnamon
2 tablespoon apple/orange juice
1 ⅓ cups butter, room temperature
8 ounces cream cheese, room temperature
2 ⅔ cups flour
1 teaspoon vanilla
In a medium saucepan, place the apricots and enough water to cover the fruit and come 1 inch above the apricots. Simmer on medium-low for about 20 minutes, until thickened. Stir in the sugar, butter, cinnamon, and juice and continue cooking until the mixture becomes like jam. Place in a separate bowl and refrigerate until chilled.
To make the dough, combine the butter and cream cheese in a large mixer bowl. Beat on medium until incorporated. Add the vanilla and stir to combine. With the mixer running on low, gradually add the flour, mixing until the dough comes together. Wrap the dough in plastic wrap and refrigerate for one hour, or longer.
Heat the oven to 400 degrees. Have on hand several mini muffin pans, as this recipe yields between 3-4 dozen tassies.
Shape the dough into 1-1/2 inch balls and place into the mini muffin pans. Using a tart tamper or similar tool, press down the dough and make and indentation in each to make a tart/tassie shape. Fill each cookie with a small amount of the apricot jam.
Bake for 10-14 minutes, until the filling is bubbly and the tassie dough is barely golden. Allow the tassies to cool in the pan for 10 minutes before removing to a wire rack to cool completely.
Dust with powdered sugar, if desired.
Recipe from Amee’s Savory Dish
Friday, February 25, 2022
Cherry Pie Cookies
It seems like I would be missing something if I didn’t make some sort of cookie cup for this month of cherry recipes! I have had this recipe saved for a long time, and I’m not sure why it has taken so long for me to make them. These cookies are very simple, and none of the ingredients are unusual. I happened to have sour cream in the refrigerator already, so all I picked up was the cherry pie filling. Sure, I love making cherry pie from scratch, but let’s be honest: I’m not going to pit that many cherries.
Cookie cups vary a bit in how they are made. Some recipes make a small amount of dough that you have to shape around the mini muffin pans. I like these cookies, but it can get tedious. This recipe has you place the dough in the pan, bake, and then make an indentation. This method doesn’t make a huge area for filling, but it is very easy. In retrospect, I believe that I could have used slightly less dough per cookie, but I still had no problem.
The only change that I did for this recipe was the glaze. The original recipe called for a white chocolate glaze, but I didn’t feel like doing that. White chocolate can be very fussy. I ended up making a simple powdered sugar glaze, which looked perfect but the glaze melts into the cookies, so it is less obvious. That’s not really much of a concern, in all honesty. I like the soft cookie combined with the sweetness of the cherry. My husband thinks they would be even better with a layer of cream cheese filling, and I’ll have to try that!
Cherry Pie Cookies
½ cup butter, room temperature
1 cup sugar
1 egg
1 teaspoon vanilla
⅓ cup sour cream
½ teaspoon salt
½ teaspoon baking soda
2 cups flour
1 can cherry pie filling
¾ cup powdered sugar
1-2 tablespoons milk
Heat the oven to 350 degrees. Spray a mini muffin pan (24 mini muffins) with nonstick cooking spray.
In a large mixer bowl, beat the butter and sugar on medium until light. Add the egg and vanilla and mix on medium again to combine. Combine the sour cream, salt, and baking soda in a separate bowl. Add the flour and the sour cream mixture and mix on low until the dough comes together.
Divide the dough between the 24 mini muffin cups, using about 2 tablespoons dough per cookie. There’s no need to shape the dough in the pan.
Bake for 15-18 minutes, until golden. Immediately after removing from the oven, make an indentation in each cookie with a teaspoon, tart tamper, or similar device. Allow the cookies to cool in the pan for 15 minutes before removing to a wire rack to cool completely.
Once cool, use a fork to fill each cookie with cherry pie filling, using about 3 cherries per cookie. Finally, make the glaze: in a medium bowl, whisk together the powdered sugar and milk. Drizzle the glaze over the cooled and filled cookies.
Recipe from Butter with a Side of Bread
Friday, December 10, 2021
Gingerbread Eggnog Cheesecake Cups
I make cookies in mini muffin cups all the time. They are usually easy to put together and always look fantastic. The cookies made in mini muffin pans and petite and just a couple of bites. This recipe, on the other hand, is made in a regular muffin cup. That makes for a sizeable cookie! The flavors of gingerbread and eggnog cheesecake is such a winning combination that I couldn’t resist. I did decide to make a half batch, as our house is already full of holiday goodies.
By cutting this recipe half, I made nine big cookies. I’m not sure how the full recipe made two dozen, but they must have used less dough for each cookie. I did measure, using my three-tablespoon cookie scoop, so I’m not sure what happened. A half recipe of the cheesecake filling was also the correct amount for nine or ten cookies, so at least it was consistent? I don’t have a lot of faith in recipe yields, which is why I don’t often provide many specifics about how many cookies a recipe will make.
My husband came into the kitchen when I was making the filling, and I’m certainly an independent baker! He was after the eggnog, which was just silly as this recipe called for such a small amount that it makes little difference in the half-gallon container we bought. Chilling these when they were ready were the biggest challenges of these cookies, but they were worth the wait! These are so good, the great ginger flavor balances with the creamy cheesecake filling. These are the best!
Gingerbread Eggnog Cheesecake Cups
2 1/4 cups flour
2 teaspoons baking soda
1 teaspoon cinnamon
1 teaspoon ginger
1/2 teaspoon cloves
1/4 teaspoon salt
3/4 cup butter, room temperature
1 cup packed brown sugar
1/4 cup molasses
1 egg
1 cup heavy cream, cold
8 ounces cream cheese, room temperature
1/2 cup sugar
1/4 cup eggnog
1/4 teaspoon nutmeg
¼ teaspoon cinnamon
Heat the oven to 350 degrees. Spray two regular-sized muffin tins with nonstick spray.
In a medium bowl, whisk together the flour, baking soda, cinnamon, ginger, cloves, and salt; set aside. In a large mixer bowl, beat the butter, brown sugar, and molasses on medium until pale. Add the egg and beat on medium to combine. With the mixer running on low, gradually add the flour mixture.
Scoop about 3 tablespoons of dough into each of the muffin cups, flattening slightly.
Bake for 9-10 minutes, until set, but still soft. Remove from the oven and immediately press the cups down to create a well. Cool in the pans for 10 minutes, twisting the cups to ensure that they don’t stick to the pan. Remove from the pan and cool completely on a wire rack.
Once the cups are cooled, make the filling: in a cold mixer bowl, whip the heavy cream until stiff peaks form. Transfer the whipped cream to a separate bowl. In the same mixer bowl, beat the cream cheese and sugar until smooth. Stir in the eggnog, nutmeg, and cinnamon. Fold the whipped cream into the cream cheese mixture and pipe into the cookie cups.
Refrigerate for at least two hours to set. Serve cold.
Recipe from Liv for Cake
Friday, July 30, 2021
Pineapple Coconut Tassies
Tassies are one of my favorites to make. These little cookie cups can have almost any type of filling, and I have enjoyed finding new and different recipes to try. Most people are familiar with pecan tassies, which are little pecan pies, but this type of cookie can hold just about anything and work for any number of occasions. I like that you bake them all at once, so when the weather is warm you don’t have to work with the oven for too long.
This recipe felt perfect for summer with the combination of pineapple and coconut. The pineapple comes in the form of pineapple ice cream topping. I saw this at the store, when I was checking for something else, but didn’t end up buying it. I then discovered that it wasn’t an item found at the normal places that I shop! I made a trip back to that first grocery store and picked it up since they had a lot. I’m not really sure why it is common some places and non-existent at other spots.
When I went to make these, I realized that the only nuts that I had on hand were pecans, which didn’t seem to fit this recipe. I figured I would be ok with macadamias or almonds, both of which I usually have on hand. Since I didn’t have them, I made these cookies without nuts, and they turned out fine. The only challenge with these cookies is to press the dough into the mini muffin pans, and that’s just a tedious task that isn’t too bad if you just get to it. These cookies are great, with little bits of pineapple coming through from the filling. They are a little crumbly, but that makes them extra tasty!
Pineapple Coconut Tassies
1 cup butter, room temperature
1/2 cup powdered sugar
1 teaspoon vanilla
2 cups flour
2 tablespoons cornstarch
1/2 teaspoon salt
1-1/2 cups shredded coconut
1 cup pineapple ice cream topping
1/2 cup sugar
1/4 cup chopped macadamia nuts
1 egg
2 teaspoons cornstarch
1/2 cup powdered sugar
1 tablespoon milk
1/2 teaspoon coconut extract (or vanilla)
Heat the oven to 350 degrees. Spray a mini muffin pan with nonstick spray. You will need about 36 mini muffin cups.
In a large mixer bowl, beat the butter and powdered sugar on medium until light, several minutes. Add the vanilla and mix to combine. With the mixer running on low, gradually add the flour, cornstarch, and salt. Shape the dough into balls and press evenly on the bottom and up the sides of the prepared mini muffin cups.
Bake the filling: in a medium bowl, mix the coconut, pineapple ice cream topping, sugar, nuts, egg, and cornstarch. Fill each cup with about a tablespoon of filling.
Bake for 20-25 minutes until golden. Allow the cookies to cool in the pan for 10 minutes before removing to a wire rack to cool completely.
Whisk together the powdered sugar, milk, and extract. Drizzle over the cooled cookies. Allow the glaze to set before serving.
Recipe from Connie Shuff via Taste of Home
Friday, April 2, 2021
Ginger Cookie Cups
It seems like the weather is starting to get a little better here in the Seattle area, but I shouldn’t jinx it as we have some sunny days but just a few days ago it was very rainy and windy. I guess I will take whatever I get! It’s spring break and it does seem like the weather is cooperating. I doubt anyone has grand plans, but it is certainly nice to be hopeful for the future.
I came across this cookie cup recipe and if you follow this blog at all, you know that I love cookie cups! The original recipe is for lemon bar cookie cups, which does sound great as I am a big fan of lemon bars. I did want to mix it up a little bit, and I figured that I could use something other than lemon curd as the filling. There were some interesting options online, but in the end, I went to our local British shop and found ginger curd. I knew that would be perfect. Of course, lemon curd would also work and it’s a lot easier to find!
This recipe makes a big batch of small cookies. I halved the recipe and it still made two dozen cookies. I liked the ease of these cookies, where you par-bake them and then make and indentation and fill them. It was very easy to make an indentation when the cookies were warm! The ginger curd I used had bit of fresh ginger in it, so some of the cookie cups were very gingery. They are so perfect with the crisp buttery cookie and then soft ginger filling. They’re small and you can just pop one in your mouth. Perhaps I should have made more than 24 cookies?!
Ginger Cookie Cups
2 1/4 cups flour
1/2 teaspoon salt
1/2 teaspoon baking soda
1/2 teaspoon cream of tartar
1/2 cup butter, room temperature
1/2 cup sugar
1/2 cup powdered sugar
1/2 cup vegetable oil
1 egg
1 teaspoon vanilla
3/4 cup ginger curd
Powdered sugar
Heat the oven to 350 degrees. Spray four 1 dozen mini muffin pans with nonstick cooking spray.
In a medium bowl, whisk together the flour, salt, baking soda, and cream of tartar; set aside. In a larger mixer bowl, beat the butter, sugar, and powdered sugar on medium until combined. Add the oil, egg, and vanilla and mix again to incorporate. With the mixer running on low, gradually add the flour mixture, mixing until just combined.
Place 1 tablespoon of dough into each prepared mini muffin cup.
Bake for 8 minutes.
Remove the cookie cups from the oven and with the end of a wooden spoon, make an indentation in the center of each cookie cup. Fill the indentations with a small amount of ginger curd.
Bake for 4-6 more minutes, until the edges of the cookie cups are lightly browned. Allow to cool in the pan for 15 minutes and then remove the cookie cups from the pan and place on a wire rack. Dust with powdered sugar before serving.
Recipe from Barbara Bakes
Friday, January 29, 2021
S’mores Tassies
Tassies are one of my favorite types of cookies to make. They’re generally quick to make, although they do require a little bit of work to form the crust. I don’t really think about this too much, but my friend made some pecan tassies around the holidays and she texted me that they are so fussy. I suppose that is true, but I know that’s just part of the process. These are no exception, as the crust takes so patience to form it in the cup, but at least it makes a smaller batch?
Over the holidays I went through my iPad and found all the recipes that I had photographed. I often forget about those recipes, so I took the time to do a basic write up for some of the recipes. They are much less likely to be forgotten if I do that! This recipe was perfect as it used some ingredients that I had anyway: cream cheese, graham cracker crumbs, and chocolate. The original recipe called for rectangles from a Hershey bar, but I used the chocolate I had on hand. The only ingredient I needed was marshmallow crème.
Gosh, I forget how sticky and how difficult marshmallow crème is to work with! It is nearly impossible to measure accurately, so do the best that you can. It wasn’t too bad in the filling, but when you dollop a bit on top of each tassie it is just so messy! I think the only change I would make is that I would put the marshmallow crème and chocolate under the broiler to toast rather than baking it for a couple of minutes. These are good, pop in your mouth bits of s’mores, and they are really hard to beat.
S’mores Tassies
8 ounces cream cheese
1/3 cup butter, room temperature
½ cup flour
½ cup graham cracker crumbs
2 tablespoons sugar
1 egg
½ teaspoon vanilla
About 1 cup marshmallow crème
24 small chocolate rectangles
Heat the oven to 325 degrees. Spray a 24 mini muffin pan with nonstick cooking spray.
In a large mixer bowl, beat half of the cream cheese and 1/3 cup butter on medium until combined. Stir in the flour and graham cracker crumbs. Divide the dough into 24 pieces and press onto the bottom and up the sides of the prepared mini muffin cups. Bake for 5 minutes.
Make the filling: in a separate bowl, beat the sugar and the remaining half of the cream cheese on medium until smooth. Beat in the egg and vanilla, and then add ½ cup of marshmallow crème and mix on low until combined. Fill each partially baked tassie with 2 teaspoons of the marshmallow filling.
Bake for 15 minutes, until light brown and the filling is puffed.
As soon as the tassies come out of the oven, top each with about ½ teaspoon marshmallow crème and a piece of chocolate. Bake for an additional minute or two to soften the chocolate. Or brown under the broiler.
Cool in the pan for 10 minutes, then remove from the pan and allow the tassies to cool completely on a wire rack.
Recipe from Christmas Cookies, 2019
Friday, November 13, 2020
Peanut Butter Caramel Pretzel Cups
Knowing that I had pretzels remaining as well as some leftover Halloween candy, I went looking for a recipe where I could use them. I have made many cookie cups for this blog and they are one of my favorite things to bake. When I came across this recipe, which is cookie dough, stuffed with a peanut butter cup, topped with caramel and a pretzel, I knew that I couldn’t go wrong.
Since these cookies bake in a regular-sized muffin tin, they do make big cookies. Thankfully, the recipe only makes a dozen, which is somehow better. I didn’t change anything from the recipe with the exception of the caramel- I used a prepared caramel sauce rather than making my own by melting down caramels. The prepared sauce is a lot easier, but it doesn’t firm up quite as much. Ultimately, these cups are on the messy side because of that.
Despite having several steps, this cookie is very easy to make. I liked not having to measure the dough between the muffin pans. I just guessed and had a little dough left, so I added a bit more to the smaller ones. The baking time is best calculated by when the edges of the cookies are golden. If they are slightly under baked it works out in the end as you press down the cookie with a peanut butter cup. These are said to mimic a Take 5 candy bar, and they are pretty close. Not nearly as close as the Take 5 candy that my dad makes, but very tasty!
Peanut Butter Caramel Pretzel Cups1/2 cup butter, room temperature
1/2 cup sugar
1/2 cup packed brown sugar
1 egg
1 teaspoon vanilla
1 1/2 cups flour
1/4 teaspoon salt
1/2 teaspoon baking soda
12 peanut butter cups (snack size, not miniature)
12 mini pretzels
Caramel sauce
Preheat oven to 350 degrees. Spray a standard muffin pan with nonstick cooking spray.
In a large mixer bowl, beat the butter, sugar, and brown sugar on medium until light. Add the egg and vanilla and stir to combine. With the mixer running on low, gradually add the flour, salt, and baking soda and stir until the dough comes together.
Divide the dough between the 12 indentations in the muffin pan.
Bake for about 14-16 minutes, until the edges of the cookie cups are golden.
Once the cookies come out of the oven, top each with a peanut butter cup, pressing the cup into the cookie until the cup is lower than the edge of the cookie. Place the muffin tin in the refrigerator and allow the chocolate to set.
Once the chocolate has set, remove the cookies from the pan and transfer to a wire rack. Spoon a small amount of caramel on top of each cookie, and then press a pretzel into the caramel. Allow the caramel to set before serving.
Recipe from Lovely Little Kitchen